One of the more popular posts on this site is a review of the MacBook Air 2020 for travel photography. It seems a lot of people are interested in using this sleek and capable machine when we need computing power on the go. In the aforementioned post, I was pleased with the performance of the computer and found it to be sufficient for my portable computing needs.
Poor Sustained Performance
Unfortunately, with more time with the computer, I started to notice something bothersome. At the start of sustained workloads, the computer was great, but after a few seconds, the performance would suffer. While the processor speed never dropped below Apple’s marketed 1.2GHz, the turbo boost function operated for a shorter duration than I expected, and the fans would spin up to the maximum 8,000rpm frequently.
I conducted a comparison of how much time it takes to export 125 Fujifilm GFX50R images on both computers. The 13″ MacBook Air 2020 i7/16GB/1TB (hereafter referred to as MBA) took 20.5 minutes whereas the 13″ MacBook Pro 2018 i7/16GB/1GB (hereafter referred to as MBP) took only 12.9 minutes. While this is a 41% increase in duration, it was a tradeoff I was willing to make.
I had concluded that the computer was great at short “bursty” type of work (clicking on a RAW file, moving a slider in Capture One, importing files, etc.), but lagged significantly behind my 2018 13″ MacBook Pro i7 in sustained workloads (exporting raw files to JPEG, or rendering video files).
The Internet Finds a Solution
I went online to see if my experience was an isolated one; I was fortunate to come across an epic forum topic on Macrumors.com. The solutions include a wide range including adding heat transfer pipes, creating more efficient air channels, and improving the heat transfer from the CPU to the heatsink and external case.
While I used to build PC’s early in my life, I’m pretty reticent to open up a new computer and fiddle with a screwdriver! However, the ideas posted on the forum topic seemed to be easy to implement, and more importantly, easy to reverse in case I decided it wasn’t worthwhile.
I ultimately decided I was going to methodically try the following two common solutions that people had implemented and take before/after measures:
- Replacing the thermal paste with a better quality thermal interface material, which includes a copper shim
- Installing a heat pad between the heat sink and the bottom case
Performance Results
To say that I was pleased with the outcome would be an understatement. I now believe that Apple designed a great product that’s been hampered by poor execution in the manufacturing channel (understandable given my computer was manufactured during the peak of the COVID-19 pandemic). The below is based on the i7 with 16GB of RAM and 1 TB SSD.
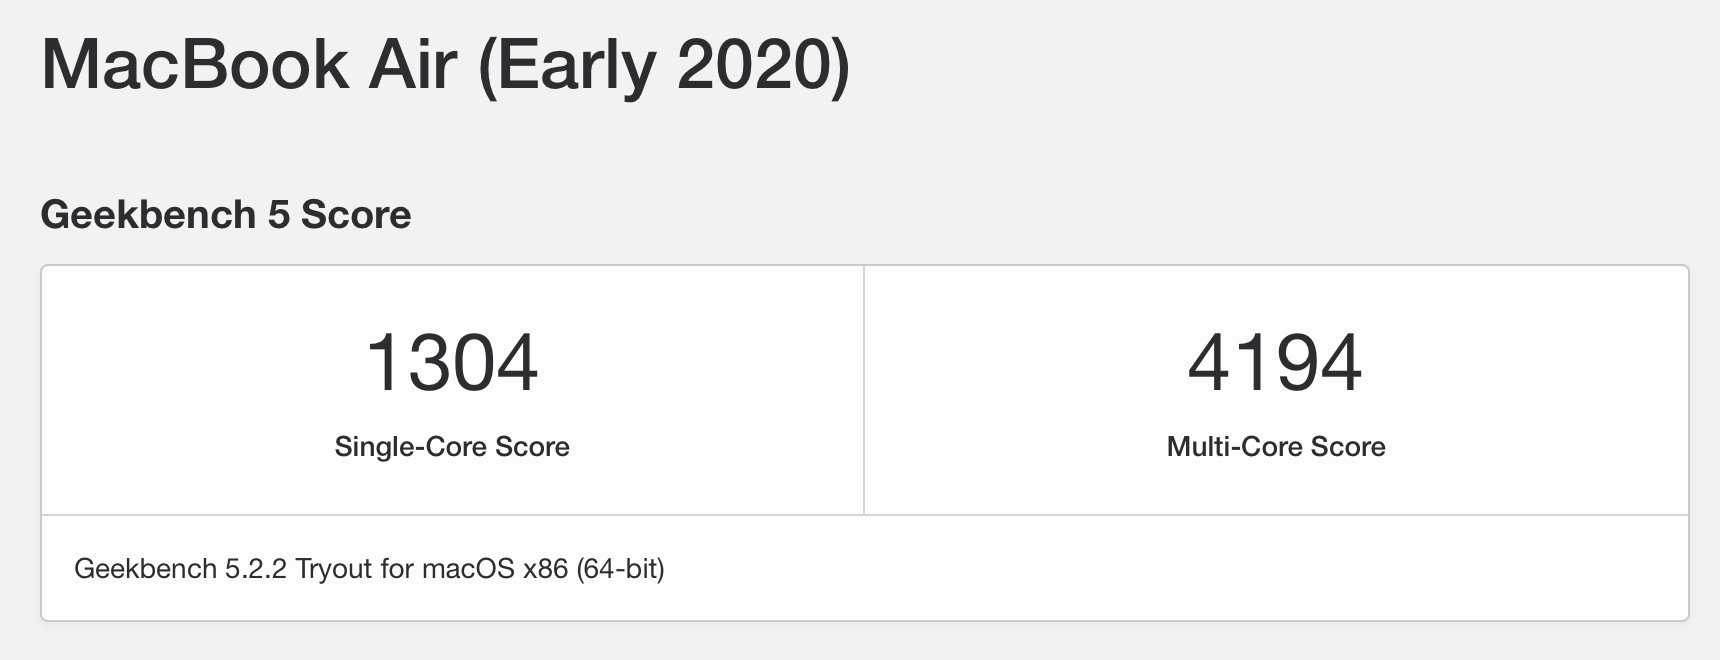
Geekbench 5
In Geekbench 5, the computer, under sustained heavy workloads, improved by 12% in single-core and 37% in multi-core. More importantly, the difference between testing from a stone cold computer to testing when the CPU/GPU is already hot became a much smaller ~150 versus ~500 with the stock configuration. This means that the computer will be able to sustain more performance when the going gets tough.
Each row below is an average of five runs completed back to back with the CPU/GPU already warm. By conducting the test in this way, it provides the worst-case scenario performance of the computer. As a comparison, starting from idle temperature and completing only one test run, the benchmark will result in a multi-core score of ~3450 before modifications, ~4000 for paste/shim or thermal pad, and ~4100 for paste/shim and pad.
When comparing your results to others on the Internet, take the testing method into consideration; it’s important to note whether the benchmark is being run back to back, from a cold start or from idle temperature; each method will result in a different score.
| Geekbench 5 Average of five runs | Single-core | Multi-core | CPU Util % | Avg Frequency (GHz) | Avg Req Frequency (GHz) | Avg Temperature (C) | Average Power (W) | Power Consumed (J) | Power Consumed (mWh) | Time to Complete (s) |
|---|---|---|---|---|---|---|---|---|---|---|
| Before Modifications | 1117 | 2901 | 51.2 | 2.04 | 3.09 | 93.6 | 8.8 | 1462 | 406 | 166.5 |
| After either the Paste and Shim or the 1MM Thermal Pad | 1181 | 3459 | 47.4 | 2.27 | 3.01 | 90.4 | 10.4 | 1546 | 430 | 149.3 |
| After the Paste, Shim and 1MM thermal pad | 1249 | 3988 | 45.8 | 2.41 | 2.45 | 76.1 | 11.4 | 1635 | 454 | 143.3 |
| Change | +12% | +37% | -11% | +18% | -21% | -19% | +30% | +12% | +12% | -14% |
Cinebench R20
The story is largely the same with Cinebench R20, the computer improved by 15% even under the very high stress of multiple runs back to back. While the gains are more subtle under Cinebench because the computer seems to hit a hard limit in frequency, what isn’t so subtle is the difference in the sustained temperatures and the reduction in the fan noise.
Prior to the modifications, the computer would hit 100C and the fan would go to 8000rpm and stay there. Performance would then drop with the temperature pegged at 100C. With the modifications, the computer never hits 100C and the fan stays off or at low rpm throughout. This makes for a far more comfortable and quiet computer to use, especially when doing photo editing.
| Cinebench R20 Average of five runs | Score | Stable Power (W) | Stable CPU Core AVG (GHz) | Stable PKG Temp (C) | Power Consumed (J) | Power Consumed (mWh) | Time to Complete (s) |
|---|---|---|---|---|---|---|---|
| Before Modifications | 1032 | 10.6 | 1.7 | 100 | 3089 | 858 | 290 |
| After either the Paste and Shim or the 1MM Thermal Pad | 1165 | 12.1 | 1.9 | 99 | 3268 | 908 | 256 |
| After the Paste and Shim and 1MM thermal pad | 1187 | 12.4* | 1.9* | 90 | 3294 | 915 | 252 |
| Change | +15% | +17% | +12% | -10% | +7% | +7% | -13% |
Capture One Pro Image Export Test
Using synthetic benchmarks makes it very easy to do comparisons to test if a modification has made a positive or negative change. However, a synthetic benchmark can never be a replacement for ensuring the change will benefit you on your workflow. I use Capture One extensively for photo editing on the go, and so I wanted to test the changes to ensure there was a real improvement in day-to-day work.
| Capture One 125 GFX50R Image Export | Time (minutes & seconds, lower is better) |
|---|---|
| Before modifications | 20m 38s |
| After either the Paste and Shim or the 1MM Thermal Pad | 19m 24s |
| After the Paste and Shim and 1MM thermal pad | 18m 27s |
| Change | –10% or ~2 minutes less |
We can see that real life performance has increased by 10% in this workflow that is mostly bursty (Capture One has short pauses between each image export), so a great outcome overall. It still however doesn’t close the gap to my MBP which completes this same task in 12m 56s!
Case Temperature Test
For travellers like ourselves, the temperature of the bottom case is an important factor in why we chose the MBA in the first place. It is therefore important that we test this and ensure that the modifications don’t introduce too significant a tradeoff than we’re willing to accept.
All temperature measurements were taken with an IR gun that is claimed to be accurate to +/- 1C. Cinebench R20 produced the hottest temperatures of the various workloads I tried; I left it continuously running and recorded the highest sustained temperature from the bottom cover near where the CPU is located (near the model information text).
| Setup | Highest Temperature (C) | Safe For Skin Contact? | Geekbench MC Score from idle |
|---|---|---|---|
| Stock i7 | 38C | Yes | ~3000 |
| i7 + Shim + Paste | 38C | Yes | ~3450 |
| i7 + Shim + Paste + 1.5MM Arctic Pad covering only the centre of the heat sink | 48C | No | ~3950 |
| i7 + Shim + Paste + 1.5MM Arctic Pad covering the whole heat sink | 50C | No | ~4130 |
| i7 + Shim + Paste + 1MM Arctic Pad covering the whole heat sink | 45C | Yes (barely) | ~4130 |
| i7 MBP 13″ 2018 for reference | 44C | Yes (barely) | ~4150 |
If you’re considering doing the modification, I highly recommend you consider going for no thermal pad or use the 1MM thick pad instead. It’s not clear to me why the 0.5MM makes such a big difference, but I tested it back to back several times with the same results each time, a bottom case about 5C cooler when using the 1MM pad. A theory is that the pad material does not fully transfer the heat to the bottom case, but still works because it expands the volume of the heat sink.
Step-by-Step Tutorial
The below will provide a step-by-step tutorial of how you can make the same improvements.
Before you start any of these modifications, you should know that any changes you make can void your warranty so please proceed with caution. This website will not be held responsible for any damage you cause to your machine or yourself. You should ensure you have the proper tools before starting the job; there is nothing worse than trying to use a hammer for when a screwdriver is called for. You should also be aware that the modifications will compromise some of the characteristics that make the MBA the perfect travel laptop (heat and/or battery life).
There are two modifications which I’ll cover in this post, one is somewhat intimidating but as noted above has no tradeoffs, and the other is super easy, but introduces the most tradeoffs, namely in bottom case heat.
1. Replacing the thermal paste with a better quality thermal interface materials, which includes a copper shim
This is perhaps where I feel that Apple designed a great product, but has been let down by manufacturing quality control and/or poor use of materials in the assembly line. By replacing the thermal paste and adding a shim between the CPU/GPU dye and the heat sink, the computer’s ability to sustain high performance is greatly enhanced. Perhaps just as importantly, there are no tradeoffs doing this modification as the case remains cool and all aspects of the computer operate as designed by Apple.
2. Installing a heat pad between the heat sink and the bottom case
If you want to keep your thighs cool, this modification is not for you. While changing the thermal paste and adding the copper shim provides benefit with no downsides, adding the thermal pad does compromise the comfort of the machine by making the bottom case hot. You can do this modification in conjunction with, and at the same time as, the thermal paste and copper shim, or you can do this one on its own.
Please note that the i3 has a different heat sink than the i5/i7. Since I have an i7, the images and process below pertain to that model and may or may not work the same for the i3.
Step 1: Get the right tools; read through the full instructions before beginning. I used the iFixit Mako Driver Kit, but you can use any high quality driver set that has a Pentalobe P5 and Torx T3 bits. If you want to be extra fancy, you can also get the iFixit Prying and Opening Tool Assortment, however it’s not necessary since the MBA bottom cover is very easy to open once the screws are out.
Step 2: Get the products you’ll need to use:
- Isopropyl cleaner; I used a 99% Isopropyl solution bought from the local drugs store for the cleaner.
- Q-tips.
- Lint free paper or cloth; I cheated and used some industrial tissue paper that doesn’t fray or leave behind residue.
- Thermal paste. I used Kryonaut Thermal Grizzly paste in the 1g quantity. If you want to do some trial and error, you can purchase another 1g packet, but I suggest that the next larger size of 5.5g is too much for a one-time user.
- 20MM x 20MM x 0.3MM copper shim/spacer.
- Thermal Pad. I recommend the blue Arctic 50MM x 50MM x 1MM thermal pad. If you want to do some R&D, you can purchase the 145MM x 145MM sheet so you can play around with different sizes. You may wonder why I recommend the 1MM vs. the 1.5MM or 2MM that everyone else does; the reason is because the height of the thermal pad has a direct influence on how hot the bottom case gets. When a pad that is 1.5MM or thicker is used, the bottom case temperature exceeds the threshold of 46C which is when skin can burn if exposed for a long period of time (as you would if editing a series of images with the laptop on your lap).
- Large towel to place the laptop on when opening the back cover.
Step 3: Set aside 60 minutes to conduct before testing, installation and after testing. I suggest you download Geekbench, Cinebench R20, Intel Power Gadget (IPG) and Fanny. Conduct two sets of tests as noted below, and please follow the same preparation each time to obtain repeatable results.
Step 4: Conduct the before testing as per the instructions below (conduct both Idle and Hot tests).
Step 5: Installation:
- Preparing the shim
- Take the 20MM x 20MM x 0.3MM shim and cut off 4MM from one side using scissors, so that the final dimensions are 20MM x 16MM x 0.3MM.
- Use the hand grip end of your screwdriver to flatten any edges that you introduced with the scissors; you want the shim to be as flat as possible.
- Opening the computer
- Place a towel on a flat surface and place the laptop upside down on the towel.
- Use the Pentalobe P5 screwdriver to remove the 10 screws. Ensure that the bit is fully inserted into the head before applying any loosening torque as the metal of the screws is very soft and you can easily strip the head if you’re not careful. The screws are not in very tight, but they appear to have some loctite so it will suddenly break free with a small amount of torque.
- Please take note that one side has screws that are longer than the other and need to be re-inserted in the same positions. In the iFixit kit, the cover has a handy slots for putting the screws down to make it easy to remember where they came from.
- With the screws removed, gently place your fingers between the bottom case and the screen hinge and use your thumb to spread it open. There are two clips in the middle of the back cover which will release with mild pressure. You can also use a plastic prying device from iFixit, but fingers work fine and provide real time feedback on pressure needed.
- With the case open, you can position the heat sink area to be closest to you, which makes it easier to work with.
- For ultimate safety, you should disconnect the battery, however I did not since I was very, very careful not to make any metal contact with the logic board or the components around it.
- Removing the heat sink
- Using the Torx T3 screwdriver, VERY carefully insert the screwdriver into the heatsink screws, and with gentle downward pressure, unfasten the screws. I’ve read of so many people stripping the head of the heat sink by using the wrong bit or by not inserting it fully. These are very soft materials that Apple intentionally uses (cheaper to replace a screw on the assembly line than a logic board).
- VERY carefully lift the heat sink straight up; whether you disconnected the battery or not, be very careful not to drop the thin heat sink onto any of the electronic components on the logic board. If the heat sink is not coming up, use your finger nail or a plastic prying tool to lift a corner up; the thermal interface material (thermal paste) will release once one corner’s bond is broken.
- Cleaning the heat sink, CPU/GPU dye, and shim
- Using a lint free cloth or tissue, wipe away the excess thermal paste on both the heat sink and the CPU/GPU dye. Given the large gap design of the heat sink, there will be more thermal paste than you expect.
- For any remaining thermal paste, wet a Q-tip with the 99% Isopropyl and carefully wipe it away. The Isopropyl will make quick work of this and you’ll soon have a mirror shine from the CPU/GPU dye surface.
- Clean both sides of the shim that you prepared at the beginning with the same 99% Isopropyl solution.


- Applying the thermal paste and installing the shim
- There are 1000 ways to apply thermal paste, of which almost all of them result in the same performance, so my recommendation is to closely follow what the manufacturer recommends.
- Thermal Grizzly recommends that you apply a thin layer with a little bit of pressure across the whole surface, so this is what I did.
- Apply a thin layer on top of the shim, and place the shim into the machined space in the heat sink.
- Apply a thin layer on top of the CPU/GPU (the two shiny parts on the dye).


- Re-installing the heat sink
- VERY carefully position the heat sink above the four screws and place the heat sink down.
- Using very little torque, start the thread on each screw of the heat sink. A handy tip to ensure you’ve got the thread right is to turn the screw counter-clockwise in the hole until you hear/feel a click. That will tell you that you’ve aligned the screw with the thread. Do not tighten each screw at this point, you just want to start the screw into the thread.
- Using an X pattern, turn each screw 1/4 turn and keep going until you start to feel pressure building. On my computer, the screw was able to bottom out on the heat sink without too much torque, however if you feel it’s taking more torque than it should, check to make sure you haven’t applied excess thermal paste or perhaps the shim has moved out of the machined space in the heat sink. It’s very important to ensure that you don’t damage the CPU/GPU dye when re-installing the heat sink.
- Installing the thermal pad
- I suggest cutting the thermal pad to match the heat sink shape. The thermal pad is very easy to cut using scissors.
- Remove the plastic protection on one side of the thermal pad and apply the pad onto the heat sink.
- Gently push down on the thermal pad so that it gets some purchase on the heat sink. The Arctic pad is not very adhesive, so it is more likely to stay in place from the pressure of the back cover near the edge of the computer where the back cover rounds and the gap narrows inside.
- Remove the top plastic of the thermal pad.

- Re-installing the back cover
- If you disconnected the battery, reconnect it.
- Position the back cover into place and apply pressure where the two clips are. You’ll hear a click and that means they’re now inserted.
- Re-insert and tighten the screws in the same position that you removed them from. The same tip for the heat sink applies here; to ensure that you have aligned the screw with the thread, turn it counterclockwise until you hear/feel a click, then go clockwise to tighten.
- While it’s unlikely to have a benefit here, I still recommend using an X pattern and tightening them with light torque first and then going back a final time to fully tighten them. Please note that you don’t need to apply any real torque, it’s just finger pressure; if you’re worried about losing screws, you can use some Loctite just like how Apple did.
Step 5: Conduct the after testing as per the instructions below (conduct both Idle and Hot tests).
Conducting Before and After testing
To determine if you’ve completed the modifications correctly, being able to complete consistent before and after testing is very important. The below guide will help you in conducting the tests. I suggest you download Geekbench, Cinebench R20, Intel Power Gadget (IPG) and Fanny in order to follow the testing procedure.
From Idle Performance Test
The goal for this test is to measure the maximum performance the computer can achieve by starting from the coolest possible temperature when the computer has been idle for some time.
Preparation
Charge the computer fully and leave it attached to the charger. Login and allow the computer to settle down to idle temperature with only IPG and Fanny running. When you see the Power and Utilization flatten out in IPG, take note of the temperature; this will become your baseline “before” idle temperature. For my i7, in a 26C ambient temperature room, the idle temperature stabilized at ~47C.
GeekBench 5
With the computer stable at the idle temperature, run Geekbench and monitor IPG for Frequency and Temperature. Take note of how much CPU frequency is being requested and how much the computer is allowing; take note of the temperature and at what point the computer hits its peak. For my i7, the computer would start out strong and then erode from there with a big gap between the requested frequency and average frequency, and the temperature would hit 100C soon after the start of the benchmark.
At the conclusion of the benchmark, take note of the Single-Core (SC) score and the Multi-Core (MC) score. My i7 would produce some great results of ~1,250 SC and ~3,450 MC from idle. From a stone cold start (just woke the computer from sleep), it would produce the same SC score, but add ~100 to the MC score to ~3,550.
Cinebench R20
Follow the same preparation as you did for Geekbench by allowing the computer to come down to idle and take note of the temperature. With IPG and Fanny running, start Cinebench and monitor the same parameters of Frequency and Temperature, but this time also monitor Fanny for the Current fan speed. Since Cinebench is a longer duration benchmark, the fans will spin up at some point.
At the conclusion of the benchmark, take note of the score. For my i7, I got ~1070. From a stone cold computer, Cinebench would produce ~1100 so not much difference, likely because it’s a longer duration benchmark where the initial spike in extra turbo boost from cold makes less of a difference.
From Hot Performance Test
The goal for this test is to determine the sustained performance of the computer while doing heavy load tasks that heat up the CPU and tax the cooling system of the computer.
Preparation
Charge the computer fully and leave it attached to the charger. Login and allow the computer to settle down to idle temperature with only IPG and Fanny running. When you see the Power and Utilization flatten out in IPG, take note of the temperature; this will become your baseline “before” idle temperature. For my i7, in a 26C ambient temperature room, the idle temperature stabilized at ~47C.
GeekBench 5
With the computer stable at the idle temperature, run Geekbench and monitor IPG for Frequency and Temperature. Take note of how much CPU frequency is being requested and how much the computer is allowing; take note of the temperature and at what point the computer hits its peak.
After the first run is completed, without waiting for the computer to cool, repeat the benchmark back to back five times, noting the SC and MC score each time. Note down how the Frequency and Temperature curves are different than when you ran the benchmark the first time, especially at the beginning of each benchmark run. Keep an eye on Fanny as well.
Cinebench R20
Follow the same preparation as you did for Geekbench by allowing the computer to come down to idle and taking note of the temperature. With IPG and Fanny running, start Cinebench and monitor the same parameters of Frequency and Temperature, and Fanny for the Current fan speed.
After the first run is completed, without waiting for the computer to cool, repeat the benchmark back to back five times, noting the score each time. Note down how the Frequency and Temperature curves are different than when you ran the benchmark the first time, especially at the beginning of each benchmark run. Fanny will most likely be showing the fan spinning up to 8,000RPM throughout prior to modifications, and then a much lower rpm after the modifications.
Conclusion
The MBA is a well engineered product that has been let down somewhat by poor assembly materials. With just a change in thermal paste and the addition of a small copper shim, the performance improves by 19% with no downsides. If you still want more performance and are willing to accept the trade off of a hotter bottom case (45C vs. 38C), adding a 1MM thermal pad to the heat sink will improve the performance a further 14%.
I’ve now had the thermal paste, shim and 1MM pad modification for a few weeks and have been very happy with the performance and improved fan behaviour. This MBA is now the perfect computer to hold me over until the new Apple silicon computers come out later this year. While this was an odd post for this blog, I still hope that it has been helpful for you. If it has, please consider subscribing.
Never miss a post again, please subscribe to our no-spam mailing list
Discover more from fcracer - Travel & Photography
Subscribe to get the latest posts sent to your email.
Hey mate – brilliant tutorial.
Just wanted to say thanks. I followed it on my A2179 (2020 13″ MacBook Air, Intel i5).
I used a 20x20x0.5mm copper shim (cut it down to about 16×20). I might have bent it slightly while cutting, beat it with a rubber mallet to “ensure” it was flat but when reinstalling the heatsink, I felt a bit of pressure and could swear it was bulging slightly in the center. Might’ve imagined it, didn’t have a straight edge to check. Curious what you think, too thick, maybe? Too much thermal paste? I did feel it “bottom out” when I torqued the four bolts. Scared I’m putting stress where I shouldn’t.
For the thermal pad, I went with a generic 85x45mmx1mm 20W/mK one (best I could find locally in MX). That 20 W/mK spec seems too good to be true, but I’m rolling with it.
Cut it to cover most of the heatsink (left 1–2mm clearance all around just to be safe).
The lower film peeled off fine, but when removing the top film (case side), it stretched the pad by about 4mm lenghtwise. I trimmed it back down, but I’m guessing it’s now closer to 0.8–0.9mm thick (?).
Ran Cinebench and got a wild 172 on multicore, so yeah, I’ll be testing with other versions because unless I’m typing this from a potato, that can’t be right.
The case gets properly hot under load, like, uncomfortable after a few seconds, but right now under light use the CPU is sitting at around 65°C and the case is just warm to the touch, so that feels like a win. I’ll see how it holds up through a workday.
This was my first time modding a MBA, so naturally I’m in full panic over:
– Whether 0.5mm was too thick and I’m flexing the board
– Maybe I warped the shim cutting it with scissors
– Possibly applied too much thermal paste (Oh, Arctic MX-4 by the way)
– And stretching the thermal pad might’ve ruined case contact
Still, I think the machine feels snappier. I’ll know more after a few days of use.
Do you have any feedback for me? Or any things to look out for in the following days after this mod?
Thanks again for putting the guide together, it was a huge help – do you have a donation page or tip jar I could contribute to as a thank-you?
Hi Luciano, it’s been such a long time since I’ve done the mod so I can’t be sure, but it sounds like your situation should be fine. I doubt that 0.2MM in extra shim height will make any difference. If you’re really concerned, you can always take it apart and check the clearance without any thermal paste. Most likely, you used too much thermal paste which added resistance to tightening the bolts. It doesn’t require much paste once the shim is in there.
What is however concerning is your Cinebench test result. Have you had the opportunity to test it again to see if it was an erroneous result? If the result is the same, then I would definitely take it apart to see if something has gone wrong. The fact that the case gets warmer indicates the modification is working, and with the CPU at a reasonable 65C, it sounds like everything is actually ok. Let me know the Geekbench result please.
I ended up buying 15x15x0.3 shims by accident. I’m guessing it will work to cut one of them in half and adding it to a whole one, for dimensions of 20x15x0.3? That 1mm shouldn’t make a difference should it?
It won’t make any difference at all. The 1mm is inconsequential. Good luck and let us know how it turns out. I’m always surprised at how many people are modding their i5/i7 in 2025! It’s great see these laptops get a new lease on life.
Hello! Thanks for this awesome guide, I’ve done the shim+paste+pad(1mm) mod to my 2020 MBA i5 and it now runs much cooler and silent! However I still have a few questions concerning the performance and the battery after modding:
1. I’ve noticed that my battery temperature often reaches 40 to 45 degrees after the mod, would you be concerned about this, and do you think this would cause any harm?
2. When I’m testing on Cinebench R23, the temperature first stabilizes at a very awesome 90 degrees, but increases to 98 degrees after a few minutes. Is this normal with all the mods applied, on an i5 variant?
Many thanks!
Tommy
Hi Tommy. I’m glad to see you’ve gotten a great performance increase.
Regarding your questions, any extra heat into electrical equipment will tend to reduce its lifespan. I don’t have access to the testing that Apple or its suppliers would have conducted so I can’t estimate what that impact would be, however the increase here appears to be relatively minimal and only under extremely stressful situations like running benchmarks designed to test the limits of equipment. In real life usage, I was seeing battery idle temperatures of 35C+ with my i7 so you’re not that much higher and your number is likely under some workload.
On my i7, I found it rare for the CPU to hit the maximum 100C temperature. I was typically finding it stabilizing at 90C even under synthetic stress-testing benchmarks. However. there’s so many variables that come into play in this kind of testing. The thermal paste/pad’s performance and how well they’re conducting heat away from the CPU, the ambient temperature of the room (I was testing at around 20C), the surface the laptop is sitting on (touching skin or something that has good thermal conductivity will transfer more heat away from the laptop), and perhaps even the age of the components which may consume more power now than they did back in 2020.
The good news is that none of the safety mechanisms that Apple put in place will have changed as a result of the thermal paste and pad modification. If the laptop battery or CPU determine that things are getting too hot, the OS and firmware will throttle the computer to get things back within range or will even shut the computer down to prevent any problems. If you were a plastic intel MacBook owner back in the day, you’ll recall the frequent shutdowns due to the factory delivered laptops exceeding thermal limits Apple had specified.
I hope this reply has been helpful. In summary, I wouldn’t worry about the extra heat and would enjoy the extra performance you’ve already achieved.
Hey, thank you very much for the reply!
I don’t think my reply was sent successfully, so here I send it another time 😅
I put my Mac on a polished rock surface in a room temperature of 26/27 degrees, and the temperature seemed to stabilize at around 91-92 degrees. I’m very happy for the result, thank you!!!
However, despite being very happy that I got a better score during my Geekbench 6 test, I noticed frequent spikes of 99 degrees during my multi-core test, but I suspect it could be caused by my CPU Package using 18-21 watts of power when it’s designed for 10W TDP. What do you think about this?
I also have a last question concerning the longevity of the parts used during the modding (Kryonaut thermal paste, copper shim and thermal pad), how long do you think they would last? Would you replace them once over a certain period of time, especially the thermal paste, as it’s constantly exposed to a high temperature environment?
Thanks for your answer on my battery question, I guess I don’t have to worry about its temperature anymore!
Again, I’m extremely grateful for this awesome tutorial you made!
Hi Tommy, it’s normal for the Intel CPUs to max out at 100C in those computers so I wouldn’t worry about the spikes. I would be more worried if it didn’t spike to 100C because it would mean there’s performance being left on the table. Think of it like a turbocharger in a modern car; they give some over-boost in short durations to help pass another car, but then the boost subsides to protect the longevity of the engine.
Regarding your question on the replacement cycle for the thermal paste, shims and pads. For the shims, I don’t see any reason why you’d need to ever replace them. You can give them a cleaning before reapplying the thermal paste, but that’s all that’s required. For the thermal paste and pad, it’s a very difficult question to answer. Heat cycles is what typically degrades the performance of these items, so it depends on how often your computer is seeing large swings in temperature over sustained periods of time.
My best advice would be to keep an eye on your CPU temperatures over time. You’ll get a feel for what the computer does at its optimal performance (today) and then if it degrades over time, you can think about refreshing the paste and pad at 3-5 year intervals. To be very frank, if I were in your shoes, I’d sell the Intel MacBook and grab an Apple Silicon device. If money is an issue, buy one second-hand. The increase in performance is astonishing. I still use my M1 MacBook Air for a Pioneer DJ rig and the M2 MacBook Air breezes through editing 102MP GFX100S/II/SII images.
Hello Fcracer,
Thank you very much for the quick reply, I’ll take your advice and not worry about the 100C spikes during my GB6 benchmarks anymore!
And you’re absolutely right, I’m planning to get a M3/M4 MBP in the near future as a replacement of my current i5 MBA. I’m sure the performance and thermal improvements would be insane!
Thank you for the amazing advices and this awesome modding guide!
Best, Tommy
Do you think that this mod could be applied to an i5 2019 MBA, and if so, would the thickness of the shim have to chnage?
Hi Nicola, I’m sorry but I can’t say for sure because I haven’t personally tried it. Best bet would be to ask on macrumors.com’s forum; there are a lot of knowledgeable people over there.
I forgot, for the record: GeekBench5 single core 1266 (from 1094) +15,7%, multi core 4040 (from 2996) +34,8% starting from 46° temperature… :)) again, god bless you!
Hi and thank you very much, great solution and very well explained, now my MBA 2020 i7 16GB 1TB ssd runs very, very cold!!! Previously it often worked almost constant 100°C, but now temperature stay always below 80 and the fan is very quiet, also with many many apps and video running and also with the external 4K monitor! The most incredible things is that X-PLANE is now playable :-O, also in this extreme condition temperature stay below 80°C !!!
I’m a computer engineer with some experience in disassembling laptops, so absolutely no problem to follow your directions. Really one of the best tutorial I’ve ever seen. I choose the 1.5MM Arctic Pad in order to obtain the maximum performance, anyway the bottom cover temperature and confort is very very similar to my MBP 2014 i5, so no problem for me.
Completely agree with you that Apple designed a great product that’s been hampered by poor execution in the manufacturing channel (also my computer, identical to yours, was manufactured during COVID-19 pandemic peak), but anyway I’m quite mad at Apple for that.
Again, thank you! Best.
Hi Massimo, I’m so glad to hear that it worked out well for you. I’m amazed at how many people have found this page and have been able to improve their MacBook Air’s performance as a result. It makes me very happy to see people get these great results.
Hi, wise stranger!
I just bought a MBA 2018 13″ for coding. And I felt big heat from my laptop and started to fix it. After some tries, I found MB make heat with extra monitor. In my case, extra monitor is super necessary so I decide to make it cooler to fix.
But there was little information about cooling MBA 2018 13″ in my country. So I had to google with Eng. And your article is perfect. Easy to read before and after translating, link with every necessary, and nice and kind reply.
So I’ll try this ASAP, but there are few questions.
1. Like you said with Jonas, is it right with cpu&gpu/paste/shim/paste/heatsink ? And if it right, 1g of paste will be enough?
2. If I use mine with cradle, how do you think about remove insulating pad?
3. You recommended 0.3mm with shim, 1mm with pad. Thicker will be worse?
Sorry for many questions, but I don’t have a place to ask. If you reply my question, it will improve my environment more than you can imagine.
Hi Kim, thanks for writing in, and sorry for the late reply. First, I should say that I did not try this modification on the 2018 model, so please know that you are taking a risk by trying this approach. It may or may not work, and the shims, may or may not fit. However, I don’t see any downside to opening it up and, at the very least, replacing the thermal paste with a higher quality product.
For the reassembly, you have it correct, it would be CPU&GPU/paste/shim/paste/heatsink. Use extreme caution when bolting the heat sink back as you don’t want to damage the CPU/GPU given that I’ve never tested this modification on the 2018 model and I’m not sure if it has the clearance. For my setup, 1g of paste was more than enough.
If you’re using it with a cradle, I don’t think heat is an issue so you can take off any protection materials and mate the new thermal pad to the casing, which in effect makes the bottom case the heatsink. For the thickness of the shim and pad, I really cannot provide you any advice because I’ve never opened up the 2018 model. You may have to do some trial and error.
Perhaps your first place to start would be to measure the performance of the laptop using Geekbench and Cinebench, with Intel CPU monitor software to determine what the root cause is. Is it throttling because of thermals or is it just running up against its maximum performance? From there, you can determine if adding more heat dissipation would help solve the issue.
Hope the above helps. I’m sorry I cannot be more specific because I haven’t opened up a 2018 model before.
Hi thanks for this great guide. I am thinking about doing this to my i3 MBA 2020.
Just one question—
For users who choose to use a 1mm thermal pad for this modification, is there any risk of the pad sliding, moving, or becoming out-of-place after the cover is put back on?
It would be a nightmare if the pad were to slide or somehow come slightly out of place, make contact with nearby components on the logic board, and inadvertently transfer heat there.
Is this at all a concern if using .5 or 1mm thermal pad?
Hi there. I would think the 1MM will be fine because there is a pinch point near the edge of the laptop where the screws go into the base. Where the cover curves, there will be a pinch point that holds the sheet in place. However, I would not go thinner than 1MM as you may find the sheet moving around, given that laptops are, by their nature, devices that spend their life being moved around.
Thank you!
My MacBook Air 2020 i3 temps have dropped 20° and I haven’t heard the fans even once when watching Netflix or any other video intensive application!
Many thanks.
Perfect tutorial, easy to do!
Very happy to hear of your results. They are in-line with everyone that has followed the guide so I’m glad to see another person getting better value from their machines, with little downside.
Hello again,
I am curious as to how an egpu might work with a thermal modded MBA i7 16GB.
Hi Isaac, I don’t see any issues in using an egpu. It would offload some work from the MacBook which can only be a good thing.
Thanks for this great guide. I’ve got geekbench5 result of Single Core 1192, Multi Core 3990 after 0.3mm copper shim and 1.5mm thermal pad modification.
Great results! It makes a world of difference on that laptop.
Do we need to remove the insulating pad inside the bottom cover?
This was not mentioned I am wondering if removing it would transfer heat better to the aluminium base for better heat conduction. I am aware of the potential discomfort, or actual, physical pain rather, due to the excessive heat on the bottom when placed on the lap.
Would it be easy to paste it back should there be a need to send it to Apple?
Your thoughts please. (I am itching to perform the thermal pad mod will be receiving a 1mm and a 0.5mm thick to play around for best configuration)
Thanks for the earlier reply. I will heed your advice on the Cinebench before/after testing.
Hi Isaac, I would NOT remove the insulating pad from the bottom cover, for two reasons:
1. If you want to return the laptop to factory configuration, you won’t be able to if you remove the insulating pad.
2. The insulating pad provides some protection from potential burns if the laptop gets very hot. As noted in my post, the temperature gets into the 45C+ range which is just on the threshold to cause mild burns if the laptop is placed on bare skin for a long period of time.
Hi there mister!
May I ask; you mention a tradeoff in the second option – adding the thermal pad spreading the heat onto the bottom of the laptop. What if the MBA has the Incase hardshell case installed?
Do you think it would be a good idea? I’m worried heat would not fully dissipated from the bottom to the surrounding air however i’m guessing there’d be greater comfort for the user’s lap as the Incase hardshell in made of hard plastic.
Your thoughts on this please.
Hi Issac, there would be no issue in using a case. By adding the thermal pad, you’re increasing the thermal capacity of the cooling system. The case will reduce the ultimate thermal capacity somewhat (because the heat can’t dissipate as quickly), but it will still be better than the factory engineered system.
In your case (sorry I couldn’t resist), make sure that the thermal pad has enough room around it for the fan’s air to flow around it. This will help ensure that you have sufficient cooling if the outer case is restricting heat from escaping. I suggest running Cinebench before and after and with and without the case; this will give you a very good indication of the cooling system’s capacity in each configuration.
Hi fcracer
Thank you so much for the detailed instructions. I’m thinking about doing it however there is one part that I am not sure about (Sorry – English is not my first language and since I want to EXACTLY follow your instructions, I need to make sure I understood everything perfectly. Thank you for your understanding).
In the text above, you “apply thermal paste on top of the shim” and then “place the shim” into the machined area of the heat sink. Then, you apply thermal paste to the cpu/gpu area and place the heatsink, with the newly installed shim, on top of it. So it means that if I have covered the shim with thermal paste, I have to put the COVERED side into the heat sink first. In conclusion, after putting the heatsink with the shim over the thermal paste covered cpu/gpu, the shim sits between two layers of thermal paste, just like the patty of a hamburger. Is that correct?
Thank you so much in advance and have a great start into the week.
Jonas
Hi Jonas. Thanks for writing in. You are correct, it’s just like a hamburger. The shim will sit between two layers of thermal paste. The goal is to transfer the heat from the CPU/GPU to the thermal paste, to the shim, to the thermal paste, to the heat sink.
The thermal paste acts as the thermal transfer agent between the three metal parts (CPU/GPU, shim, and heat sink). Hope this helps. Let me know if you need more information.
Dear fcracer
Thank you so much! Amazing explanation. That’s more than enough!
Best, Jonas
Hi !
Thank you so much for your article.
I ordered all the necessary parts and tools a few weeks ago (about 25€) and finally did the fix this morning.
It’s not the performance I’m first after but rather the quietness of my MBA 2020 i7 16Go RAM.
I did the shim + thermal paste + thermal pad 1mm fix then ran 5x Geekbench 5 and then 5x Cinebench R20 in a row (no cooling time).
Not only am I getting sensible improvements on all scores (+10% avg score on Geekbench single core w. 1195 and +26% on Geekbench Multicore w. 3670 and +17% on Cinebench w. 1110), but the greatest is: my ventilator never got above 2600rpm. In other words, my MBA stayed fully quiet even under repeated full loads with Cinebench.
According to istat menu, my bottom case temperature fluctuated between 39’C and to 42’C most of the time with brief spikes up to 46’C.
None of my cores reached 90’C over the process (89’C max).
That’s an amazing change compared to before, where my computer cores would very quickly hit 100’C.
My MBA should now stay quiet in all situations. That’s a great satisfaction !
Thank you so much again for your detailed article and guidance !
The fix took me 15mn or so, it’s very easy to perform.
( : //
Fabrice
Thanks for the excellent guide. I followed it with a few modifications. I used a Gelid thermal pad, which I cut into 4 strips, and applied horizontally. My logic being there would be more airflow, and the extra conductivity of the Gelid would make up for the reduced contact patch. Since the mod the MBA 2020 i5 is usable again. Prior to the mod the fans would spin up all the time, and the processor would just sit at 100% with even modest workloads. Now it runs cooler and quieter. It’s also faster, but that’s just a bonus. The cool and quiet is what I wanted.
Hi Paul, I’m so glad to hear that you are now enjoying your MacBook Air 2020 more than before. What was the thickness of the Gelid pad that you used? I often get asked if people should go for 1.5MM or 1.0MM. I still believe 1.0MM is the ideal balance, but for those that want maximum performance, I don’t think you can beat the extra surface contact the 1.5MM gives.
Hello,
This is a very useful article i found online. Thank you so much.
I request you to guide me choosing the right one please.
As Mac is an expensive brand to afford for a lot a of people, I have to choose either Macbook Air 16gb, 2020 or Macbook pro 8gb,2020. I am confused which one would be faster to work with.
Regards,
Shonai
Hi Shonai, thanks for writing in. To help you, I would need to know what you intend on using the computer for and what are important factors to you. For example, laptop engineers typically balance the following: 1. Size, 2. Capability, 3. Battery, and 4. Heat. If you can let me know what factors are important to you and what you intend on doing with the laptop, I can better assist you.
In general however, you can split the MacBook Air 2020 vs. MacBook Pro 13 2020 into two typical scenarios: The MacBook Air 2020 is excellent for short duration workloads such as browsing the internet, photo editing, using productivity software and any other activity that puts strain on the CPU for a short duration; the MacBook Pro matches the Air for short duration workloads, and then extends that capability to long duration workloads such as rendering video, exporting images in photo editing software, and any other workload that requires more than a few seconds of the CPU’s time.
In summary:
I have now finished the mods to my 2020 MBA i5 1.1 and I have too say that I’m absolutely delighted with the results. Prior to starting this my Geekbench 5 multi core score was a fairly decent 2947 but now is 3695 and my idle temps have dropped down from around 43c to 37c! The underside of the body only gets noticeably warmer than standard if really pushing the system so that higher temps are sustained, otherwise it actually stays cooler because the whole thing is running cooler to start with. While typing this with 9 other safari tabs open, mail running and various background tasks I’m now at 40c.
Give the overall gains I have no hesitation in recommending the procedure as laid out in this excellent guide, and thanks again to Farz for bothering to take the time to publish such a well written and clear manner.
Hi Mark, I’m so glad it worked well for you. I’ve gotten feedback now from a number of people who are enjoying their MBA 2020’s much more after doing this simple modification. I think this will hold us over until the Apple Silicon arrives sometime later this year or next year! I wish you good health during this challenging time. Be safe!
Hi, I’ve been following the heatsink mod thread over on MacRumours, and have gathered together the necessary items in order to mod my i5 using your excellent guide here.
But… having used the MBA for a few weeks, and following the latest 10.15.6 update, my working temps have settled down to a pretty healthy 43c idle (measured at the core rather than proximity) and I’m beginning to wonder if this is really even necessary at all now especially since there’s been a general realisation that heat isn’t as big an issue as was first suggested (my old faithful late 2012 MBP is running at 72c while I’m typing this!).
So 6 weeks later do you still feel that this is still a worthwhile modification?
Hi Mark, hope this note finds you well. Your question is difficult to answer because there are two factors at play that hinder the MBA2020 performance: 1. Inefficient thermal paste application, and 2. Inefficient CPU cooling due to no heat pipe.
Factor 1 may have been addressed in more recently manufactured computers. One way is to use Geekbench to test. If you conduct back to back tests and see scores below 3300-3400 for the i5/i7, then you can gain performance by doing the shim/paste mod. There are no downsides to this modification as it is how it should have come from Apple anyhow.
Factor 2 can only be addressed by adding something to dissipate the heat. I’ve been using the 1MM thermal pad and have been very happy with the performance. While the bottom cover gets noticeably hotter with the thermal pad, it’s no hotter than my previous MacBook Pro 2018 used to get. I’ve done heavy photo editing with Capture One with the laptop on my lap without any issues.
To answer your questions directly, I feel that the modifications continue to be worth it, especially given the ease with which they can be implemented, and for the thermal pad, reversed if you decide to sell the laptop.
Hope this reply helps you in your decision. I’ve been so happy with the MBA2020 that I’ve put my 2018 MacBook Pro up for sale since I never reach for it anymore.
Thanks for such a prompt and response, I’m very well thanks and I hope you are too. Living in Hong Kong at least means that life in the current circumstances is perhaps a little less fraught than it might be elsewhere!
Having fully considered your more than helpful reply, and since you’ve gone to the trouble of providing such a clear and precise easy to follow guide, I don’t think I have very much to lose by going ahead with it anyway. Actually I’m quite looking forward to it! I will let you know how it goes.
Please do let me know how it turns out for you. This page gets a lot of visitors but not much feedback. I assume people are having the same good results I got because generally people only post if they’re having problems 🙂