I recently shared a simple Capture One Pro image workflow on reddit and received a very encouraging reply from none other than David Glover of Phase One fame! This is the same Mr. Glover that hosts the wonderful Capture One webcasts on youtube that I always rave about. In his reply, he noted that he was most impressed with the resurrection of one particular image from Sri Lanka; that image went from a hazy flat mess to one that I’ve printed and hung on my wall.
It’s also an image that I often get questions about in regards to how it got from the original to the final version. This post will walk you through the process and provide a step-by-step tutorial, along with the RAW and Capture One EIP files so that you can have fun manipulating the image in your own style. If you do decide to play with the RAW file, I’d love to see your interpretation of the image; please share it in the comments below.
Background of the Image
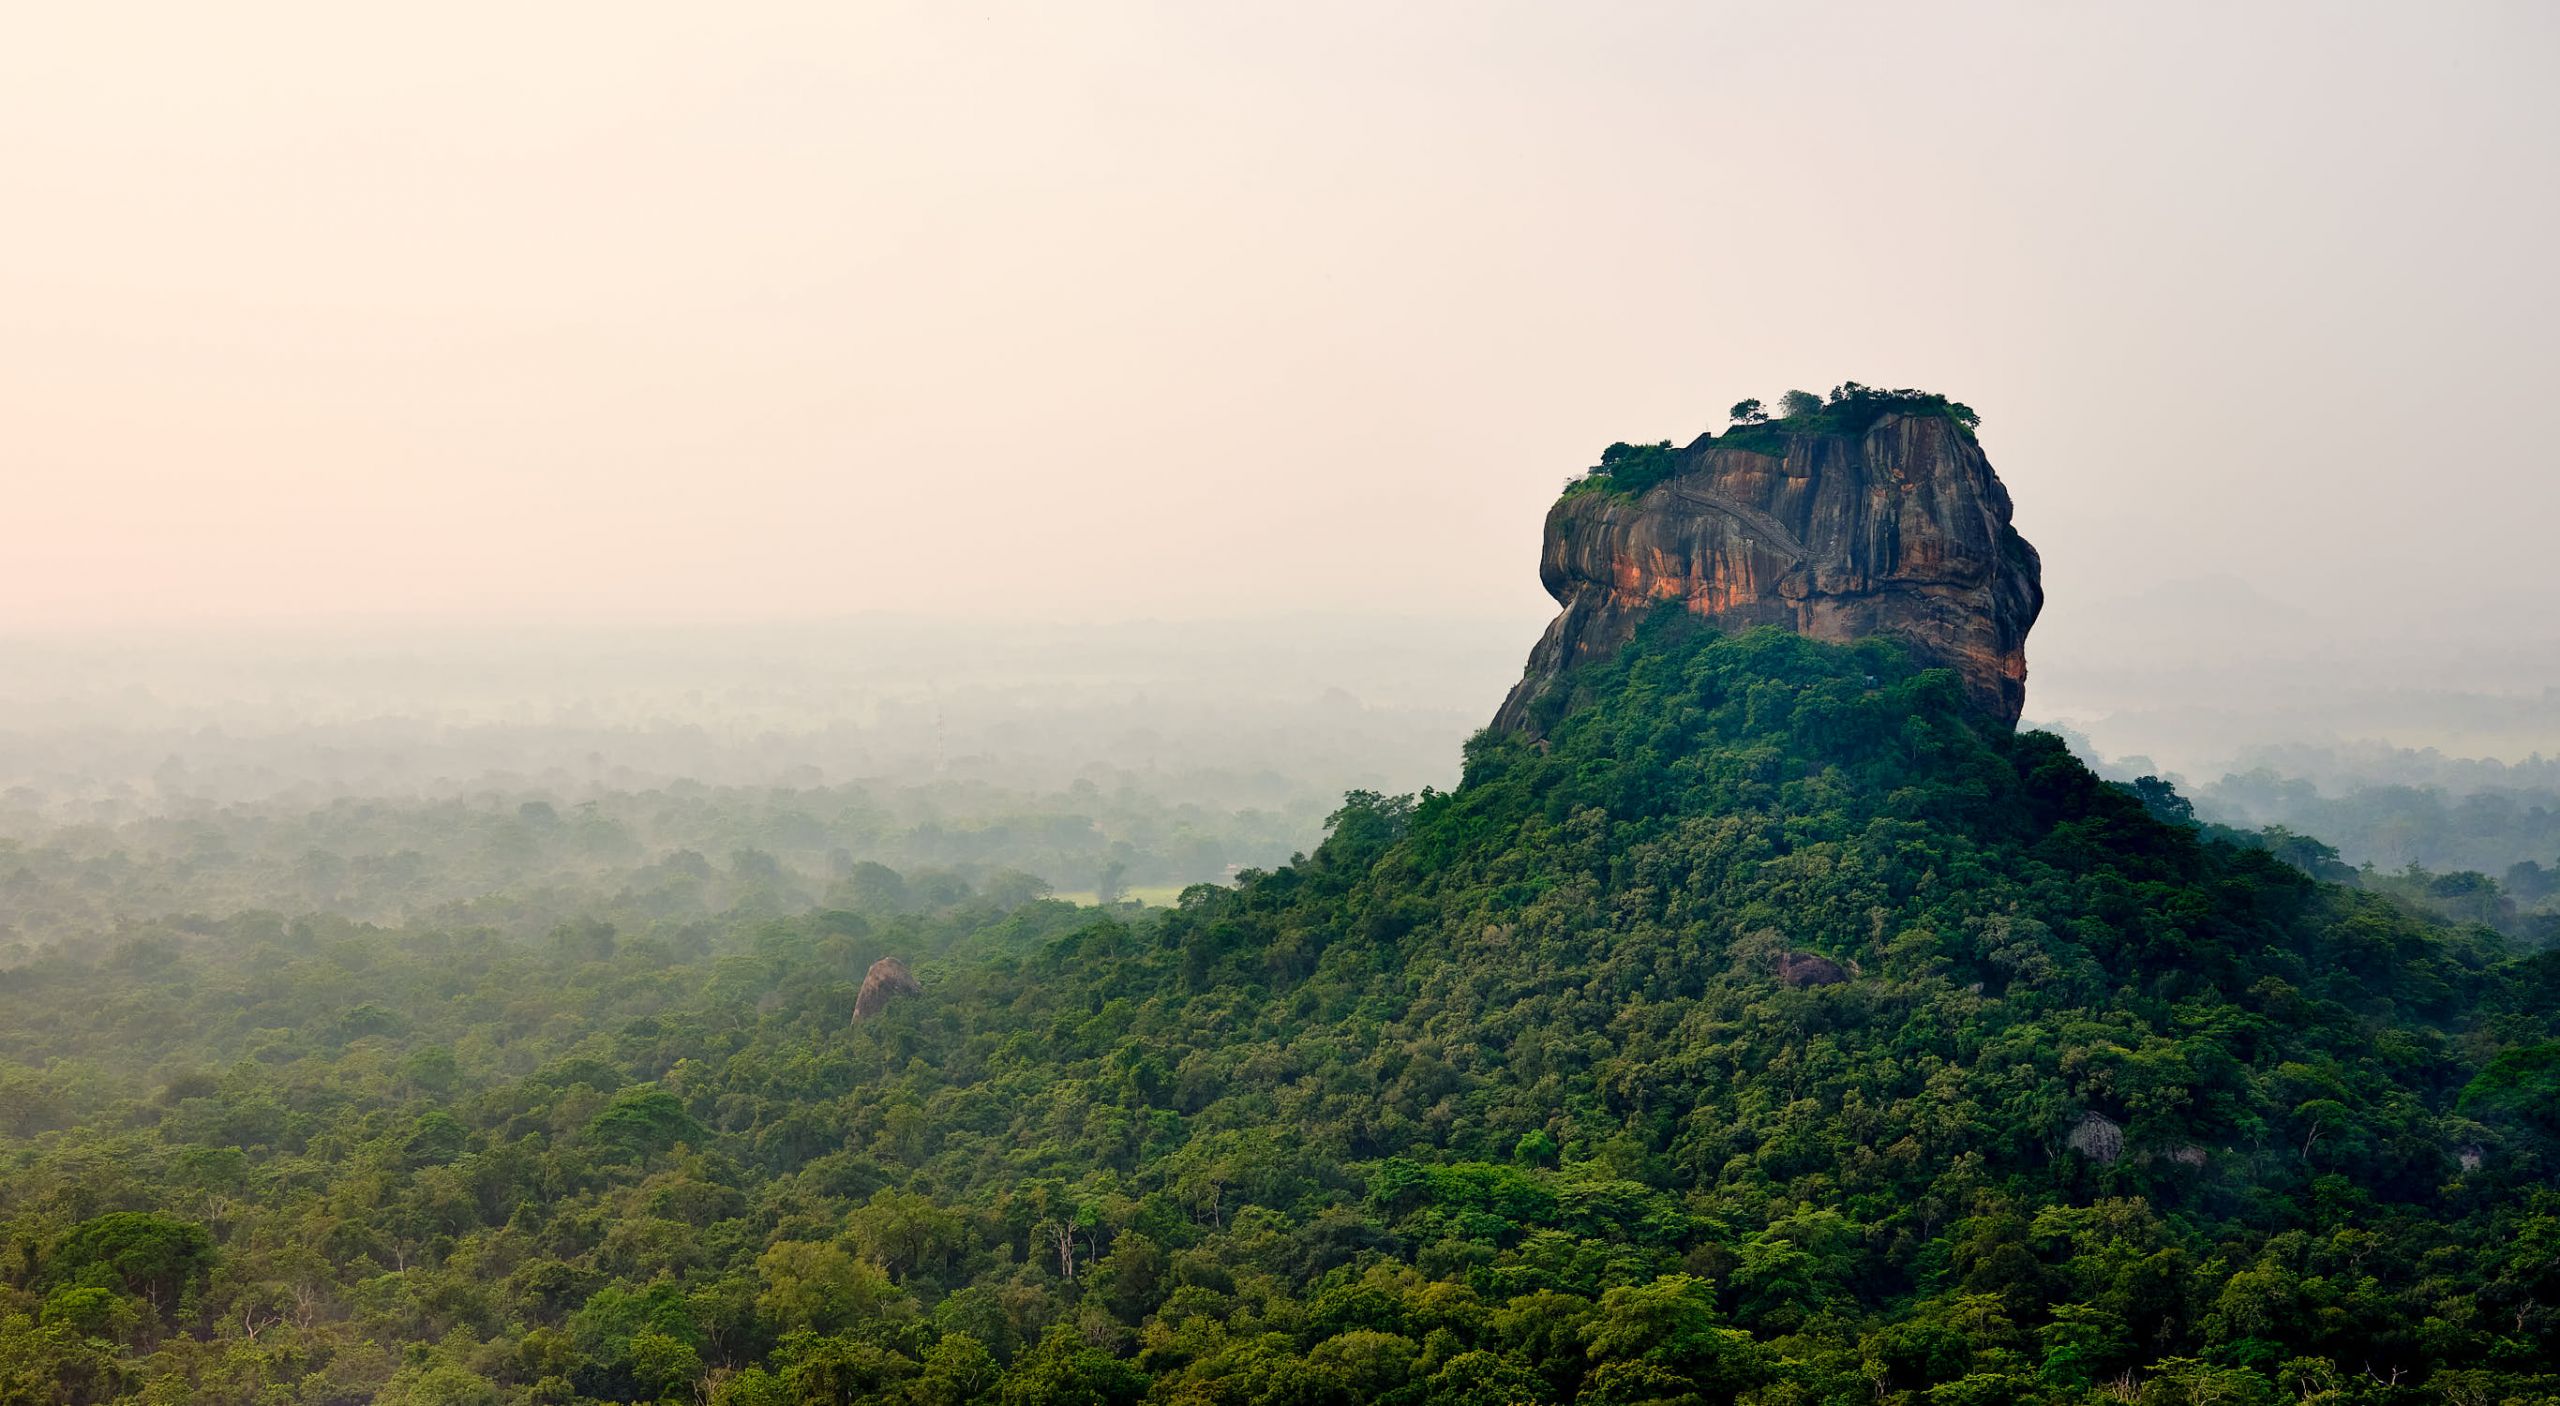
Sigiriya is one of the most visited tourist sites in Sri Lanka. Sigiriya is a rock fortress built around 475 AD and was the capital selected by the king. The Pidurangala Rock is a protector rock which is located within a few minutes drive from Sigiriya. A common tourist goal is to photograph sunrise with Sigiriya in the foreground by taking the image from Pidurangala.
To get to the top of Pidurangala before sunrise, you need to climb up a rocky terrain in pitch black conditions. There are few signs or indicators of how to get to the top. However, there are a number of dogs that call Pidurangala home that guide you to the top by barking when you go in the wrong direction. One of the dogs escorted us to the top and led the way.
For us to get to the top of Pidurangala before sunrise, we had to leave our hotel at 4:30AM, drive for over an hour and then climb up to the top. We had put a lot of effort into this experience and really wanted to come away with some beautiful images from all that effort. When we arrived at the top (after scrambling on rocks for the last part of the hike), we were welcomed with a very dark scene with a few keen photographers mixed in with people meditating just before sunrise.
As the scene started to brighten with the sun rising, it became apparent that we weren’t going to get a clear view that day. The air was thick with humidity or pollution and the sunrise was going to be visually flat and dull, however the emotional feeling was still very strong and magical. I didn’t want the dull and flat image I was seeing on the back of the camera to convey the wrong impression of what was actually a very special experience, so I took many images and hoped that Capture One could rescue the image.
Step 1: Crop
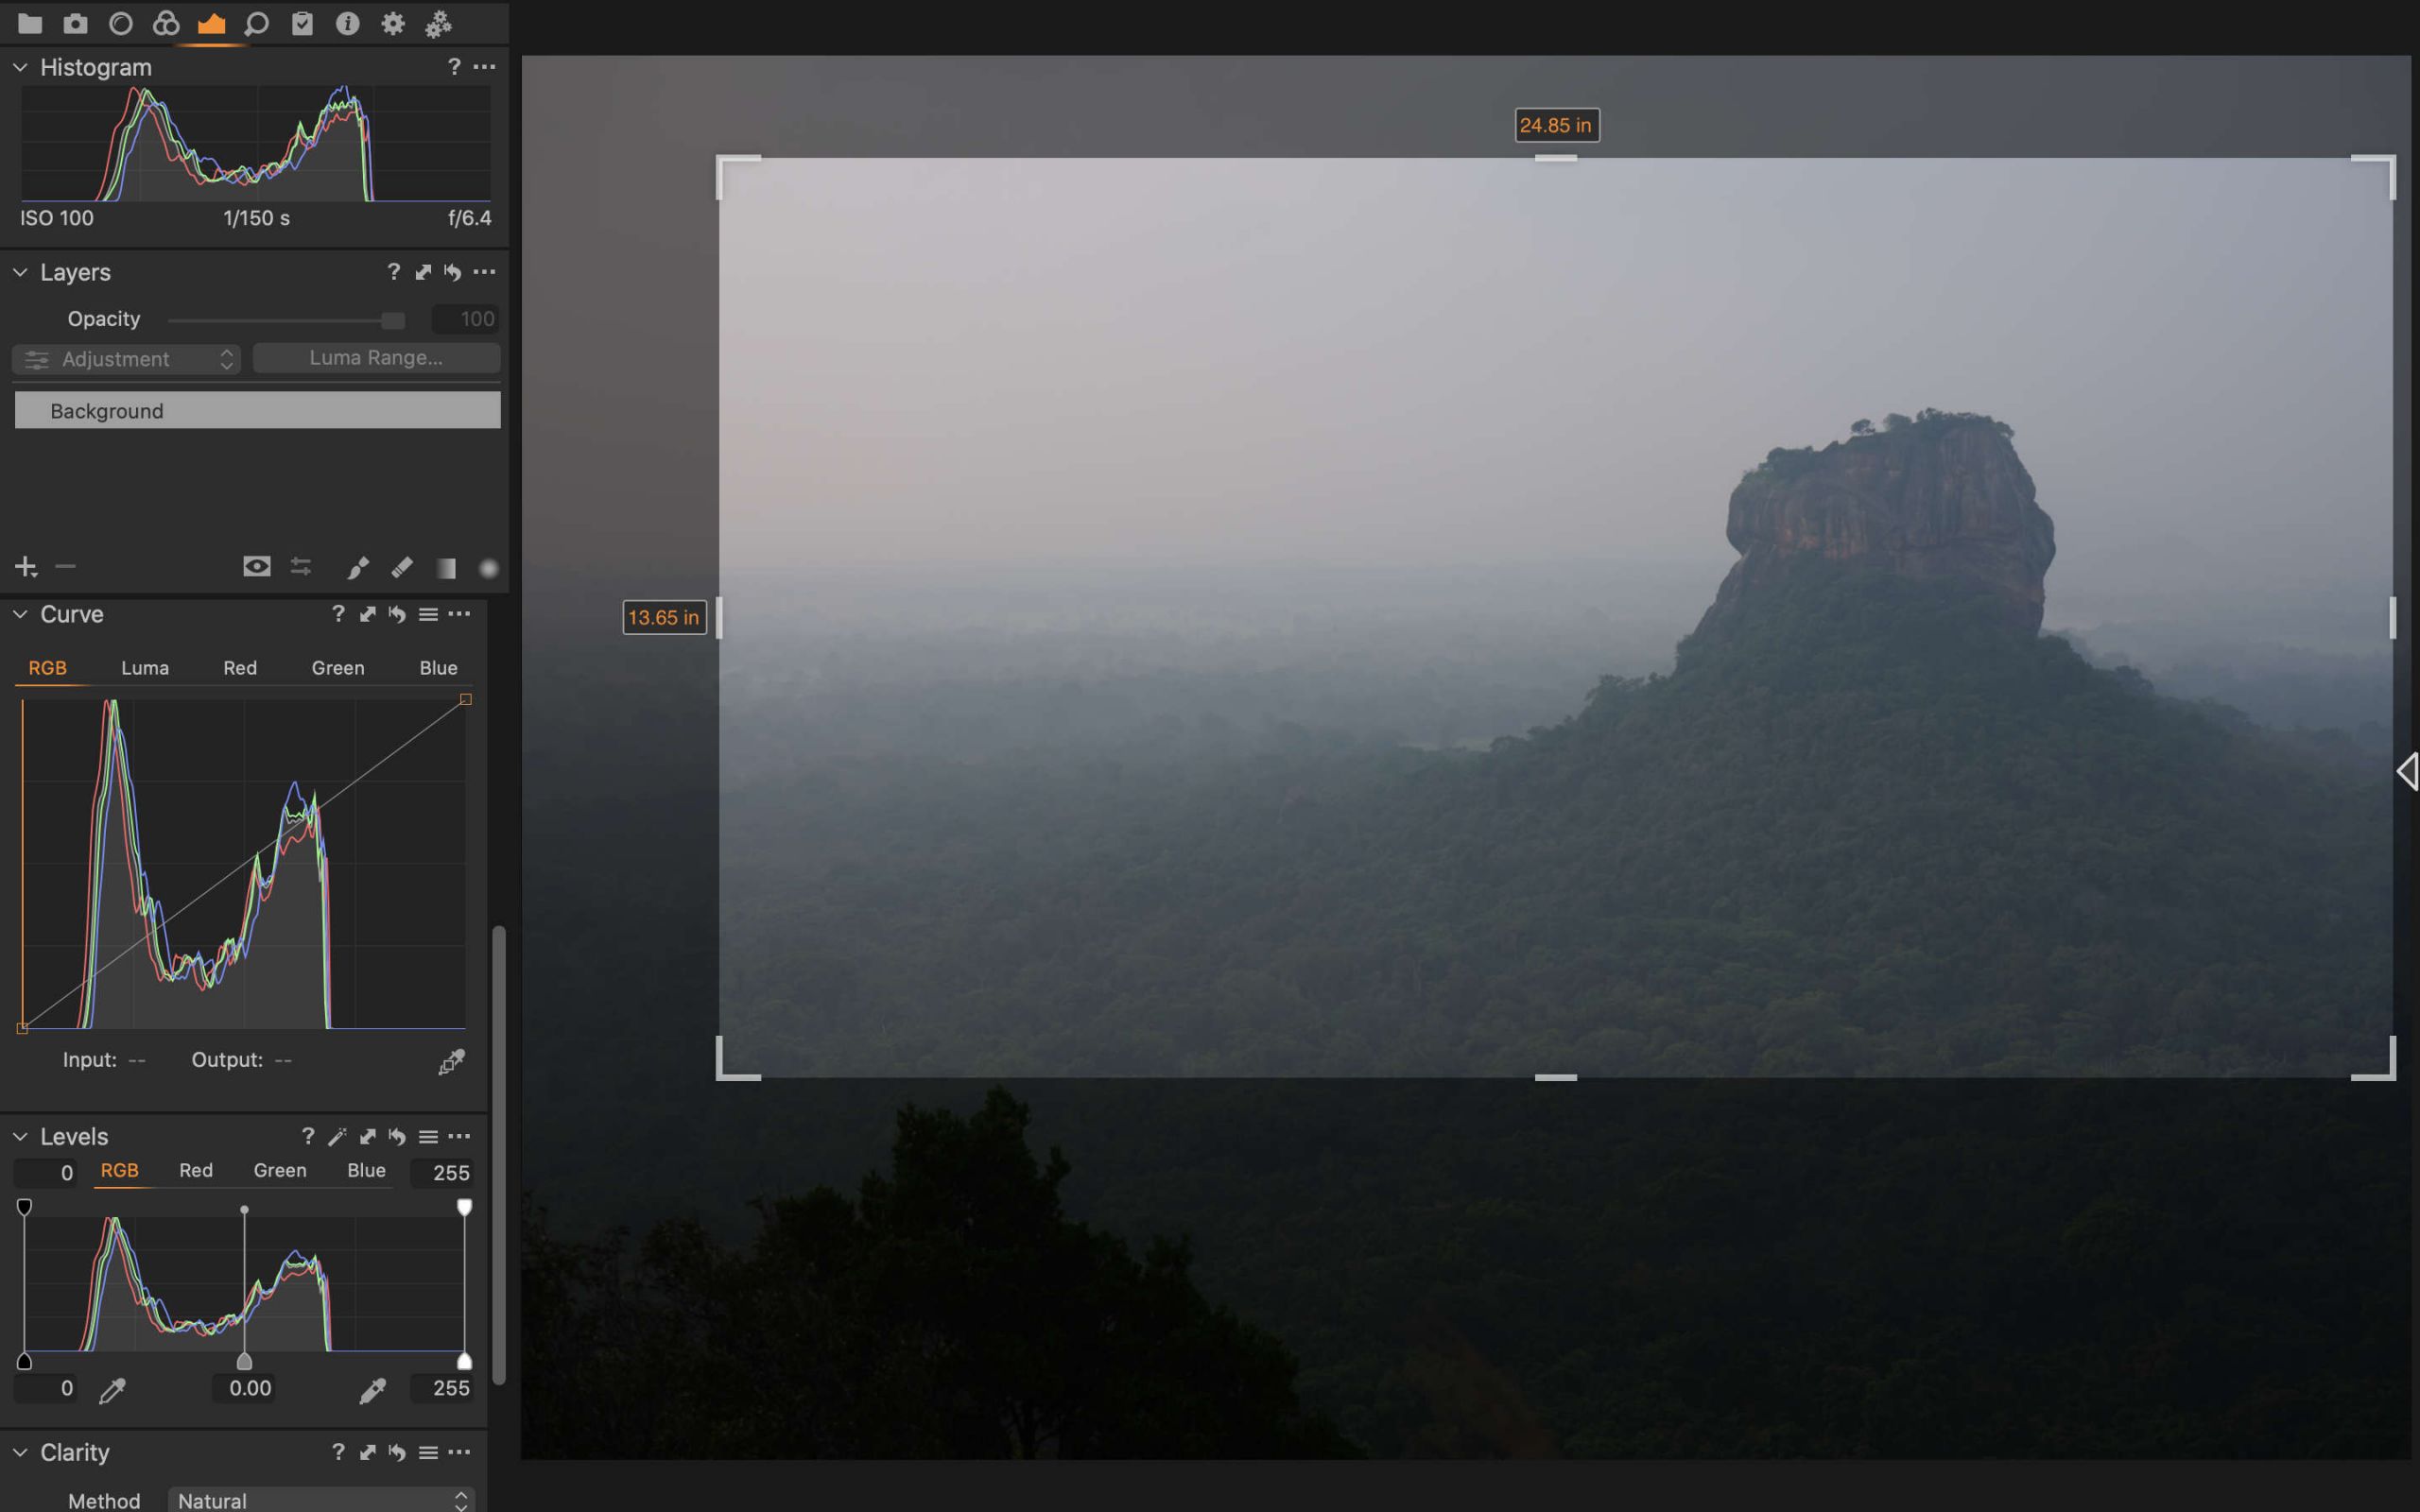
There’s no point to put a lot of effort into corrections if the image isn’t close to its final composition. The histogram and black/white points are based on the cropped image, so it’s important to get the cropping done first before making other adjustments. I wanted to convey the height of the rock, which is quite spellbinding in person and the beautiful greenery around Sigiriya, so I chose a wide and short composition.
Step 2: Adjust White Balance
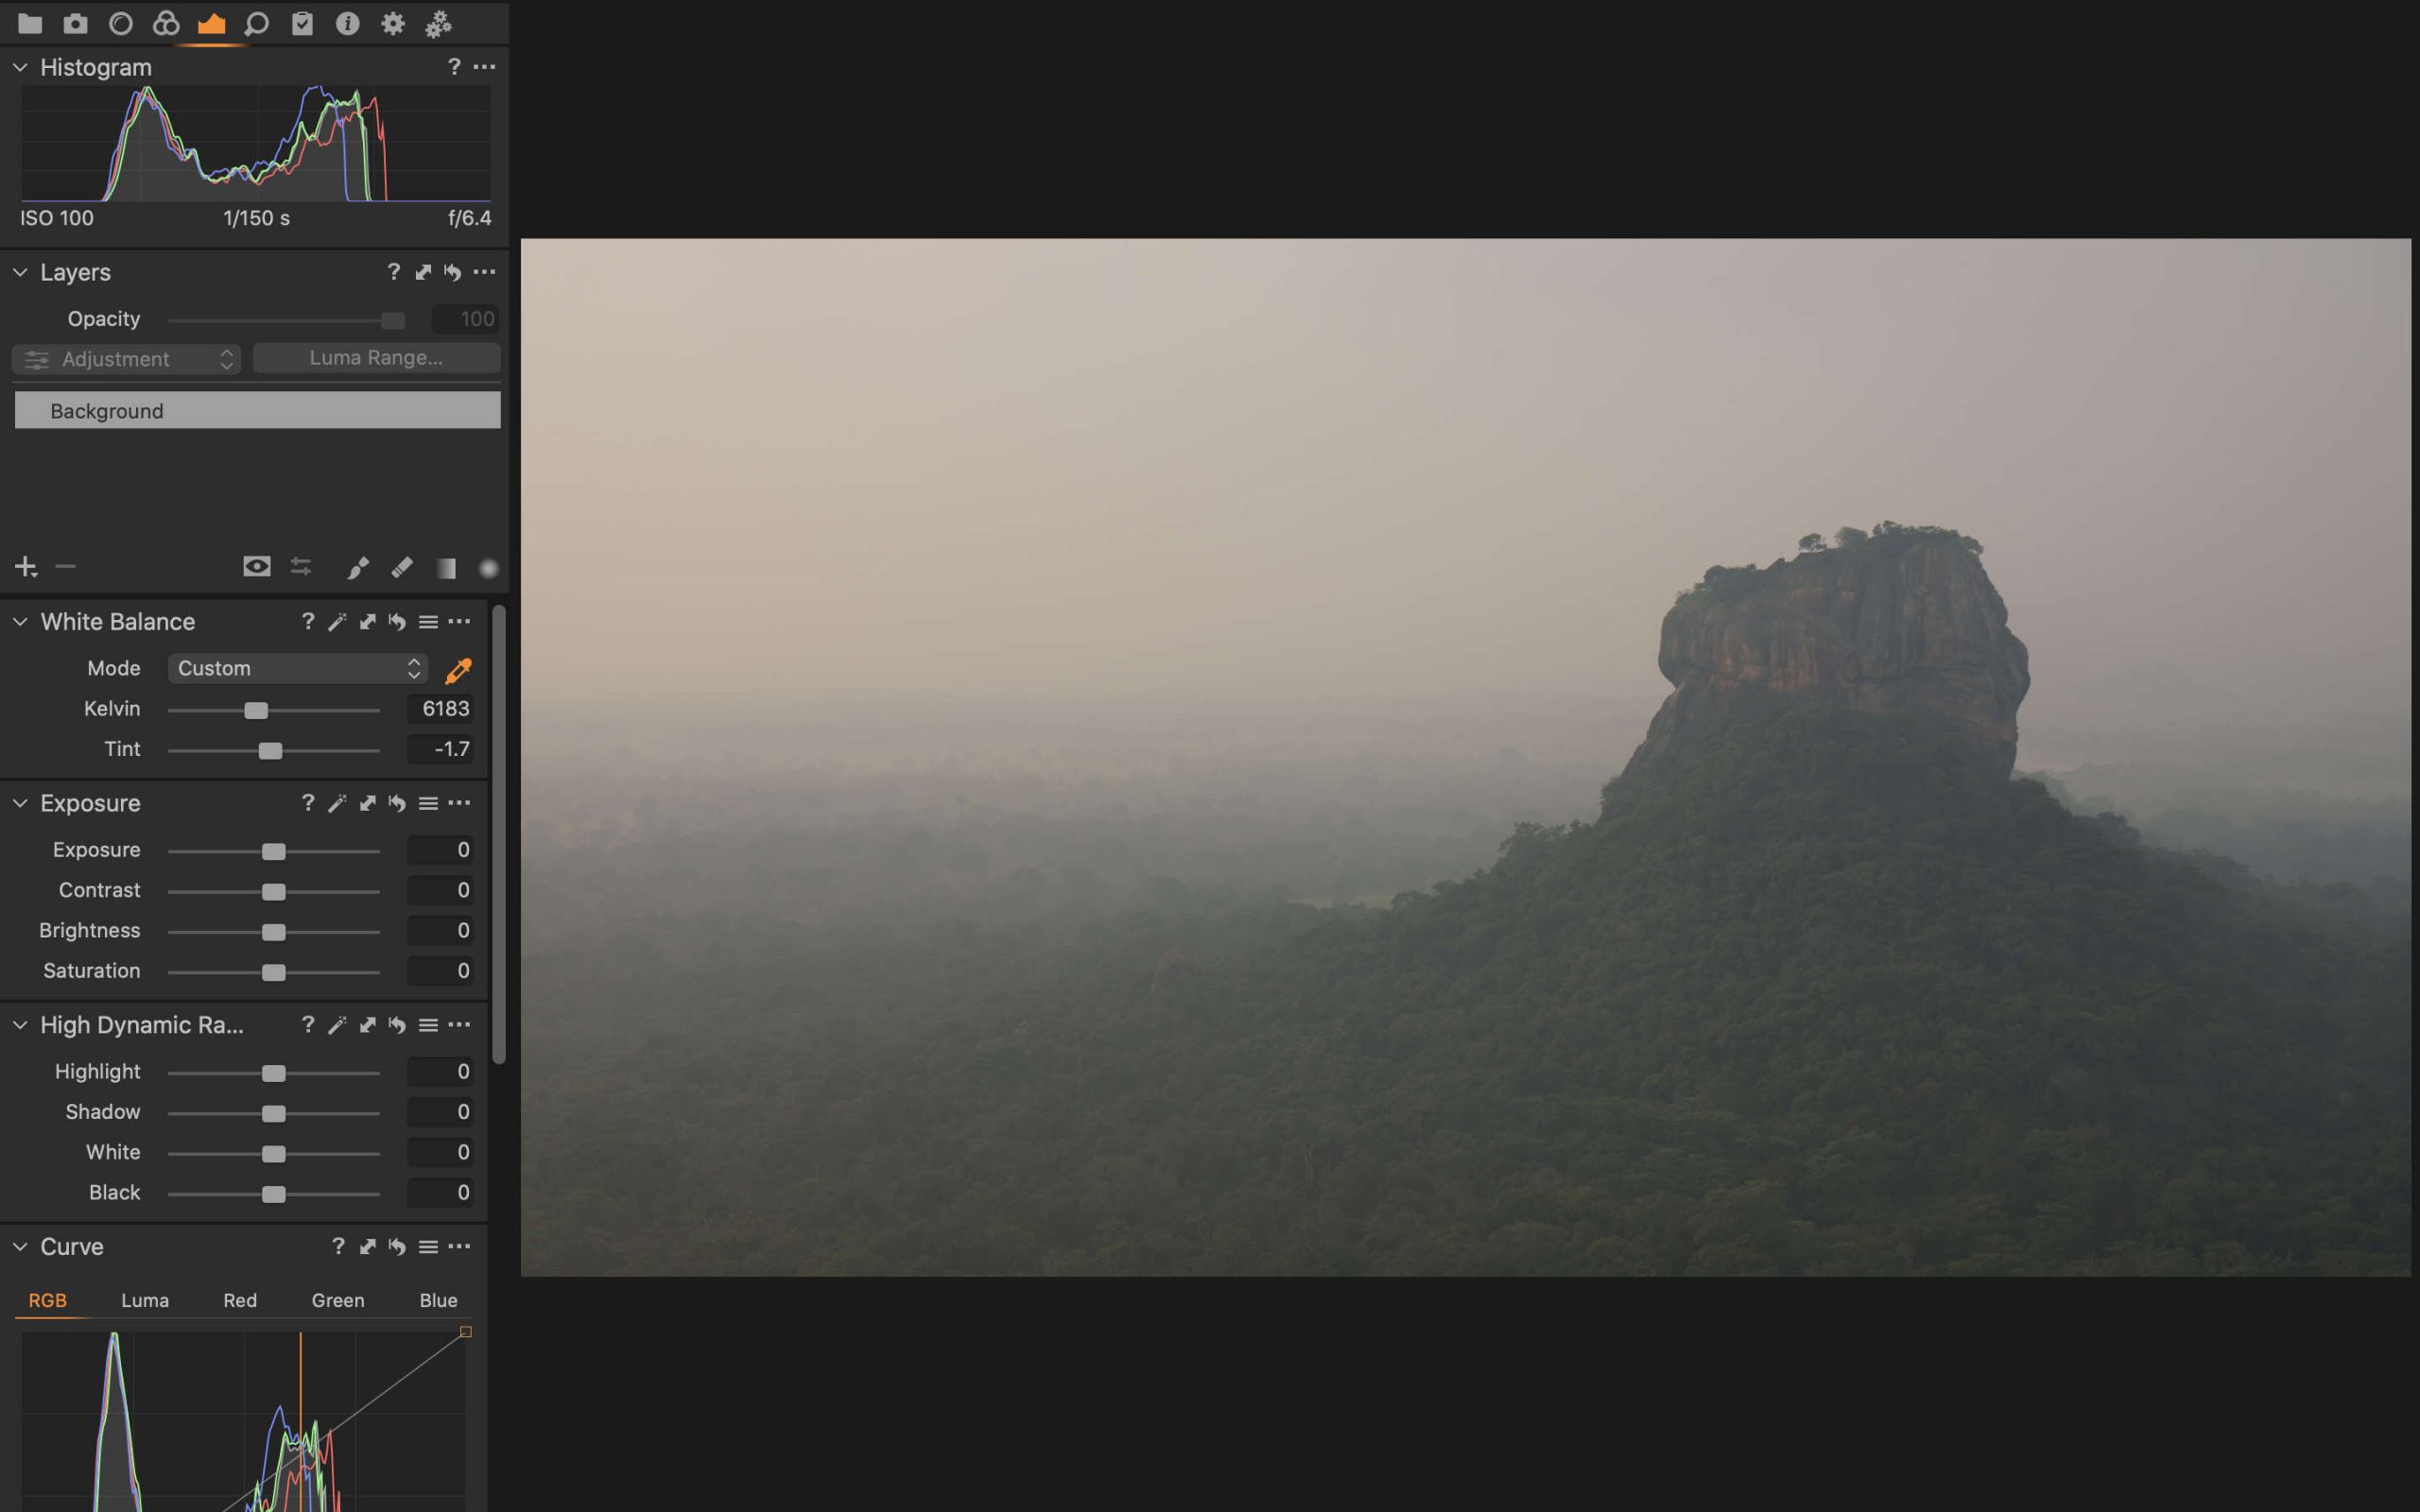
When there’s a lot of fog in an image, the white balance will tend to be too blue. Since this image was taken at sunrise, there was quite a bit of blue, but I wanted to convey the warmth that we felt when we were on top of the rock in the Sri Lankan heat. By using the white balance picker (W shortcut key), I sampled a grey part of the rock to get a corrected white balance.
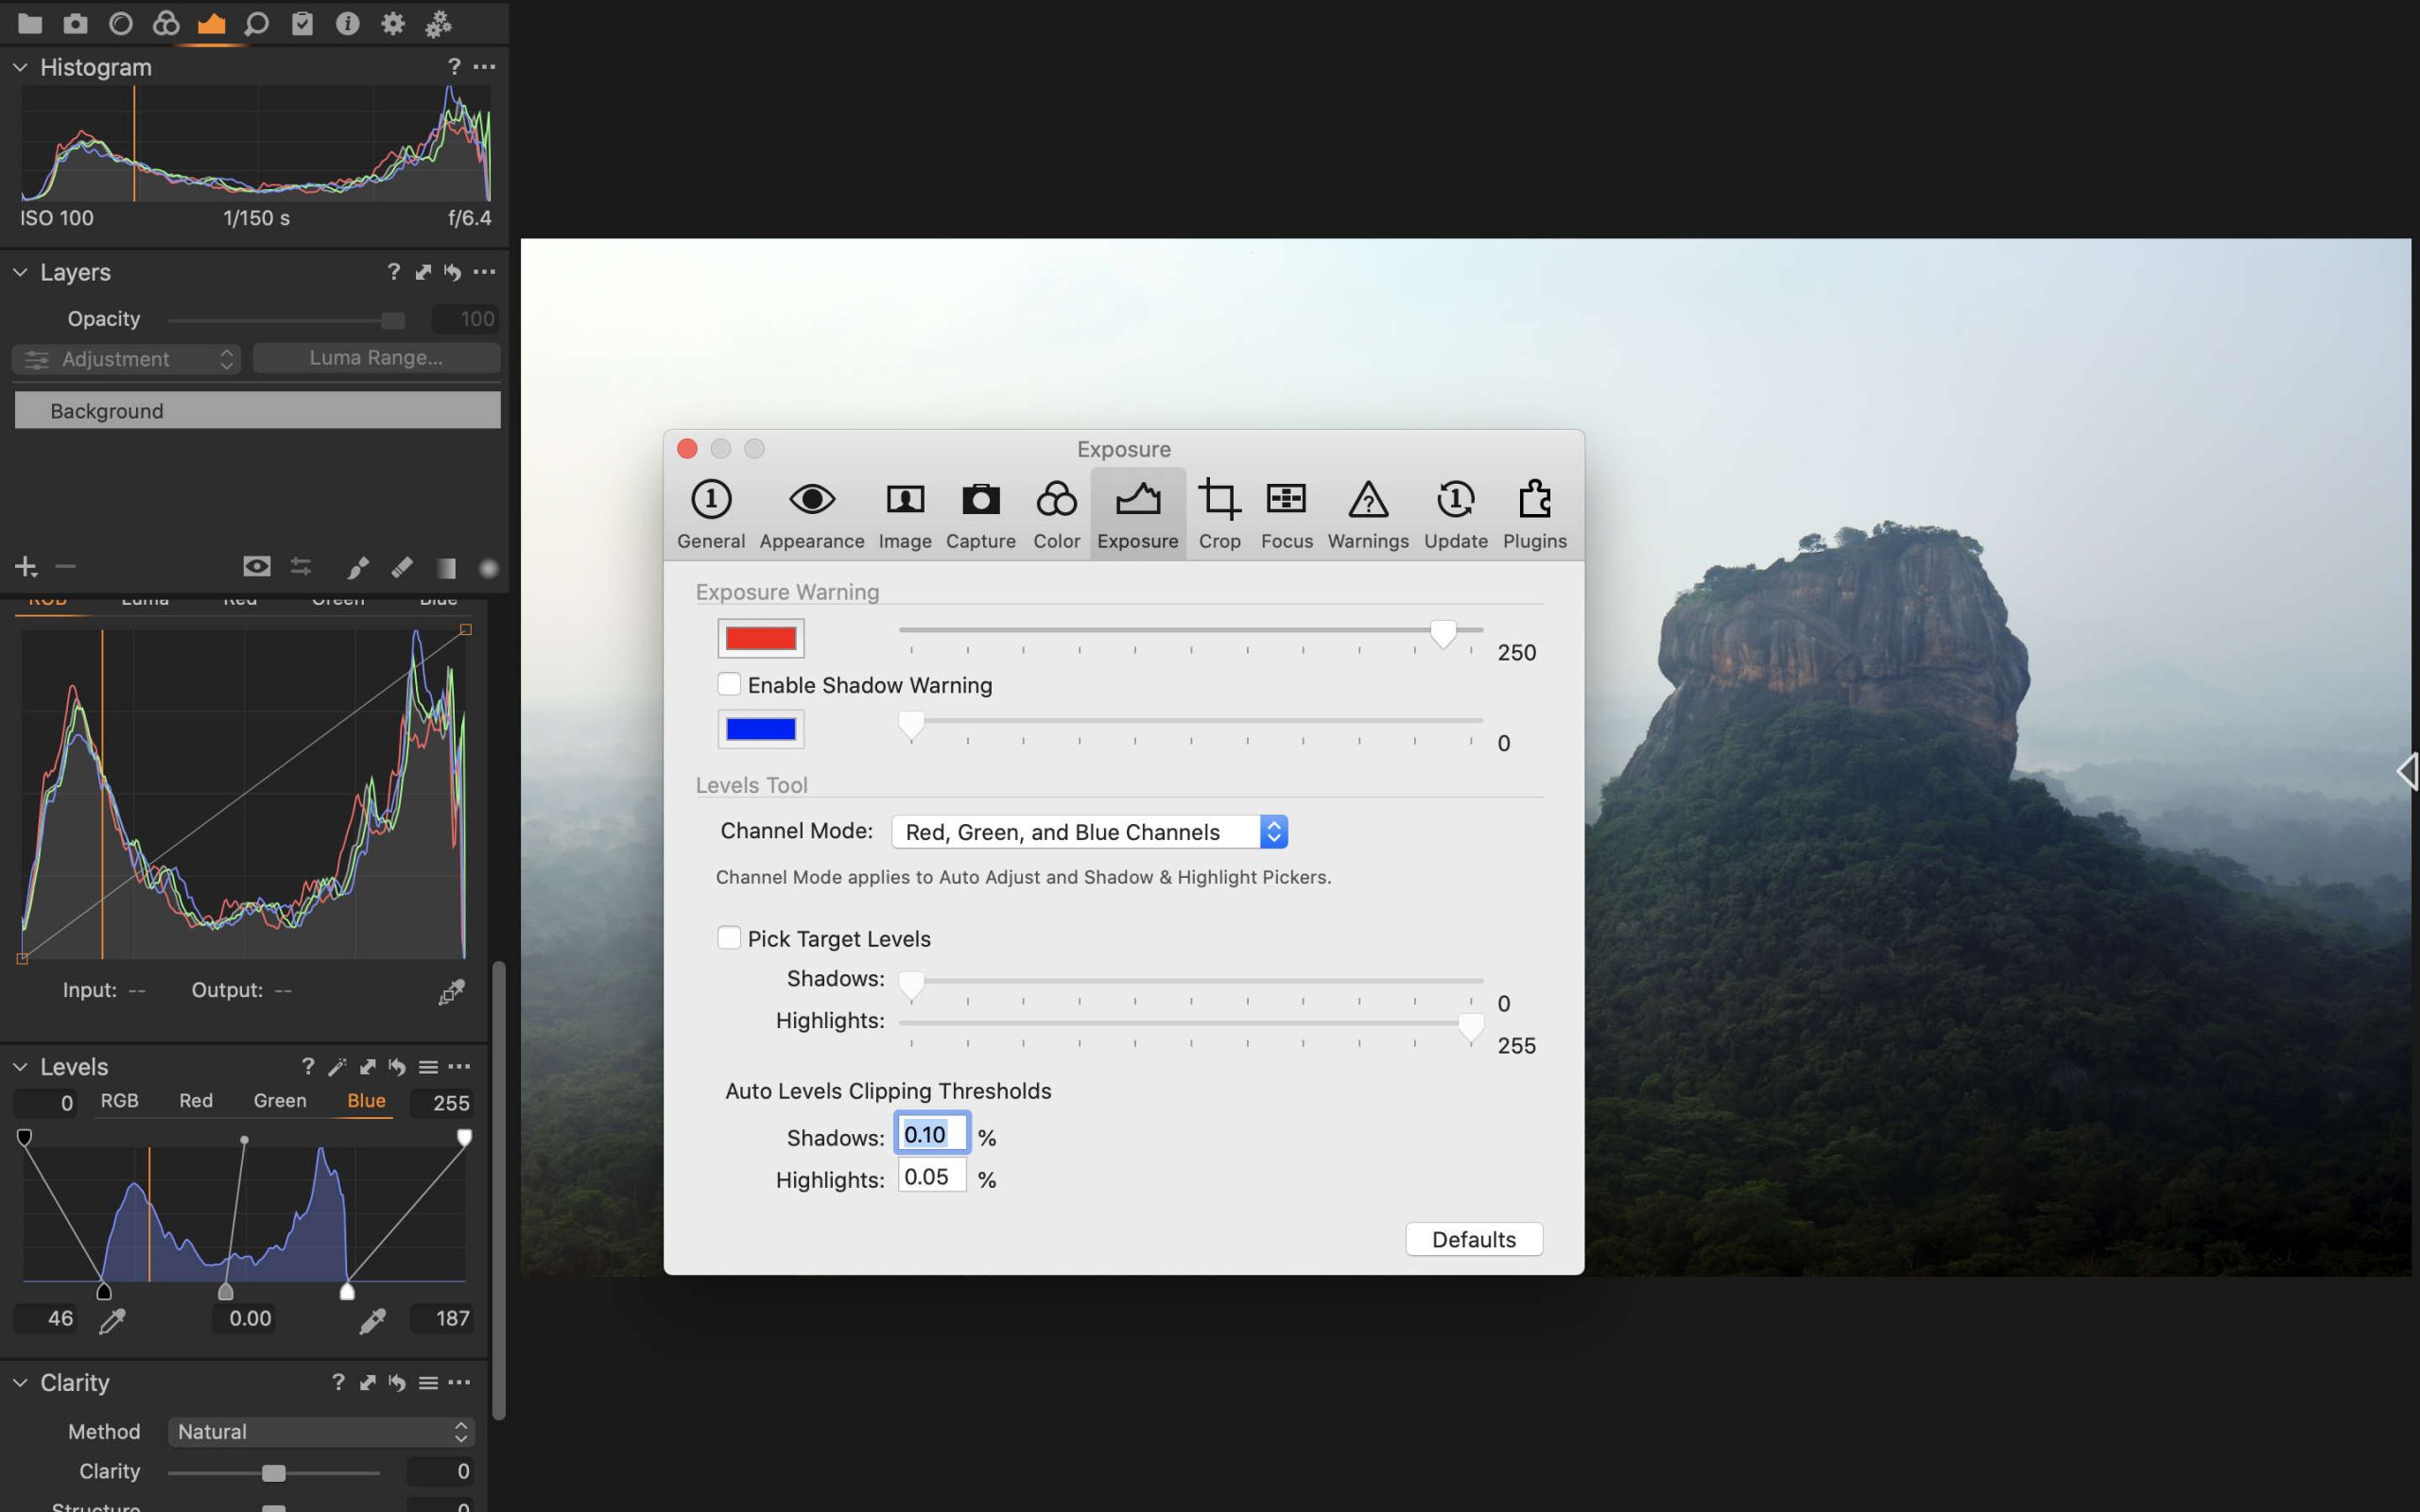
White balance is a creative choice so feel free to try different values until you get the image the way you want it. However, if you want to remove colour casts and go to a neutral point, you can use the R, G, and B channels in the Levels tool and Auto Adjust (click on the icon that looks like a magic wand) each of the red, green and blue channels. This can also be automated by going into Capture One > Preferences > Exposure > Levels Tool > Channel Mode > Red, Green and Blue Channels; when doing it this way, a global Auto Adjust will also correct for colour cast.
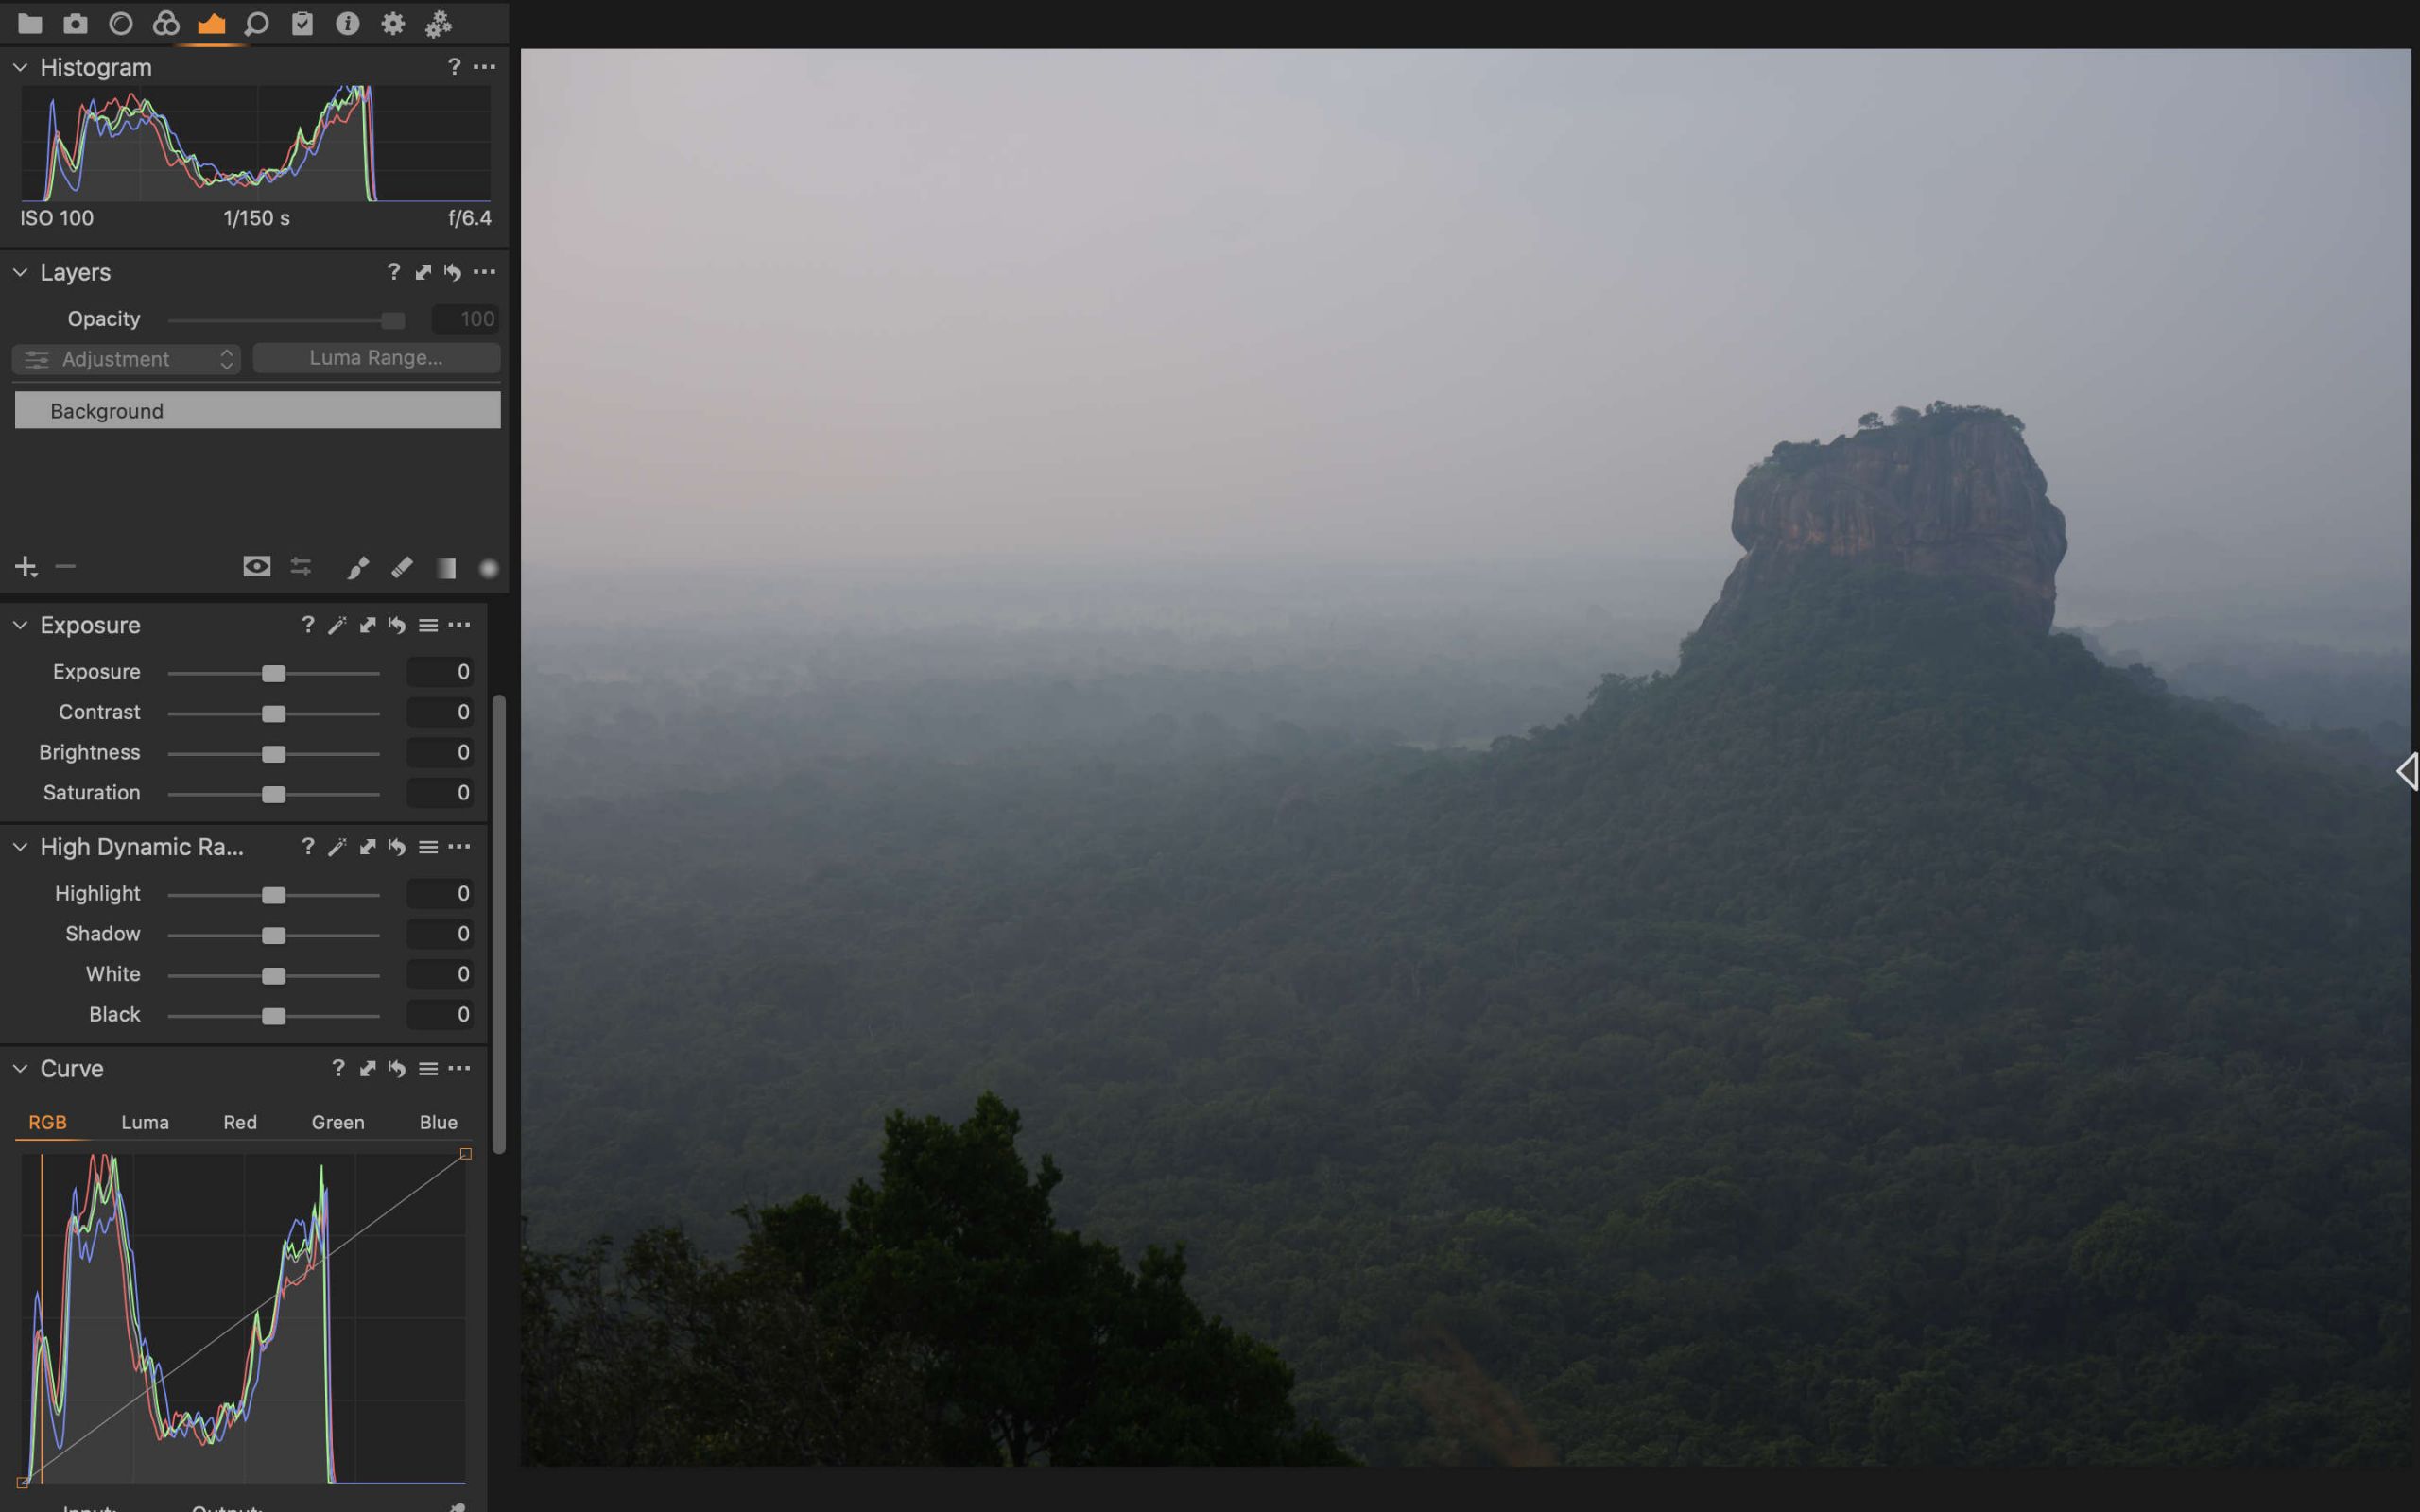
Step 3: Correct Exposure and Black/White Points
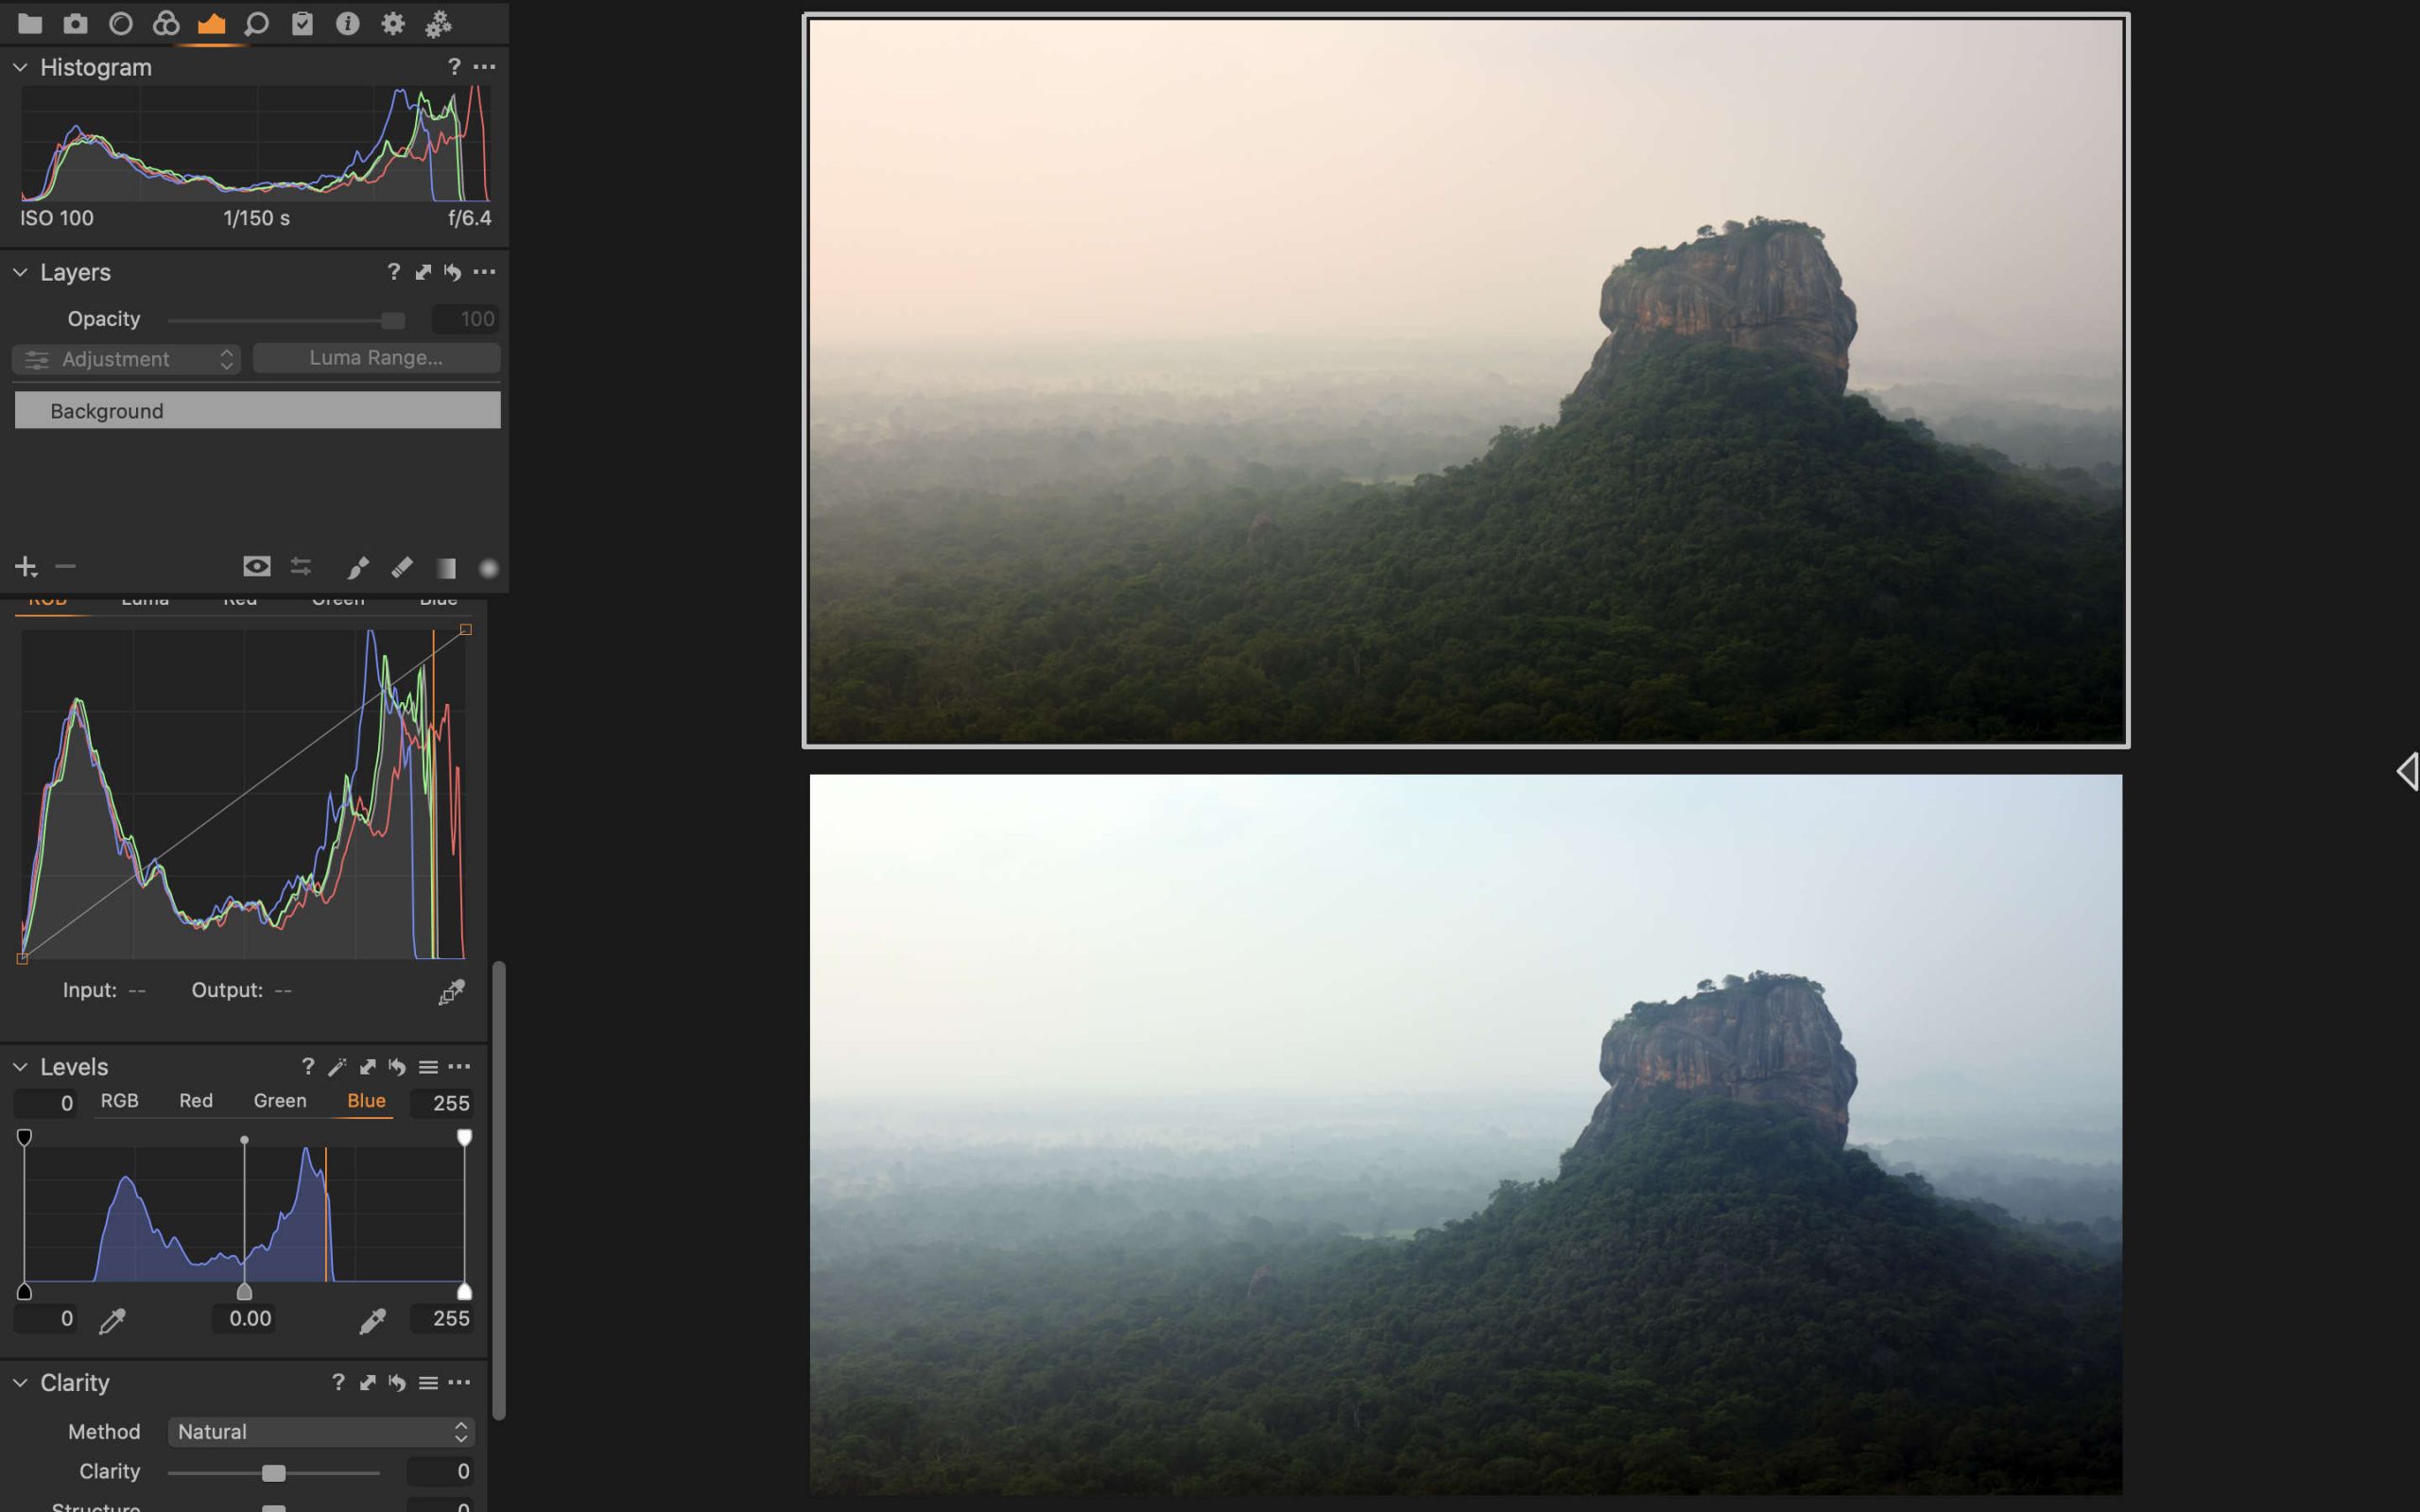
As I shared in the simple workflow, I usually start with an auto adjustment to get the image to have good brightness and proper black and white points to maximizes dynamic range. In Capture One, this is achieved by Command-L or by Adjustments > Auto Adjust from the menu. We will have to make adjustments to exposure and black/white points again later, but for now, we have a good starting point.
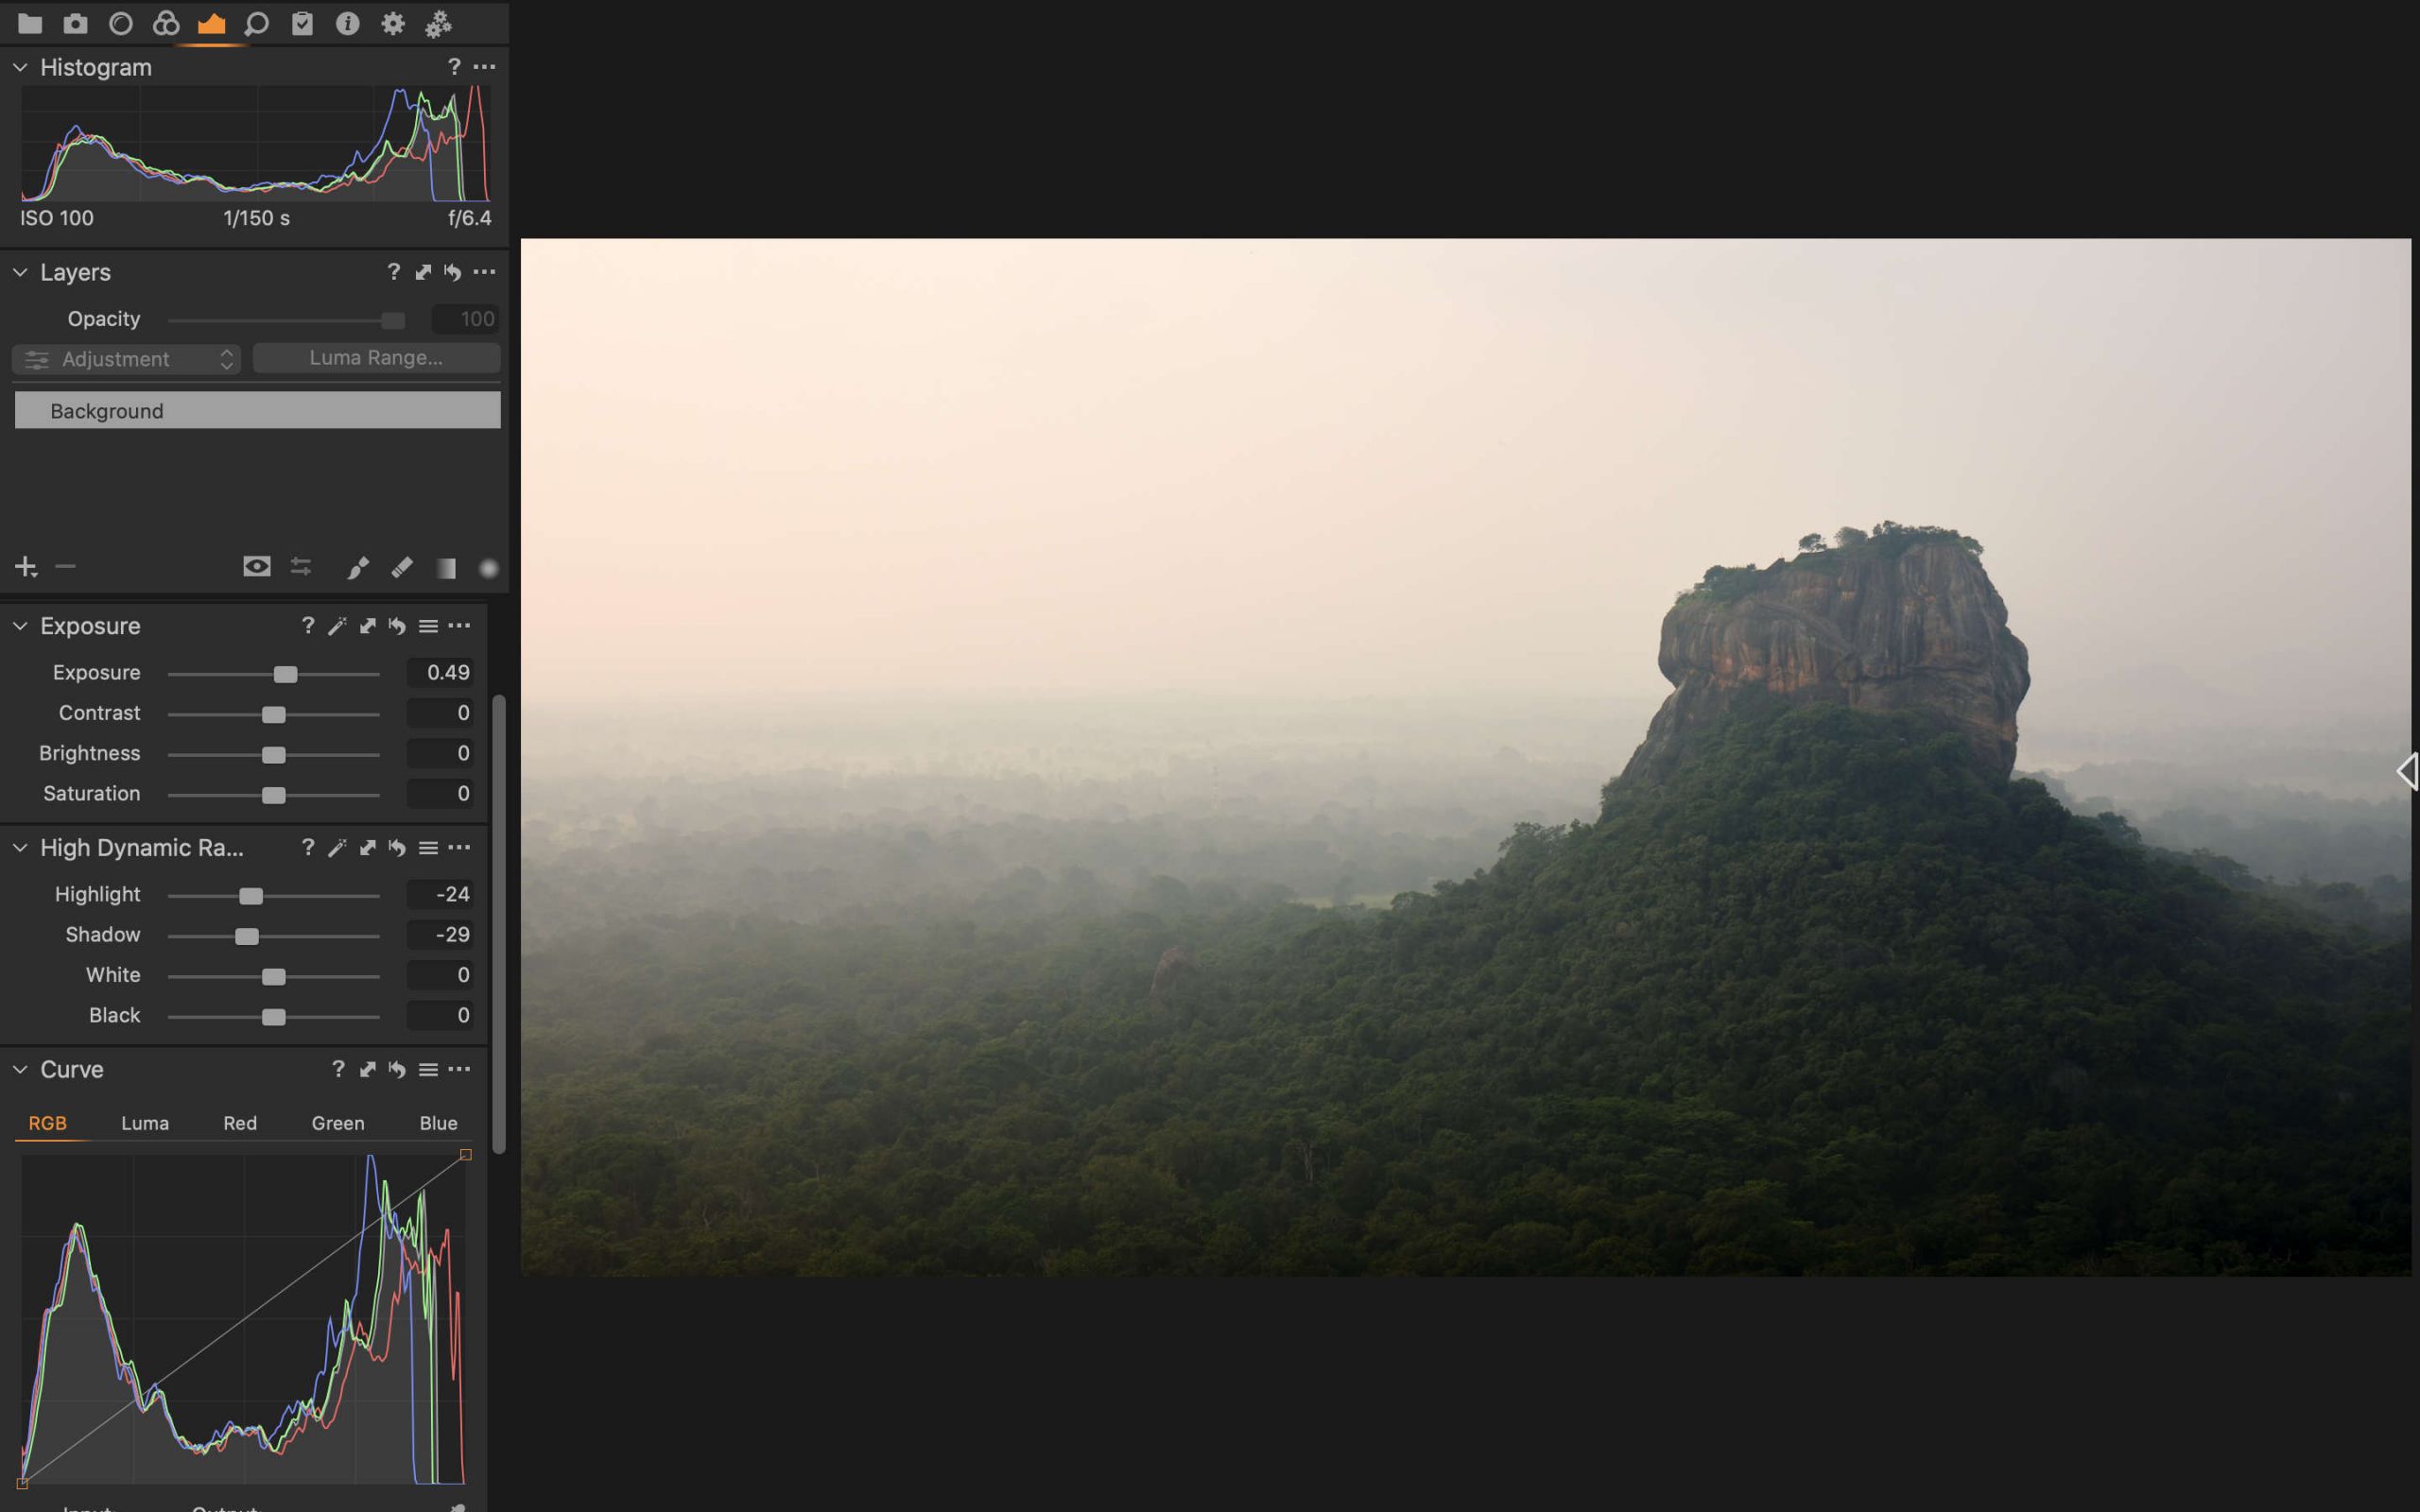
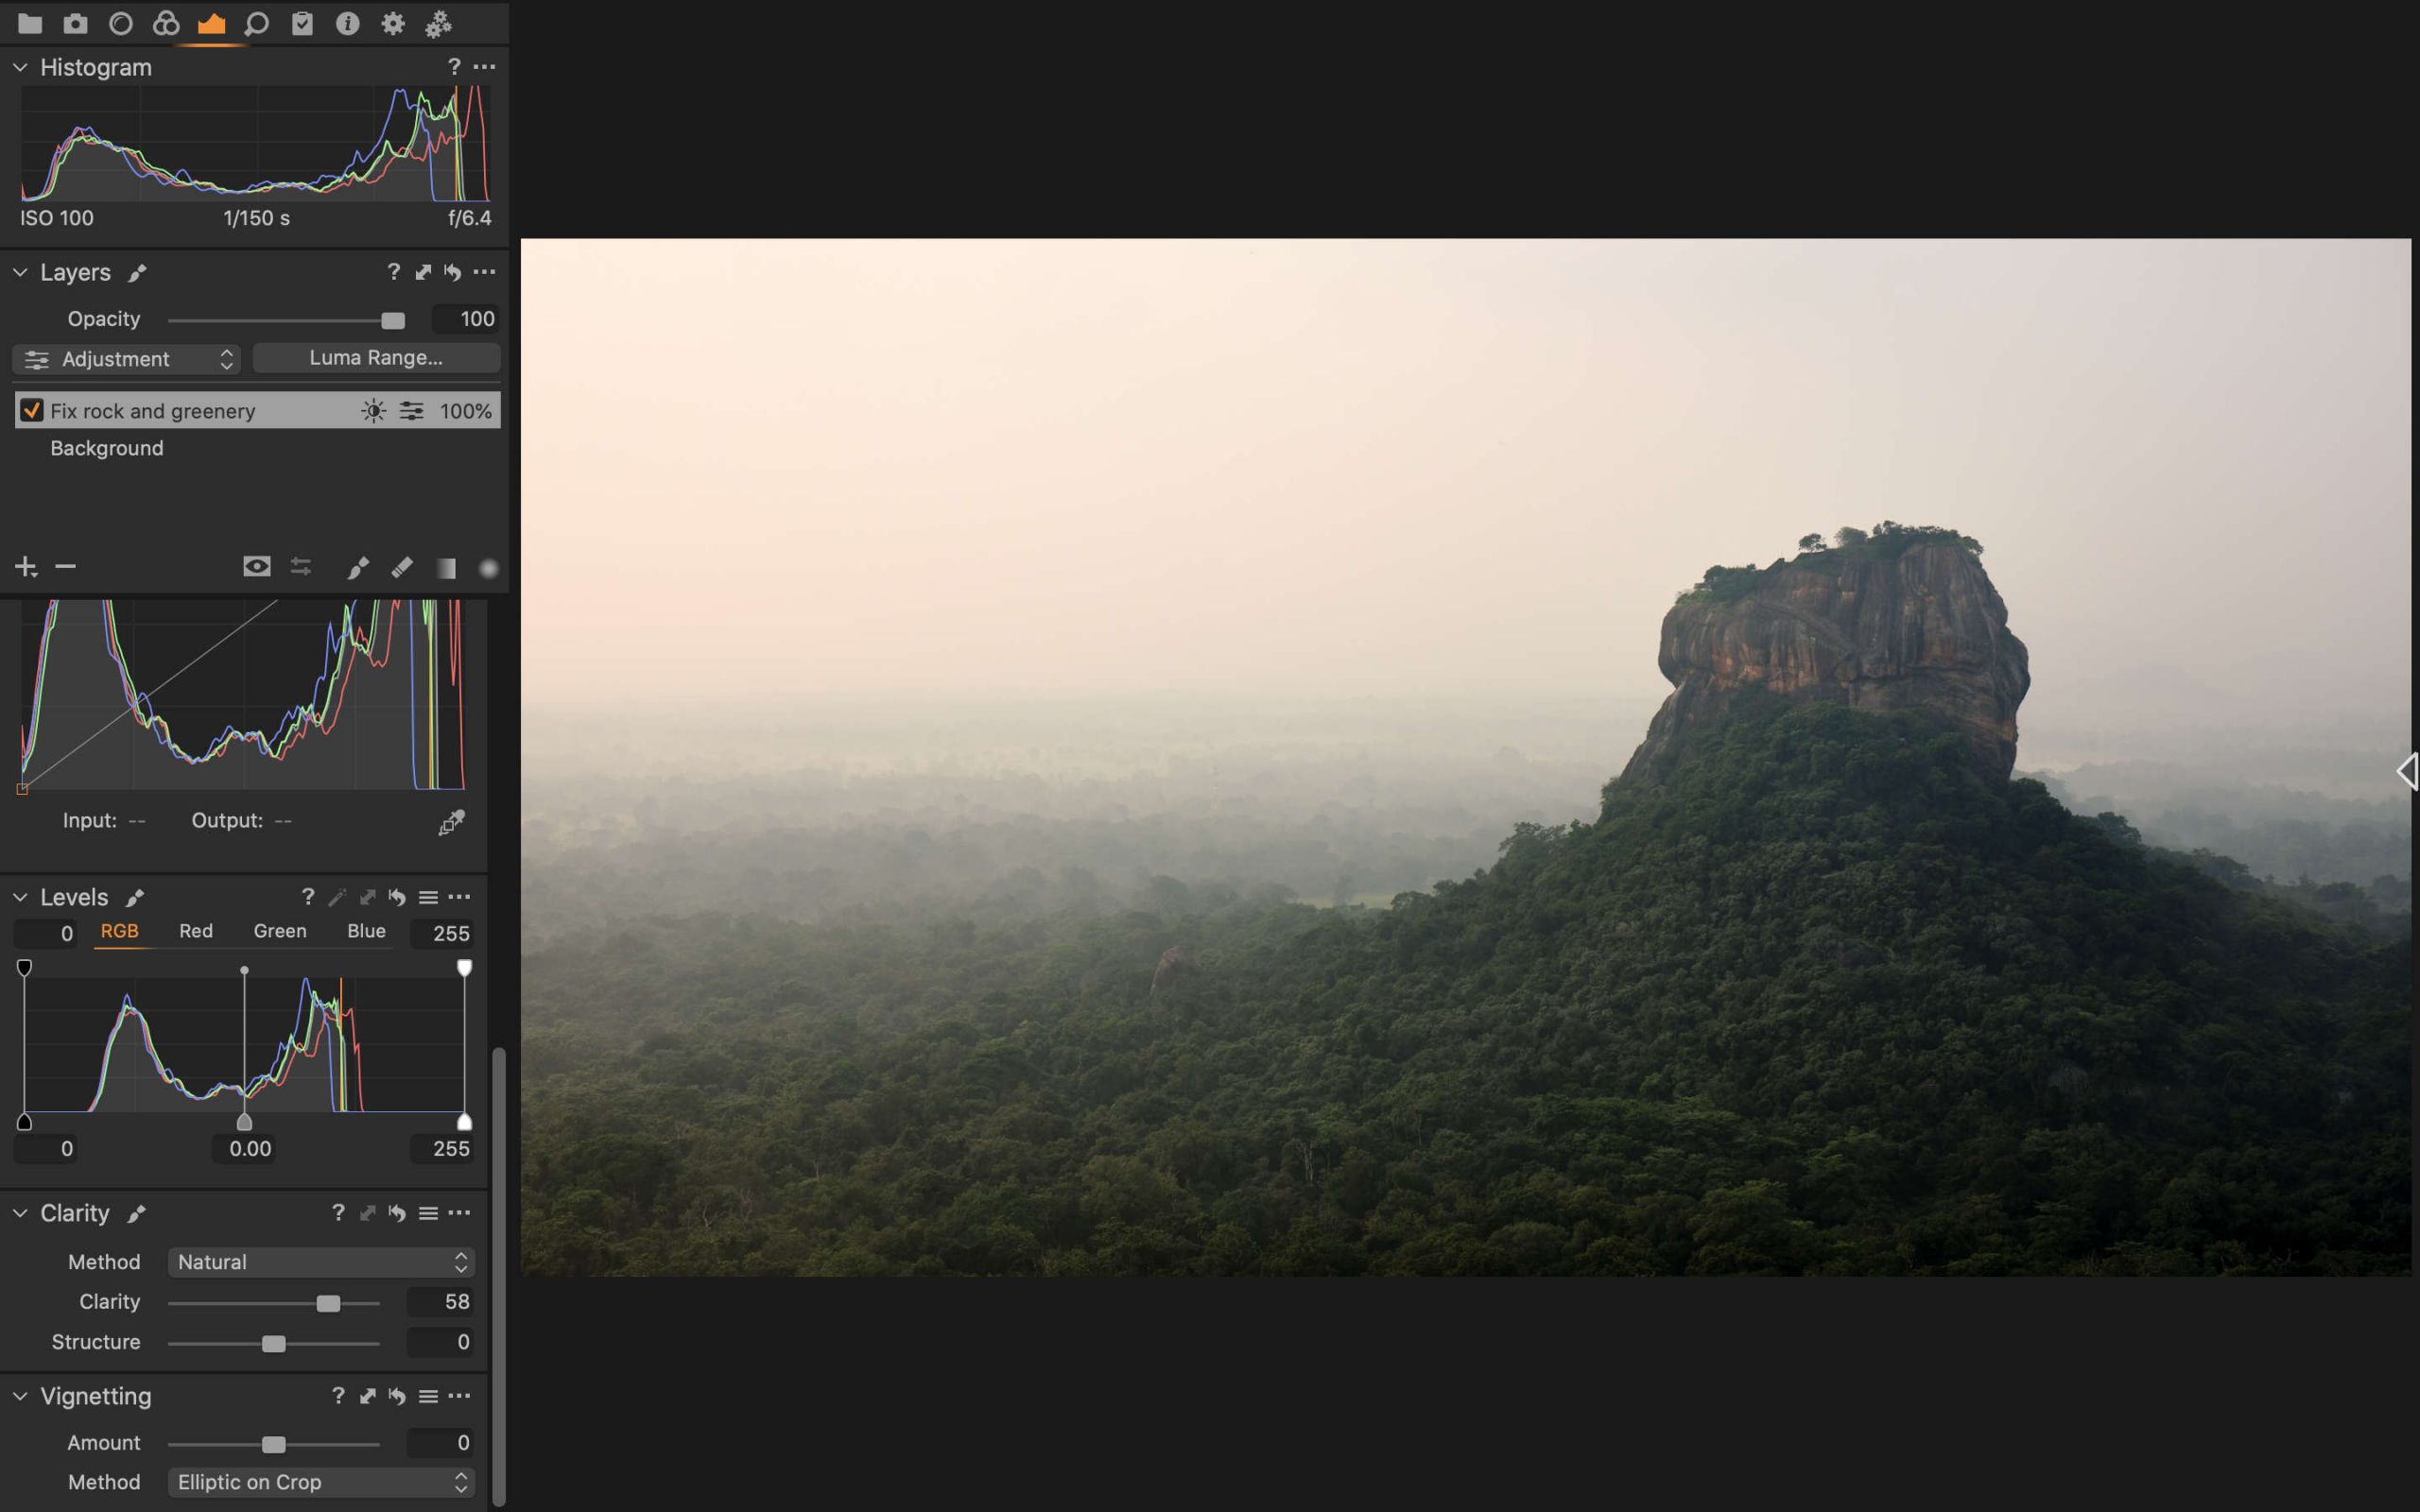
Step 4: Reduce Haze
In this particular image, there’s a very high level of haze which distracts from the image. While some haze can look good and should be left given the reality of the situation, having the rock covered in haze doesn’t depict the feeling we experienced up on that rock. To fix the haze, there are a number of approaches that can achieve the same result. I decided to use a luminosity mask since I wanted to impact the darker areas which make up the foreground of this image. Using a luminosity mask makes it easy to mask the rock without having to put in much effort, while leaving the background untouched.
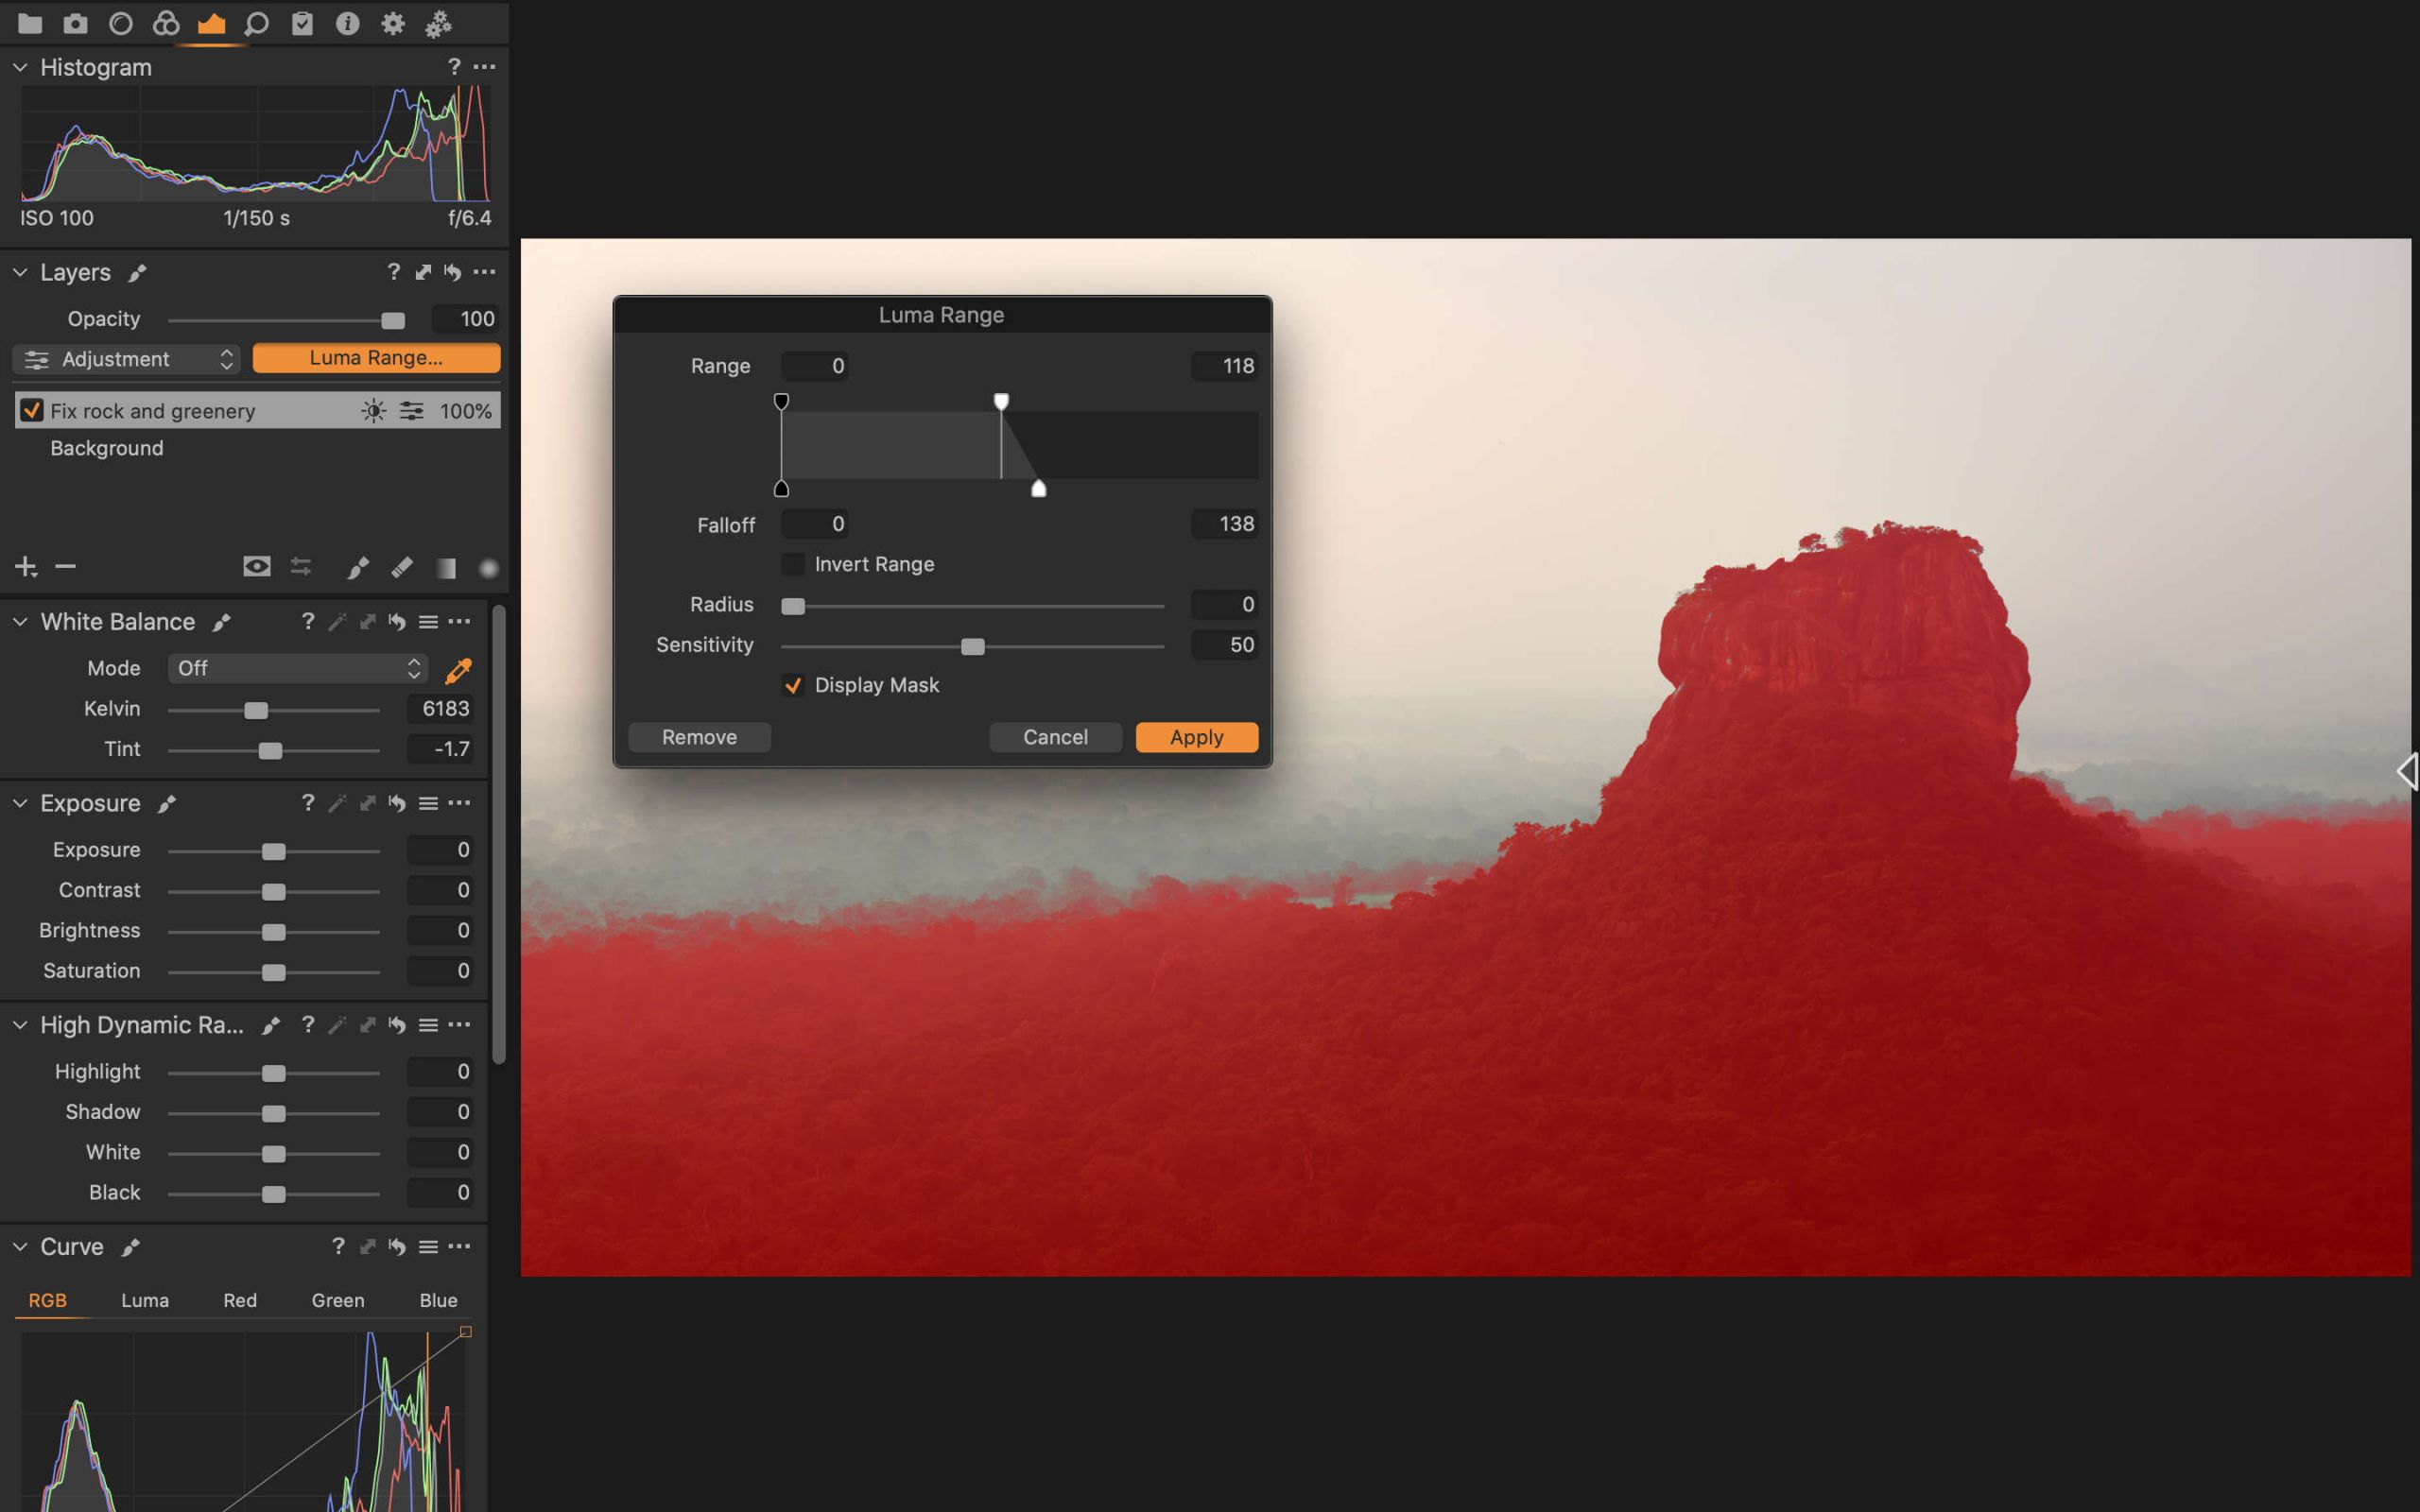
To setup a luminosity mask, it’s somewhat unintuitive in Capture One. First, you need to create a New Filled Layer in the Layers tool. Then setup the Luma Range. Because I wanted to make changes to the darker areas of the image, I moved the selection to the left with a ramp on the highlight side to soften the transition. It helps to turn on the Display Mask when moving the Range around to see what’s being masked.
With the mask in place, it’s now time to make adjustments to Clarity, Contrast, Saturation and if necessary, Levels. I usually start with Clarity since it impacts contrast in the mid-tones which gives a more subtle change to the image than Contrast does. In this case, I dialled in quite a bit of Clarity at ~60. Even with this amount of Clarity added, it still wasn’t enough to vanquish the haze, so I turned to the more aggressive Contrast tool. Because the Contrast tool impacts the entire histogram, I tend to be more careful on how much I use. For this image, I set it at ~15.
With Clarity and Contrast increased, the image appears a bit too dark, and still too hazy. The next step is an interplay between a number of parameters and need to be adjusted to compliment each other. To reduce the haze further, I like to use the Levels tool on the masked area to adjust the black point up (the black and white points are adjusted by moving the handles on the left and right most lines in the Levels tool).
This will make the masked area darker, so I start by increasing the Exposure and Shadow first, and then adjust the black point, but you can do it the other way around if you prefer. To reduce the chance of halos appearing, I prefer to make exposure and shadow adjustments on the full image rather than the masked area.
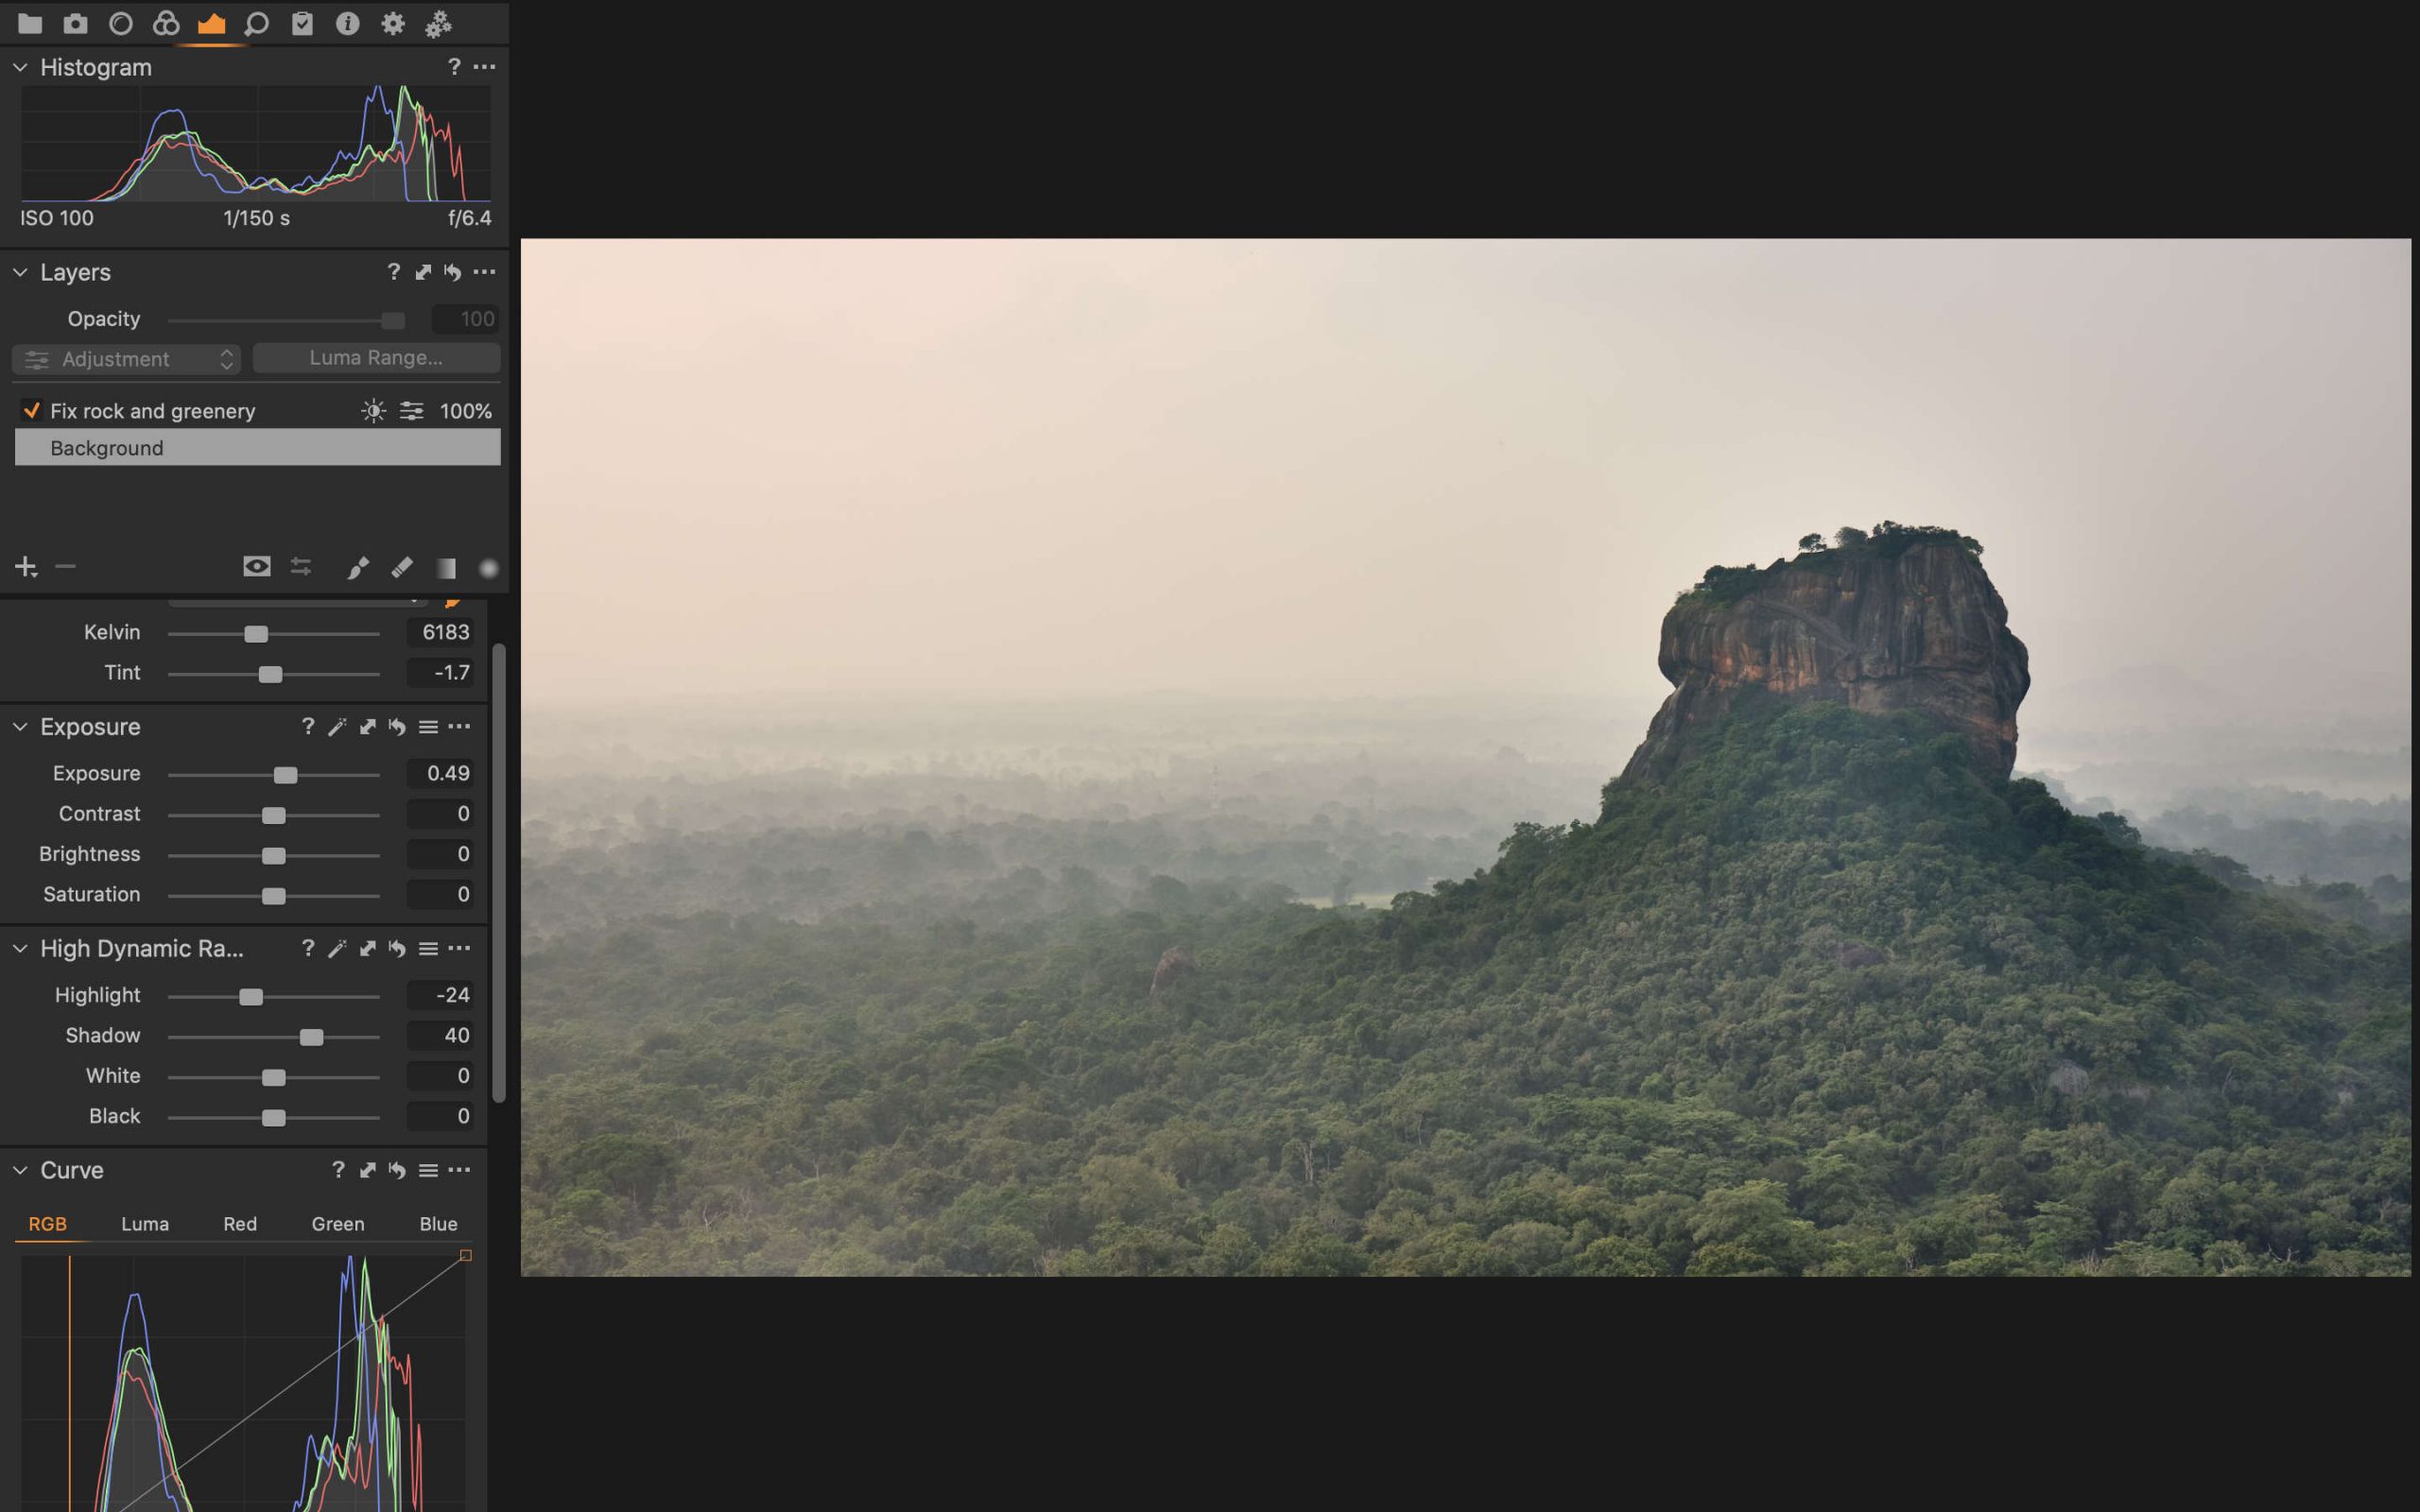
I started with boosting Shadows since the foreground is mostly made up of mid-tones and shadow-tones. I took it up to ~40 which is a bit too bright, but that was intentional because it’ll darken when we go back into the mask and use the levels tool to bring the black point higher in the next step. If the highlights were also a bit dark, I would have used Exposure to bring them up, but in this image, the highlights are fine, so I then turned to the Levels tool with the mask selected.
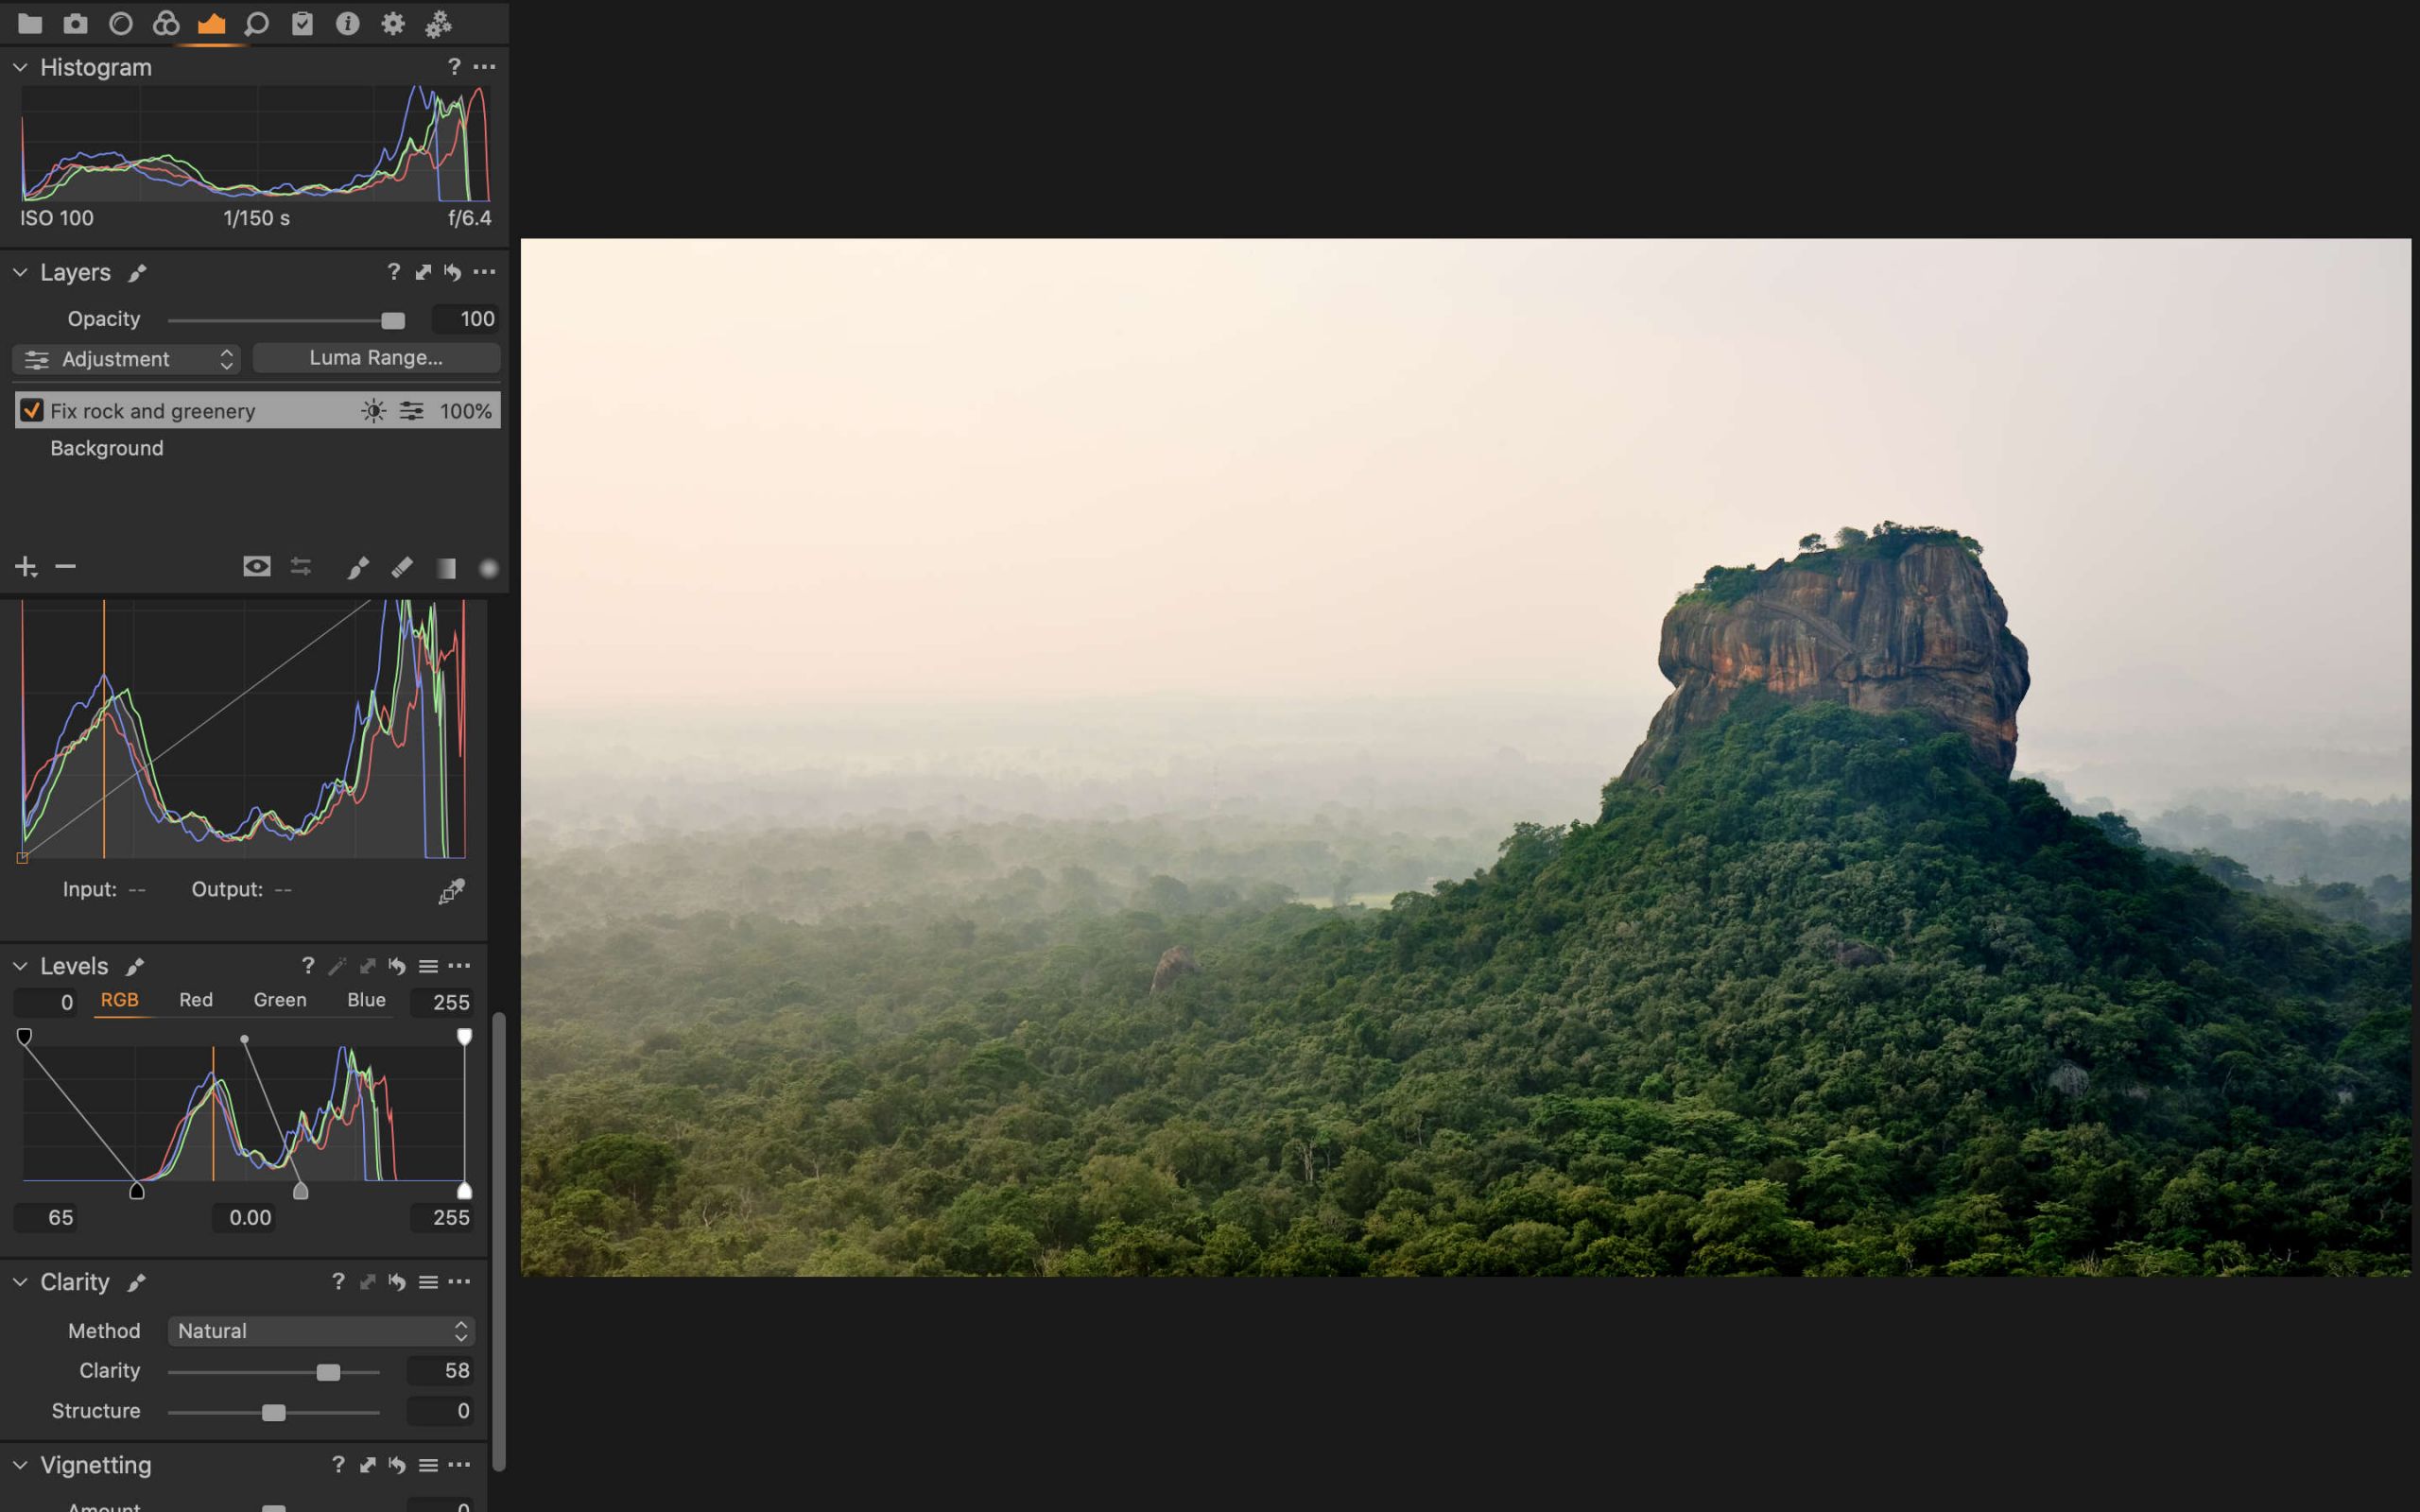
In the Levels tool, with the mask selected, which covers the rock and the foreground greenery, I moved the black point up to the point where it touches the histogram. This pretty much eliminated the really intense haze while still looking realistic. However, the image darkened a bit too much so I went back to the global image settings and bumped the Exposure up to 0.95. The slight increase in exposure should be matched with an appropriate adjustment in the black point in the Levels tool to make the black point match up to the base of the histogram.
Step 5: Finalizing Image
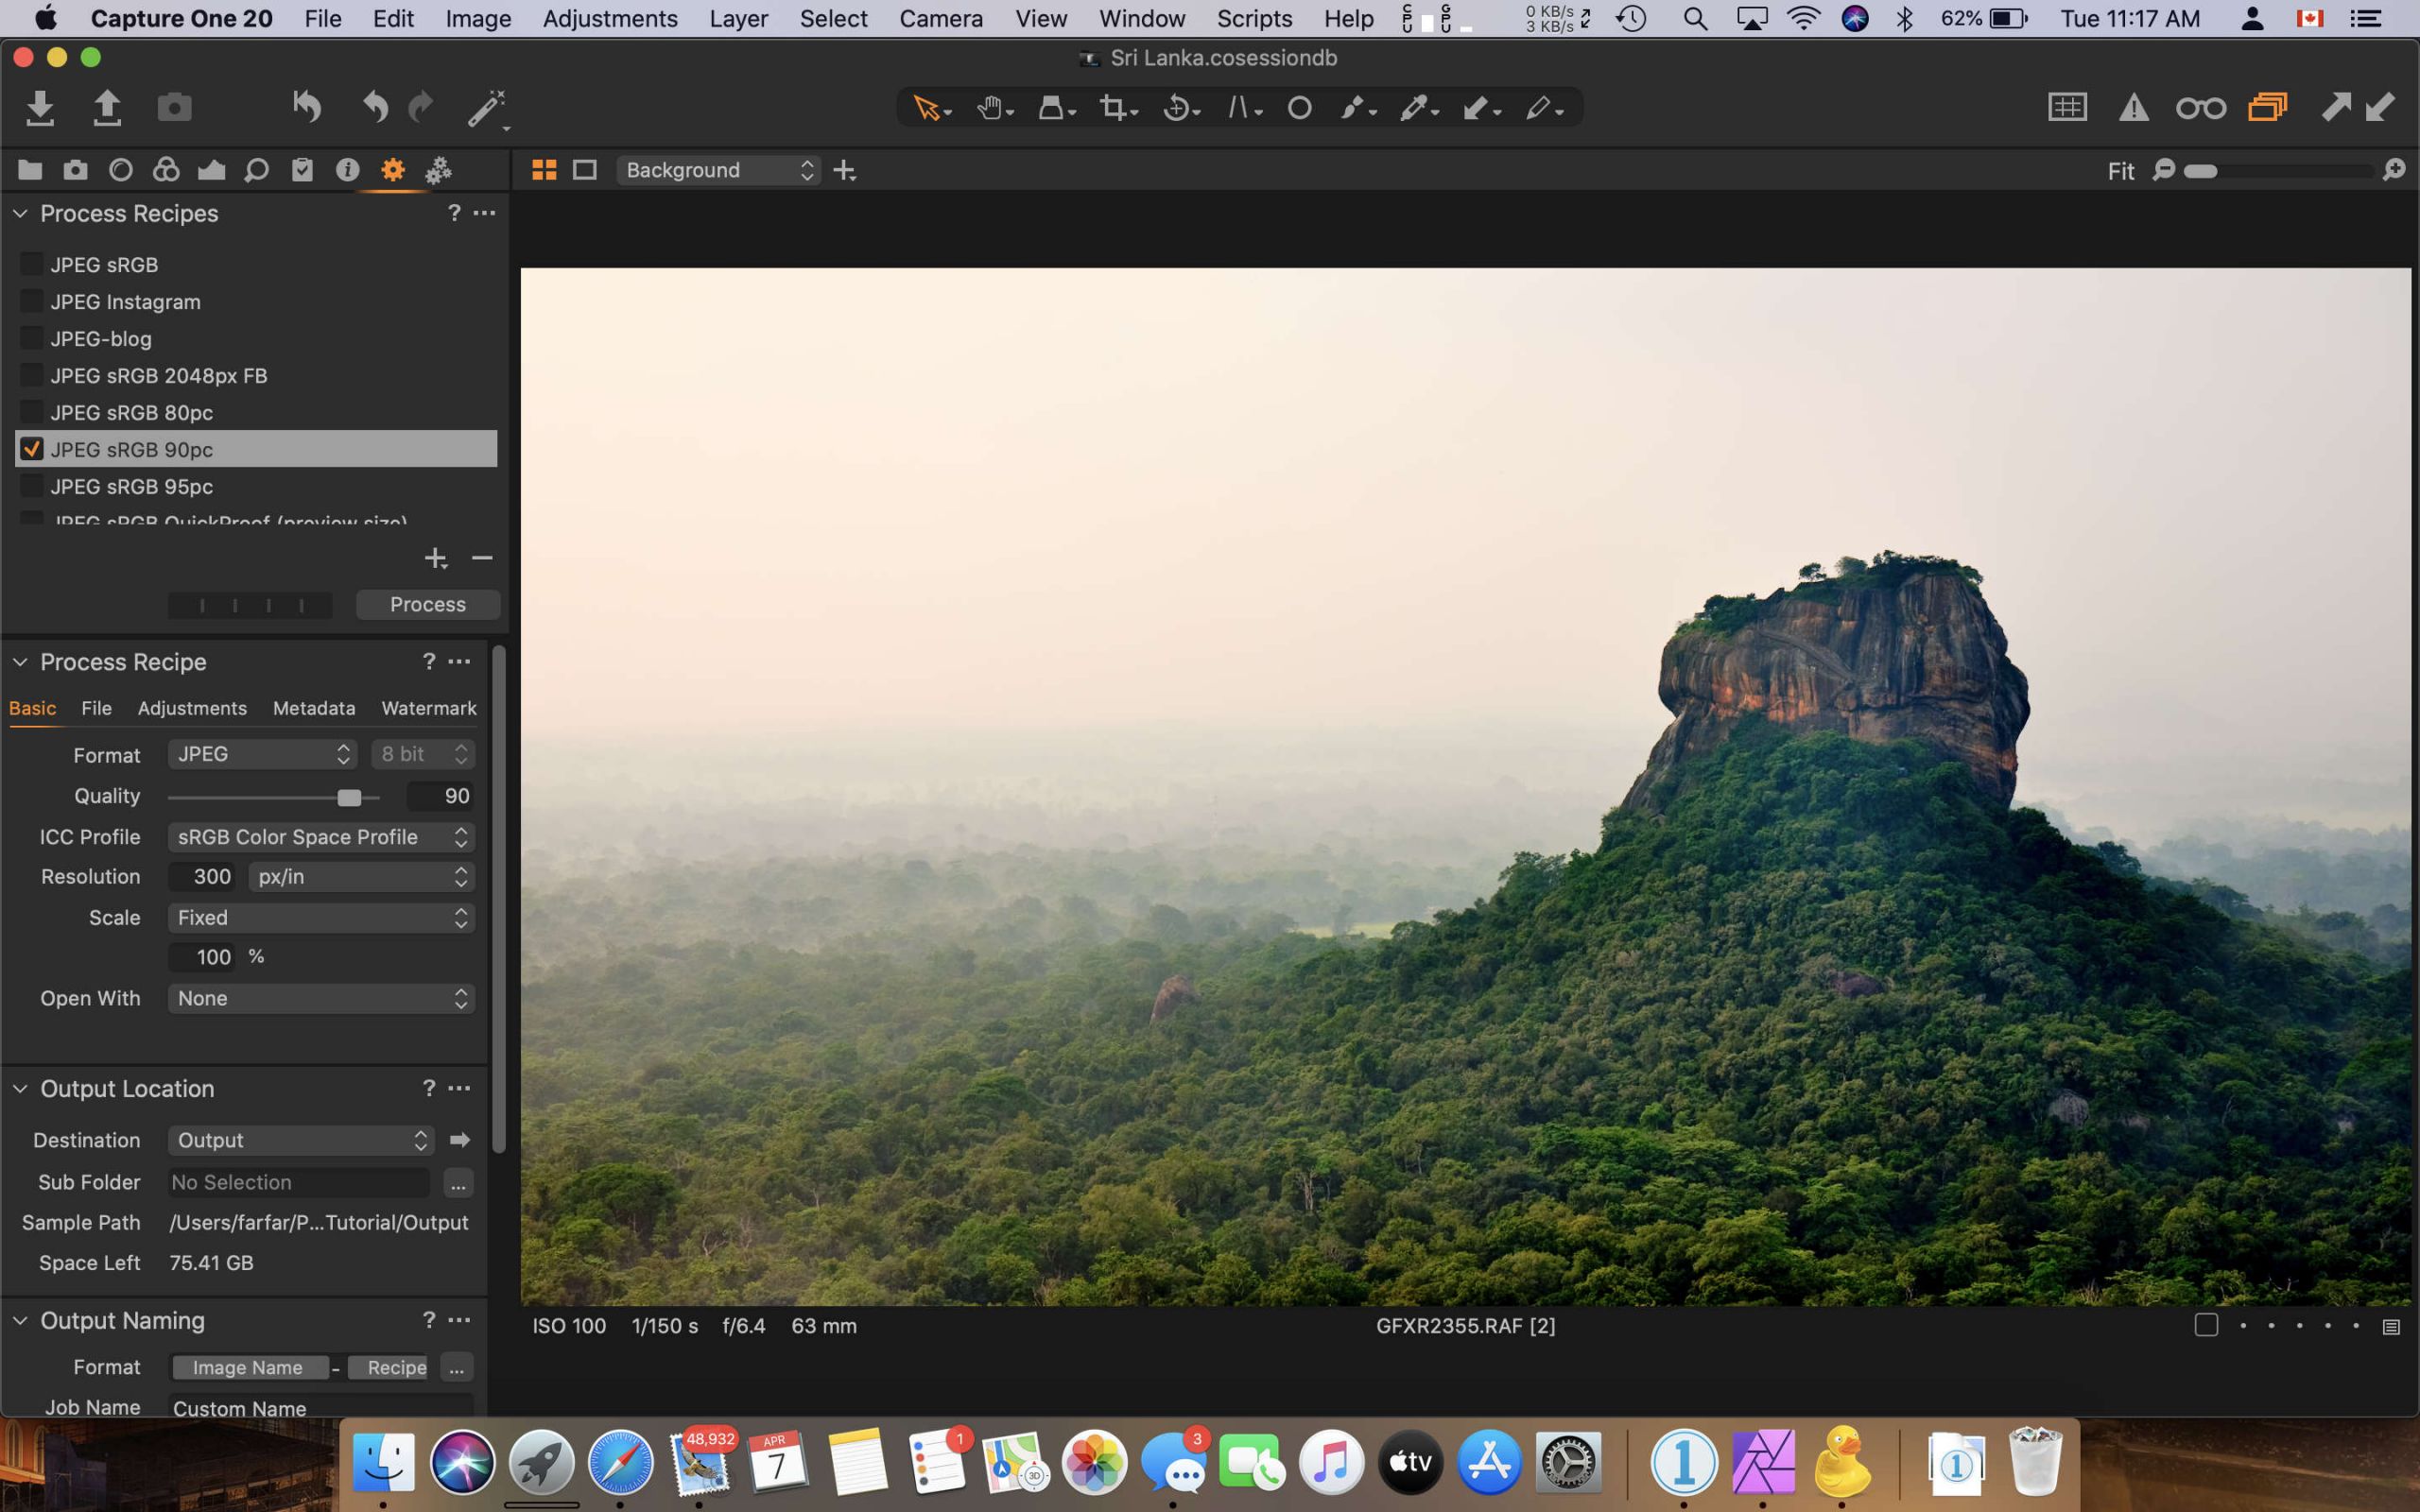
Depending on where you want to use the image, you may want to make a few more adjustments. If you’re sharing on social media such as Facebook, Instagram or WeChat, I recommend boosting the Saturation a bit and perhaps changing the Clarity method to “Punch” to give the image a bit more pop, for lack of a better word. The more extreme you go, the more likely you’ll get cheap “likes”, but please don’t fall into that trap, and try to stick with something that looks natural; five years down the road, you’ll be happy that you went subtle on Saturation. For this image, I did boost the Saturation on the masked part by 25 and changed the Clarity method to “Punch” to make the rock stand out more.
Conclusion
Using Capture One, it only took five steps to transform that hazy and flat image into something that I’ve printed and hung on my wall, and have received positive feedback on. Considering I thought it was a throwaway image based on how it looked on the back of the camera at 6AM, I’m pleased that it was salvageable. Sometimes an image doesn’t come out how you expect, but in situations like this, it’s always worth trying to rescue an image so that a memory can last a lifetime; I can now always look at the wall and remember waking up early in the morning, climbing up a pitch black mountain, with a cute dog guiding us along the way, and the beautiful serenity of seeing Sigiriya at sunrise.
Never miss a post again, please subscribe to our no-spam mailing list
I hope that you’ve found the above post useful and that it helps in rescuing some of your more challenging images. If you’ve found this post helpful, please consider subscribing to future posts, or leaving a comment below. If you decide to download the RAW file, I’d love to see what your version looks like.
Capture One’s Live Edit
Subsequent to this post being made, I was contacted by Capture One to feature this image on their wonderful and useful Quick Live: Editing series. I of course obliged especially considering how much I’ve learned from their YouTube videos. Below you’ll find the live edit, presented by David Glover from the Capture One team; I highly recommend you watch it because he covers some improvements from the workflow that I presented above.
Raw Source Files
- Fujifilm GFX 50R Raw file: 46.2MB RAF
- Full-size JPEG of the original image: 5.9MB JPEG
- Full-size JPEG of the rescued image: 10.5MB JPEG
- Capture One Pro 20 EIP file with RAW file and adjustments: 158.8MB EIP
Discover more from fcracer - Travel & Photography
Subscribe to get the latest posts sent to your email.
Hi Robert, great tutorial!
Can you maybe share some explanation on your output recipes: which settings do you use for various online and printing formats?
As well I was wondering, what this demosaicing algorithm is? Is this particularly for Fuji cameras?
I happen to have a Fuji X-T2 and therefore bought the Fuji version of C1. Since I need to convert several older Nikon Raw files (I know, I could simply upgrade to the Pro version of C1, but for none-pro’s I find the double price for just one additional Raw file format a bit steep) I was wondering what the best possible transfer format would be? DNG or TIFF? Is there pro‘s and con‘s to consider?
Cheers Frank
Hi Frank. I wasn’t sure if your note is intended for me (author of the article) or for Robert, who is a reader that commented below. If it’s intended for me, I will try my best to answer your questions.
For output process recipes, I usually start with one of the baseline ones provided in the software and then tweak from there. For example, I just made a 40″ x 30″ print under acrylic and used the “TIFF – A3 Print (300dpi)” recipe as a baseline. Starting with the default parameters, I modified the dimensions to 40″ x 30″ and also dialled down the output sharpening because the GFX50R images are already too sharp straight from the camera thanks to the micro-lens design that Fujifilm uses on this camera.
The above is a good starting point for print. For online use, there are again several recipes included in the software which work well. “JPEG – 2048px for web use” is great for Facebook, Instagram and general web use. It’s important for web use to downsize the images, even if the platform does it automatically for you. For example, if you take an 8000px wide image and upload it to Facebook, it will reduce the size automatically, however it will not sharpen it for that size. If you use Capture One to resize it instead, it will use all the raw data to resample it to 2048px and apply output sharpening so that it looks great on that platform.
Before committing to any of the Process Recipes, I recommend visiting the platform website to see what the latest recommendations are for image pixel size and file size. By getting as close as possible to the platform’s recommendation, you avoid any platform-side image changes, which enables you to stay in control of how the final image will look.
In regards to your other questions on the demoniac algorithms and Nikon files, I’d recommend you reach out to Phase One directly and ask for their thoughts. Hope the above was helpful.
Super
Thank you Robert!
What an interesting step by step article. (By the way, I have been to the top of Sigiriya, so it was extra fun for me). I have been loving my C1Pro for a couple of years along with my Fuji cameras (at the moment waiting in the UK for an ordered X-T4 and 16-55mm f/2.8). I immediately put your Luma range dehaze method to practical after watching the C1 video, and was very happy with the result, although I will need to practise more, for which your detailed discussion of the considerations at each step will be very useful. Thank you.
Hi Dave, thanks so much for you note, I appreciate it. I’ve also ordered an X-T4 and am looking forward to seeing how the IBIS works. I’ve never owned a camera with IBIS before so this will be a new experience. I’m hoping to use the camera for 4k video footage of my dog and my travels. When you get yours, please let me know what you think of it. In the interim, please stay safe and healthy in these challenging times.
Hey,
i would like to edit the sample image, but since i use the Sony Pro Version and it is a Fuji File i can’t. Any solution for that problem?
Thanks in advance.
Kay
Hi Kay, there are perhaps two approaches that might work, but I’m not sure since I can’t easily test them here, given that I already have Capture One Pro installed.
One approach would be to use Adobe DNG Converter available from https://helpx.adobe.com/hk_en/photoshop/using/adobe-dng-converter.html to convert the RAF file to DNG. You lose C1’s excellent demosaicing algorithm, but perhaps the file will at least open.
The second approach would be to try and load a TIFF file version of the file. I’ve uploaded a 253MB version of the file at http://fcracer.com/wp-content/uploads/GFXR2355_Rescue/GFXR2355.tif (please right-click download so you can see the progress of this huge file).
Hope the above helps and have fun editing the pic!
Thanks. Just onverting to DNG doestn work. But i will try to edit the EXIF of the RAF to Sony and see if this works.
Great Post! Proud to be a Dane, since Capture One originates in Denmark – ha.ha!
I tried to do it almost identical to your way, but balanced it off with a gradient filter from the top left corner. Adjusted this layer by turning down the highlights and turning up the warmth by using the white balance.
GFXR2355.jpg
Hi Stig, I’d love to see the image you created. For some reason, it’s not showing up. If you can, please email it to me at web at fcracer.com and I’ll attach it to your comment.