In this post, I’ll share my trials and tribulations in trying to improve my Wi-Fi in support of a photography post-processing workflow.
When coming back home from a travelling adventure or a photoshoot, the priority is to get the RAW images off the memory cards and temporary storage and into permanent storage, whether it be a local NAS, cloud storage or other mechanism. Given the size of RAW files from modern cameras, this becomes a chore if the network is poorly setup.
My GFX100S II’s RAW files come in at ~100 megabytes (MB) each. A typical trip to a new destination will net 1,000+ captures totaling 100+ gigabytes (GB). If there’s action shots involved, or a sequence of images taken during a long duration such as sunrise or sunset, one scene alone can have 100 images or 10 GB of RAW files. Getting 100-200 GB of RAW images off the laptop or iPad onto the NAS can be painful over a typical Wi-Fi connection.

Let’s do some math. Based off years of experience providing “technical support” to friends and family with their home networks, I’ve found most homes have Wi-Fi speeds that approach 200 megabits per second (Mbps), often with dead zones that either lose Wi-Fi or drop speeds to less than 10 Mbps. If we want to move 200 GB of RAW files across a network capped at 200 Mbps, we will need 2 hours (h) and 13 minutes (min) to move those files!
In comparison, if we have a well-tuned Wi-Fi network, we can achieve speeds of 600-1,200 Mbps with Wi-Fi 6 clients (most of what we have today is compatible with this standard). The time it would take to move these files drops to 44 min and 22 min for 600 Mbps and 1,200 Mbps respectively. If we have a wired Ethernet connection, which I always recommend, the times drop to 11 min and 3 min for a 2.5 gigabit per second (Gbps) and 10 Gbps connection respectively.
“Going from 2 h 13 min of waiting down to 44 min using your existing equipment is very likely possible.”
Going from 2 h 13 min of waiting down to 44 min using your existing equipment is very likely possible. Taking it a step further and implementing a high speed wired connection can drop that time down to 3 min. From more than two hours down to three minutes! In this post, I’ll share with you the trials and tribulations of trying to upgrade my own home network that I use primarily for video streaming, photo post processing, and general internet use.
Disclaimer: All products used in this post were purchased at full retail. No vendor provided products for free or at a discount and no vendor has had any say in the content of this post.
Context
My current home internet performs at a high level of performance. I’ve been using products from Ubiquiti Networks’ home networking lineup, AmpliFi for more than a decade. I first started with the AmpliFi HD and then moved to the AmpliFi Alien a few years back. These little beasts have been very reliable with rock-solid Wi-Fi and very good performance. I’m able to regularly get speeds of 500-700 Mbps from my MacBook Air M2 to the Synology DS1522+ NAS when seated in optimal locations. This speed translates to files moving at 62-87 MB/s or about one RAW file per second.
My apartment has concrete walls which makes Wi-Fi penetration challenging. To resolve this issue, I need to use multiple Access Points (AP) spread throughout the home. I have one in the entrance where the Internet line comes in, one in the Master Bedroom and one in the Den where the Mac Studio Max and Synology DS1522+ NAS are located.

In the current setup, these are automatically connected via Wireless Mesh on 5 GHz by the AmpliFi Alien routers. As noted, speeds in general are very good, but I do have dead spots throughout the apartment including the two washrooms and most annoyingly, the two areas in the Living Room near the windows. I often like to work on the dinner table, but the Wi-Fi is unreliable and slow there.
In the Den, I have the Mac Studio Max and Synology DS1522+ NAS wired to a 10 Gbps TP-Link switch which allows for incredible speeds when moving images around or editing in Capture One Pro. I prefer to do all my editing from the NAS to keep things robust and simple. However, this convenience only exists in the Den as the remainder of the apartment is Wi-Fi only and limited to a maximum of ~700 Mbps.
Problems to solve
When looking to purchase new gear, whether it be camera gear or networking gear, it’s always beneficial to list out the problems we’re trying to solve. This will keep us focused on the right products and not get sucked too deep into buying fun things that don’t help us get closer to our goals. The problems I’m trying to solve include:
- Wi-Fi speeds have been degrading, and I can’t figure out why. A reboot of the AmpliFi Alien system will bring Wi-Fi speeds back up to 700 Mbps, but without any rhyme or reason, it can drop significantly in the same location.
- Several IoT devices in my apartment cannot be reached or work intermittently; the most irritating of all are the two HomePod Minis which seem to always be disconnected from the Internet when I most need them.
- The analytics capabilities in the AmpliFi Alien line are very limited so I can’t determine what the root causes are when there are network or Wi-Fi issues.
- Wi-Fi 7 has now been ratified and I want my network to be ready for new devices I expect to purchase in 2025 including the MacBook Air M4.
- The iPad Pro M4 and iPhone 15 Pro are capable of Wi-Fi speeds greater than 1 Gbps, however my current network is mostly limited to ~1 Gbps.
- I want to be able to move large image files and use Capture One Pro over wireless from anywhere in the apartment; I don’t want to be confined to the Den with a wired connection, where I use a 5 Gbps USB-C dongle for my mobile devices.
- The hardware must support site-to-site VPN with the ability to route specific devices over the VPN and out through the remote site’s Internet.
- I manage my parent’s network remotely and my two apartments; if possible, I want the same remote management software for all three locations.
- With Wi-Fi getting more and more important in our lives, I want to learn how it works and how to get the most out of this technology, especially Wi-Fi 7 which holds so much promise of a wired-like experience over wireless.
Solutions
The solutions available to me are limited in China compared to what’s available in North America, Europe or other parts of Asia. Due to chip shortages and local regulations, I can’t easily obtain popular brands such as Amazon’s eero or Google’s Nest Wi-Fi. I have a plethora of local brands to choose from (at very reasonable prices I might add) such as Xiaomi and Huawei as well as localized versions of global brands such as TP-Link, Tenda and ZTE.
Hardware linked to local regulations
The challenge with choosing a local solution is that it won’t meet my requirement to have one common remote management interface for all three locations (Mainland China, Hong Kong and Canada). The other major challenge is that many localized products don’t have an English language interface; this is intentional by the manufacturer so that the lower priced China-specific models don’t end up being sold in the grey market outside of China.
It’s not just about money; it’s also about China-specific regulations that would create issues for customers using this hardware in other countries. I’ll dig into this more when we look at the solution I ultimately ended up with. Suffice to say, when selecting hardware for Wi-Fi, be sure to buy from your local authorized dealer so that you get products that are tailored to meet your local regulatory landscape.
“Suffice to say, when selecting hardware for Wi-Fi, be sure to buy from your local authorized dealer so that you get products that are tailored to meet your local regulatory landscape.”
For example, I learned through this experience that China has set aside the 6 GHz band for cellular use, whereas the USA has dedicated that to unlicensed use including Wi-Fi. This means that a China-specific Wi-Fi AP will not support the 6 GHz band and thus can be made for less cost as it would only need a dual band antenna for 2.4 GHz and 5 GHz.
International solution selected
Since I’m working across three countries, I decided to go with an international prosumer solution from Ubiquiti Networks, the same company behind my existing consumer AmpliFi Alien setup; they sell prosumer hardware under the UniFi brand.
UniFi
UniFi is said to have been started by the same person or team behind Apple’s excellent AirPort routers, which were discontinued a long time ago. When you experience the way UniFi designs their products, packaging and user experience, you’ll clearly see the Apple DNA. The hardware is beautiful, and the software, while powerful, is simplified and well thought out.
Understanding UniFi’s product line
Where UniFi does however fail is in their product marketing; it’s nearly impossible for a novice to understand what to buy and how it fits together. For example, they have an AP called the U6 Mesh, which indicates you’d need that to implement a mesh network, however it turns out that all their APs can be setup in a mesh. The U6 Mesh includes a 4×4 5 GHz antenna which helps mesh, but then so do other products from UniFi which don’t have the “mesh” designation.
“Where UniFi does however fail is in their product marketing; it’s nearly impossible for a novice to understand what to buy and how it fits together.”
Another example is their most recent line of gateway/router/controllers; UniFi calls them Cloud Gateways, even though the controller software resides on the hardware and doesn’t even need a UniFi account to setup. It’s bizarre they do this as it’s very confusing to the customer. There’s a new Cloud Gateway Fibre product that overlaps with the Cloud Gateway Max. Furthermore, they’ve adopted Apple’s annoying Max and Ultra naming, but they reversed it with the Ultra being lower than the Max.
I’ll try to simplify UniFi’s offerings by asking some questions:
- Do you want everything in one device with the option to add Wi-Fi APs? Look at the Wi-Fi Integrated series such as the Dream Router 7 or Express 7
- Do you need flexibility in where you place the Wi-Fi APs? Look at the Cloud Gateway series such as the Cloud Gateway Max or
- Do you need 10 Gbps WAN speeds? Look at the Cloud Gateway Fiber or Dream Router 7.
- Do you need 10 Gbps LAN speeds? Look at the Cloud Gateway Fiber.
Understanding UniFi’s applications
The magic in UniFi comes from the way the hardware and software form a seamless ecosystem. Unlike their hardware offerings, the software side is much easier to understand, with the following software that runs on their gateways:
- UniFi Network – The core of the UniFi offering that combines powerful internet gateways with scalable Wi-Fi and switching. Provides real-time traffic dashboards, topology and data that can be used for optimization.
- UniFi Protect – AI-driven camera platform for local video storage. Features smart detection, customizable recording schedules and notification settings. Learn more here.
- UniFi Access: Secure and intuitive access control system featuring modern touch-screen readers, integrated video for entry and exit events and flexible mobile credentials.
- UniFi Talk – Plug-and-play VoIP system for small and medium businesses. Learn more here.
- UniFi Connect – Enterprise of Things platform for digital signage, EV charging stations and building-wide lighting and display content.
For home use, we will spend most of our time in Network and if you have security cameras or electronic door access, Protect and Access as well. I can’t stress enough how amazing Network is. It’s incredibly powerful while somehow being super simple and intuitive to use.
“I can’t stress enough how amazing Network is. It’s incredibly powerful while somehow being super simple and intuitive to use.”
If you’re like me and are the designated “technical support” for your extended family, you’ll also spend some time in the Site Manager. The Site Manager is where you can access all the sites that you oversee as either the Administrator or an invited user. It’s from Site Manager that you can then go into each location’s applications like Network.
Suggested UniFi setups
Basic UniFi setups for home
- UniFi Express 7 (UX7) which hosts the Network and Controller applications and includes a built-in Wi-Fi 7 AP.
- Pros:
- Very easy introduction to UniFi and its excellent Network application.
- Extremely small and well-built device that’s easy to position.
- Built-in Wi-Fi that supports up to 300 client devices saves you the hassle of dealing with APs and their PoE injectors.
- Cons:
- Only one Ethernet port and no PoE.
- Can only run the UniFi Network Application (cannot run Protect for example which is UniFi’s camera software).
- Pros:
- UniFi Dream Router 7 (UDR7) which hosts all UniFi applications, includes a built-in Wi-Fi 7 AP and has a robust CPU that can handle IDS/IPS at 2.3 Gbps.
- Pros:
- Very easy introduction to UniFi and its excellent Network application.
- Small and well-built device that’s easy to position.
- Three 2.5 Gbps LAN ports (of which one has POE+), one each of 2.5 Gbps and 10 Gbps WAN ports.
- Built-in Wi-Fi that supports up to 300 client devices saves you the hassle of dealing with APs and their PoE injectors.
- Cons:
- Less flexibility for AP placement since it’s built into the device.
- The fan inside sounds like a small refrigerator that can be heard from a meter away.
- Pros:
Advanced UniFi setup for home
- UniFi Cloud Gateway Ultra (UCG-Max) or Cloud Gateway Fiber (UCG-Fiber), both which host all UniFi applications and have robust CPUs that can handle IDS/IPS at 2.3 Gbps and 5.0 Gbps respectively; UniFi U7 Pro/U-7 Pro Wall/U7 In-wall APs and PoE/PoE+ injectors as some of the APs don’t come with a power source.
- Pros:
- Cost effective solution that includes the 2.5 Gbps (10 Gbps for UCG-Fiber) gateway/router/controller in one sleek package that supports the full UniFi Network stack including IPS/IDS.
- Separating the gateway and the Wi-FI APs gives more flexibility in placement.
- Supports 30+ UniFi devices that can be adopted into the network and 300+ client devices.
- Multi-WAN load balancing that supports failover for those working from home where a reliable network is a critical requirement.
- Cons:
- Power brick adds bulk to the installation
- Requires APs and their PoE* power sources to add Wi-Fi to the network.
- Complexity in the hardware arrangement with power bricks, power cables, PoE* injectors and Ethernet cables.
- Pros:
*PoE: If you get into the UniFi ecosystem, you’ll hear a lot about Power over Ethernet (PoE). There are four levels that UniFi calls PoE, PoE+, PoE++ and PoE+++. Most of their APs require PoE or PoE+.
If you don’t have a network switch that has PoE, you’ll need a PoE injector which can be purchased from UniFi or other vendors. This adds bulk and power plug requirements which are always at a premium in a home environment.
The UniFi power cables are very robust and thick. If you’re using the devices in a gentle home environment, you can get alternative power cables that are easier to work with; thick cables become an issue when you’re trying to do cable management with power bricks and PoE injectors.
My UniFi setup
Because of my unique needs, I went with the advanced setup as the basis and then tweaked it a bit:
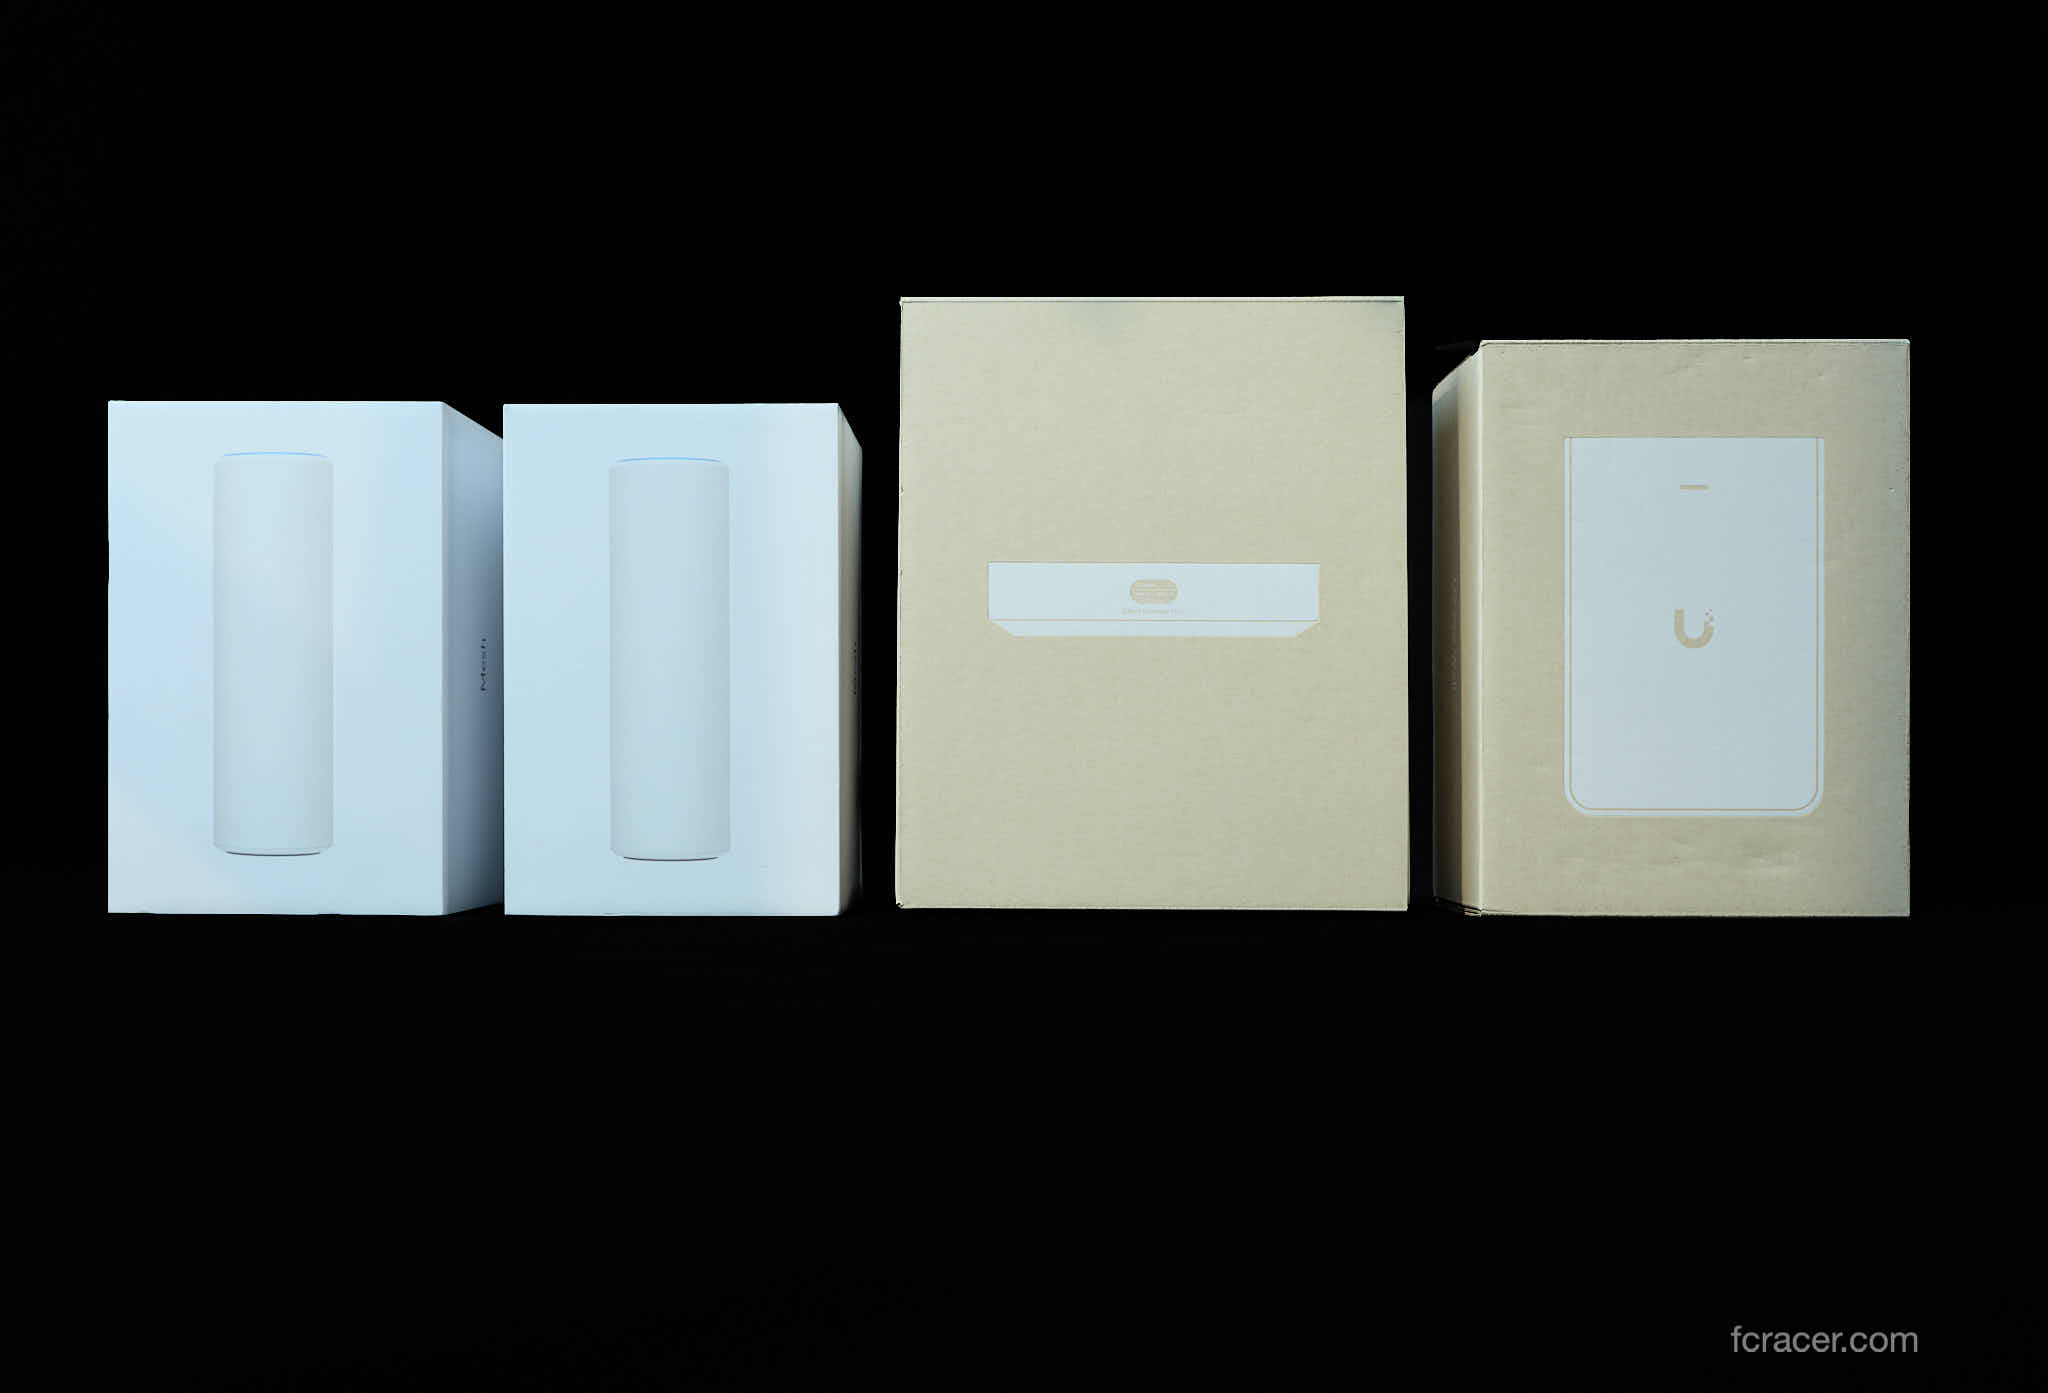
1 x UCG Max with 512 GB storage (UCG-Max-512GB)
2 x U6 Mesh APs (U6-Mesh)
1 x U7 Pro Wall AP (U7-Pro-Wall)
1 x Flex Mini 2.5G (USW-Flex-2.5G-5)
When UniFi launches a U7 Mesh device, I’ll upgrade the two U6 Mesh devices. I really like the form factor of the U6 Mesh, which looks like an Asian Coke can (Asia gets thin and tall Coke cans compared to North America’s short and wide ones).
I also bought several UniFi Ethernet cables which have bendable ends to make installation cleaner and more versatile; the cables are very thin which makes cable management much easier. It’s shocking how thin they are while being able to work at speeds of over 10 Gbps as tested in my home network environment.
Shortly after purchasing this setup and prior to writing this post, Ubiquity Networks launched the Dream Router 7 (UDR-7) and Cloud Gateway Fiber (UCG-Fiber). I ordered and received a UDR-7 but decided to return it after hearing its fan noise, which sounds like a small refrigerator. I’ve now ordered the Express 7 and will give that a try; it shouldn’t make any noise as it’s fanless. UniFi products sell out very quickly, so I put an order in as soon as the website went live. Once I’ve had it for a while, I’ll provide insight on its performance in the comments below.
Installation and setup
While the plethora of options within the UniFi Network application can be daunting, if you leave everything at its default settings, you can be up and running within 15 minutes. The only settings that I changed were to setup a different IP address range for my internal network and to setup a WireGuard site-to-site VPN.
“While the plethora of options within the UniFi Network application can be daunting, if you leave everything at its default settings, you can be up and running within 15 minutes.”
UniFi is VERY active at making updates so it’s very important to let the system cycle through a set of updates before setting everything up. I tried to rush through the setup and spent more than 30 minutes looking for the WireGuard VPN settings, only to realize it was recently implemented in a firmware update that had not yet installed.
For the first iteration of my new setup, I had setup the UniFi gear as follows:
Testing and initial results
Analytics
I love the analytics available in the UniFi Network application. There’s so much data to pour over and so much information about connection times, speeds and technology used. I can clearly see whether a device connected via Wi-Fi 5 or 6 (I don’t have any Wi-Fi 7 devices at this time) and how many spatial streams it’s using.
I can see where devices are moving around the apartment and the signal strength in each location. I can see how much data is moving and to exactly where. It’s a bit frightening to see all this data in one place as it can clearly paint a picture of what’s important to the home’s occupants based on what they view online.
For network testing, I suggest using these three tools:
- LAN iPerf: Setup an iPerf server on a wired computer or NAS on your network. This will provide a stable base from which measurements can be made. You’ll need an iPerf client on your laptop or mobile device. You can read how to set this up here and here.
- WAN speed test: Suggest using an app such as Ookla’s SPEEDTEST or using www.speedtest.net. This test should be completed first with a wired connection to the ISP router, then a wired connection to your network’s gateway router and finally, a wireless connection within your network. This will let you evaluate where issues are arising at the various potential trouble spots.
- WiFiman: Leverage the very useful tool from UniFi that lets you test speeds to your UniFi gateway, other devices with WiFiman loaded and also the internet at large. Keep in mind however that if both devices are on the same AP, the Wi-Fi speeds will likely be halved.
Testing Wi-Fi is really, really hard and I see many people posting about the issues they’ve faced. It’s important to understand the difference between Internet (WAN) speed tests and Intranet (LAN) speed tests. I would suggest starting from the Internet (WAN) and then focusing on the Intranet (LAN):
Internet (WAN)
1a. Conduct ISP Router/ONT Internet speed test. Connect a device directly to your ISP’s router or Fibre ONT. If the ISP Router/ONT is in bridged mode, you can skip this step.
1b. Conduct gateway Internet (WAN) speed test using the UniFi Network application’s built in speed test.
1c. Conduct hardwired Internet (WAN) speed tests using www.speedtest.net with a device hardwired to the gateway or switch.
1d. Conduct wireless Internet (WAN) speed tests using www.speedtest.net while connected to the same AP and the same distance.
| Internet (WAN) Speed Tests | Results* |
|---|---|
| 1a. ISP Router/ONT WAN | 921 Mbps download 49 Mbps upload |
| 1b. UniFi Gateway WAN | 957 Mbps download 45 Mbps upload |
| 1c. Device hardwired to gateway or switch (WAN) | 952 Mbps download 49 Mbps upload |
| 1d. Device wirelessly connected to AP (WAN) | 818 Mbps download 55 Mbps upload |
Intranet (LAN)
2a. Conduct hardwired Intranet (LAN) speed tests using iPerf or WiFiman. Start with a wired connection either to the gateway or to a switch.
2b. Conduct wireless Intranet (LAN) speed tests using iPerf and WiFiman. Run the iPerf test to the server hardwired in your LAN or via WiFiman to the UniFi gateway (not to the Internet).
| Intranet (LAN) Speed Tests | Results |
|---|---|
| 2a. Device hardwired to gateway or switch (LAN) | 9.41 Gbps download (on 10GbE portion of network) 9.40 Gbps upload (on 10GbE portion of network) |
| 2b. Device wirelessly connected to AP (LAN) | 1.66 Gbps download 1.33 Gbps upload |
For wired testing, if you have multiple Ethernet outlets in your home, test each one and note its speed. Ethernet has some overhead so you should expect slightly lower numbers than the rating. For example, 1 Gbps connections typically can push 950-980 Mbps and 2.5 Gbps connections can push 2.3-2.4 Gbps.
For Wi-Fi testing, start by facing an AP and ensuring connectivity has been achieved via the Network application. Confirm the frequency (should be 5 GHz or 6 GHz), channel width (80 MHz, 160 MHz, etc.) and technology (Wi-Fi 5, Wi-Fi 6, etc.) that the device connected at and note it down.
*Based on real life network using a 2024 iPad Pro 11 (2.5 Gbps network adapter, Wi-Fi6, 6 GHz, 160 MHz) on a 1 Gbps/30 Mbps Internet connection and Intranet with a 2.5 Gbps gateway and a mix of 2.5 Gbps/5 Gbps/10 Gbps segments
Speed
Using iPerf and WiFiman, the speeds I was achieving with the new setup were disappointing. Where the AmpliFi Alien setup was getting a maximum of 700-800 Mbps, the new setup was also achieving the same speeds, however when the signal had to hop across APs via mesh, the speeds halved down to 350-400 Mbps. In similar situations, the Alien setup would maintain higher speeds.
After much research, the root cause ended up being the difference between a real mesh Wi-Fi network and one where the APs can do mesh. In a real mesh network, the APs are designed with dedicated backhaul to connect the APs together or in the case of the Alien, there are more antennas which gives it more bandwidth to keep speeds high for the client device while sending data back through the mesh network.
“After much research, the root cause ended up being the difference between a real mesh Wi-Fi network and one where the APs can do mesh.”
The UniFi “Mesh” AP is just a normal AP with 4×4 antennas in the 5 GHz band. The Alien in comparison has 8×8 antennas in the 5 GHz band, which enables it to have more bandwidth to support the mesh. When connecting directly to an AP however, the speeds showed a lot of potential with the U7 Pro Wall hitting speeds of 1,500 Mbps!
I now had a conundrum because the potential was clearly there, and I loved the UniFi Network application with its analytics and slick interface. However, getting speeds slower than the outgoing setup was disappointing. With the mesh being the root cause of the slowness, I decided to try and implement wired connections to the APs wherever possible.
Lessons Learned
Wired connections
With the root cause of the speed issues identified, I hired a network technician to evaluate what it would take to get a wired connection to the two APs currently wirelessly connected. To my surprise, the technician found some very old but workable twisted pair in the walls. Some of the cables would only reach 100 Mbps, but he managed to get wiring working at >1 Gbps going into the Den and Living Room.
Lesson 1 – Wherever possible, use wired connections
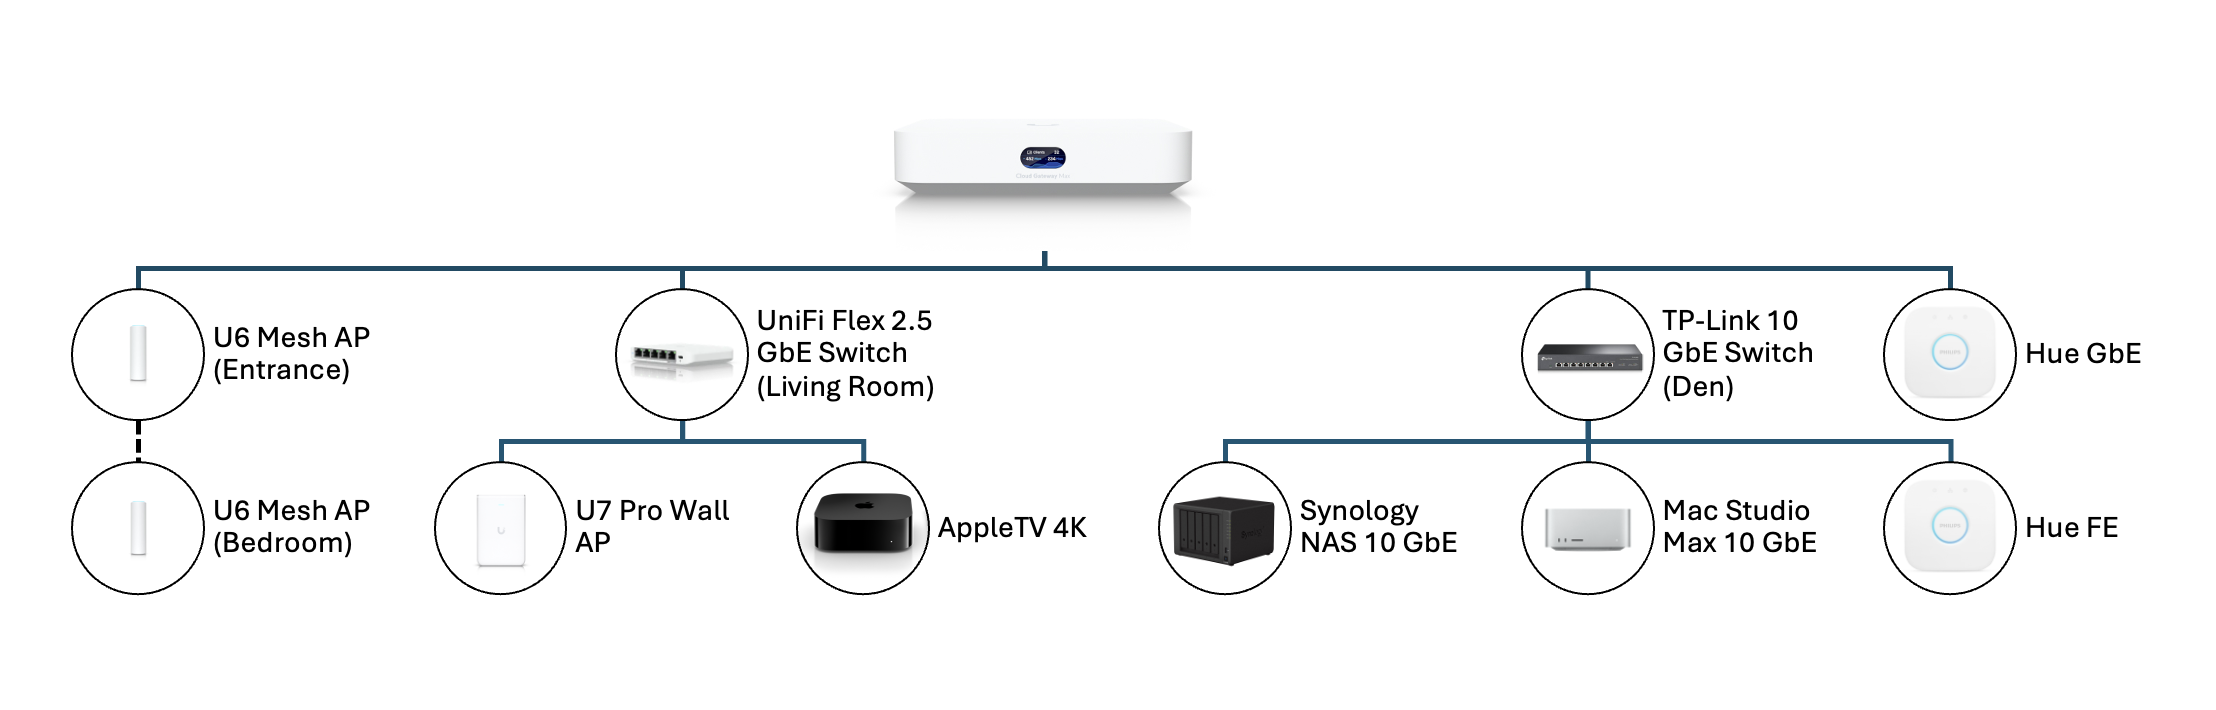
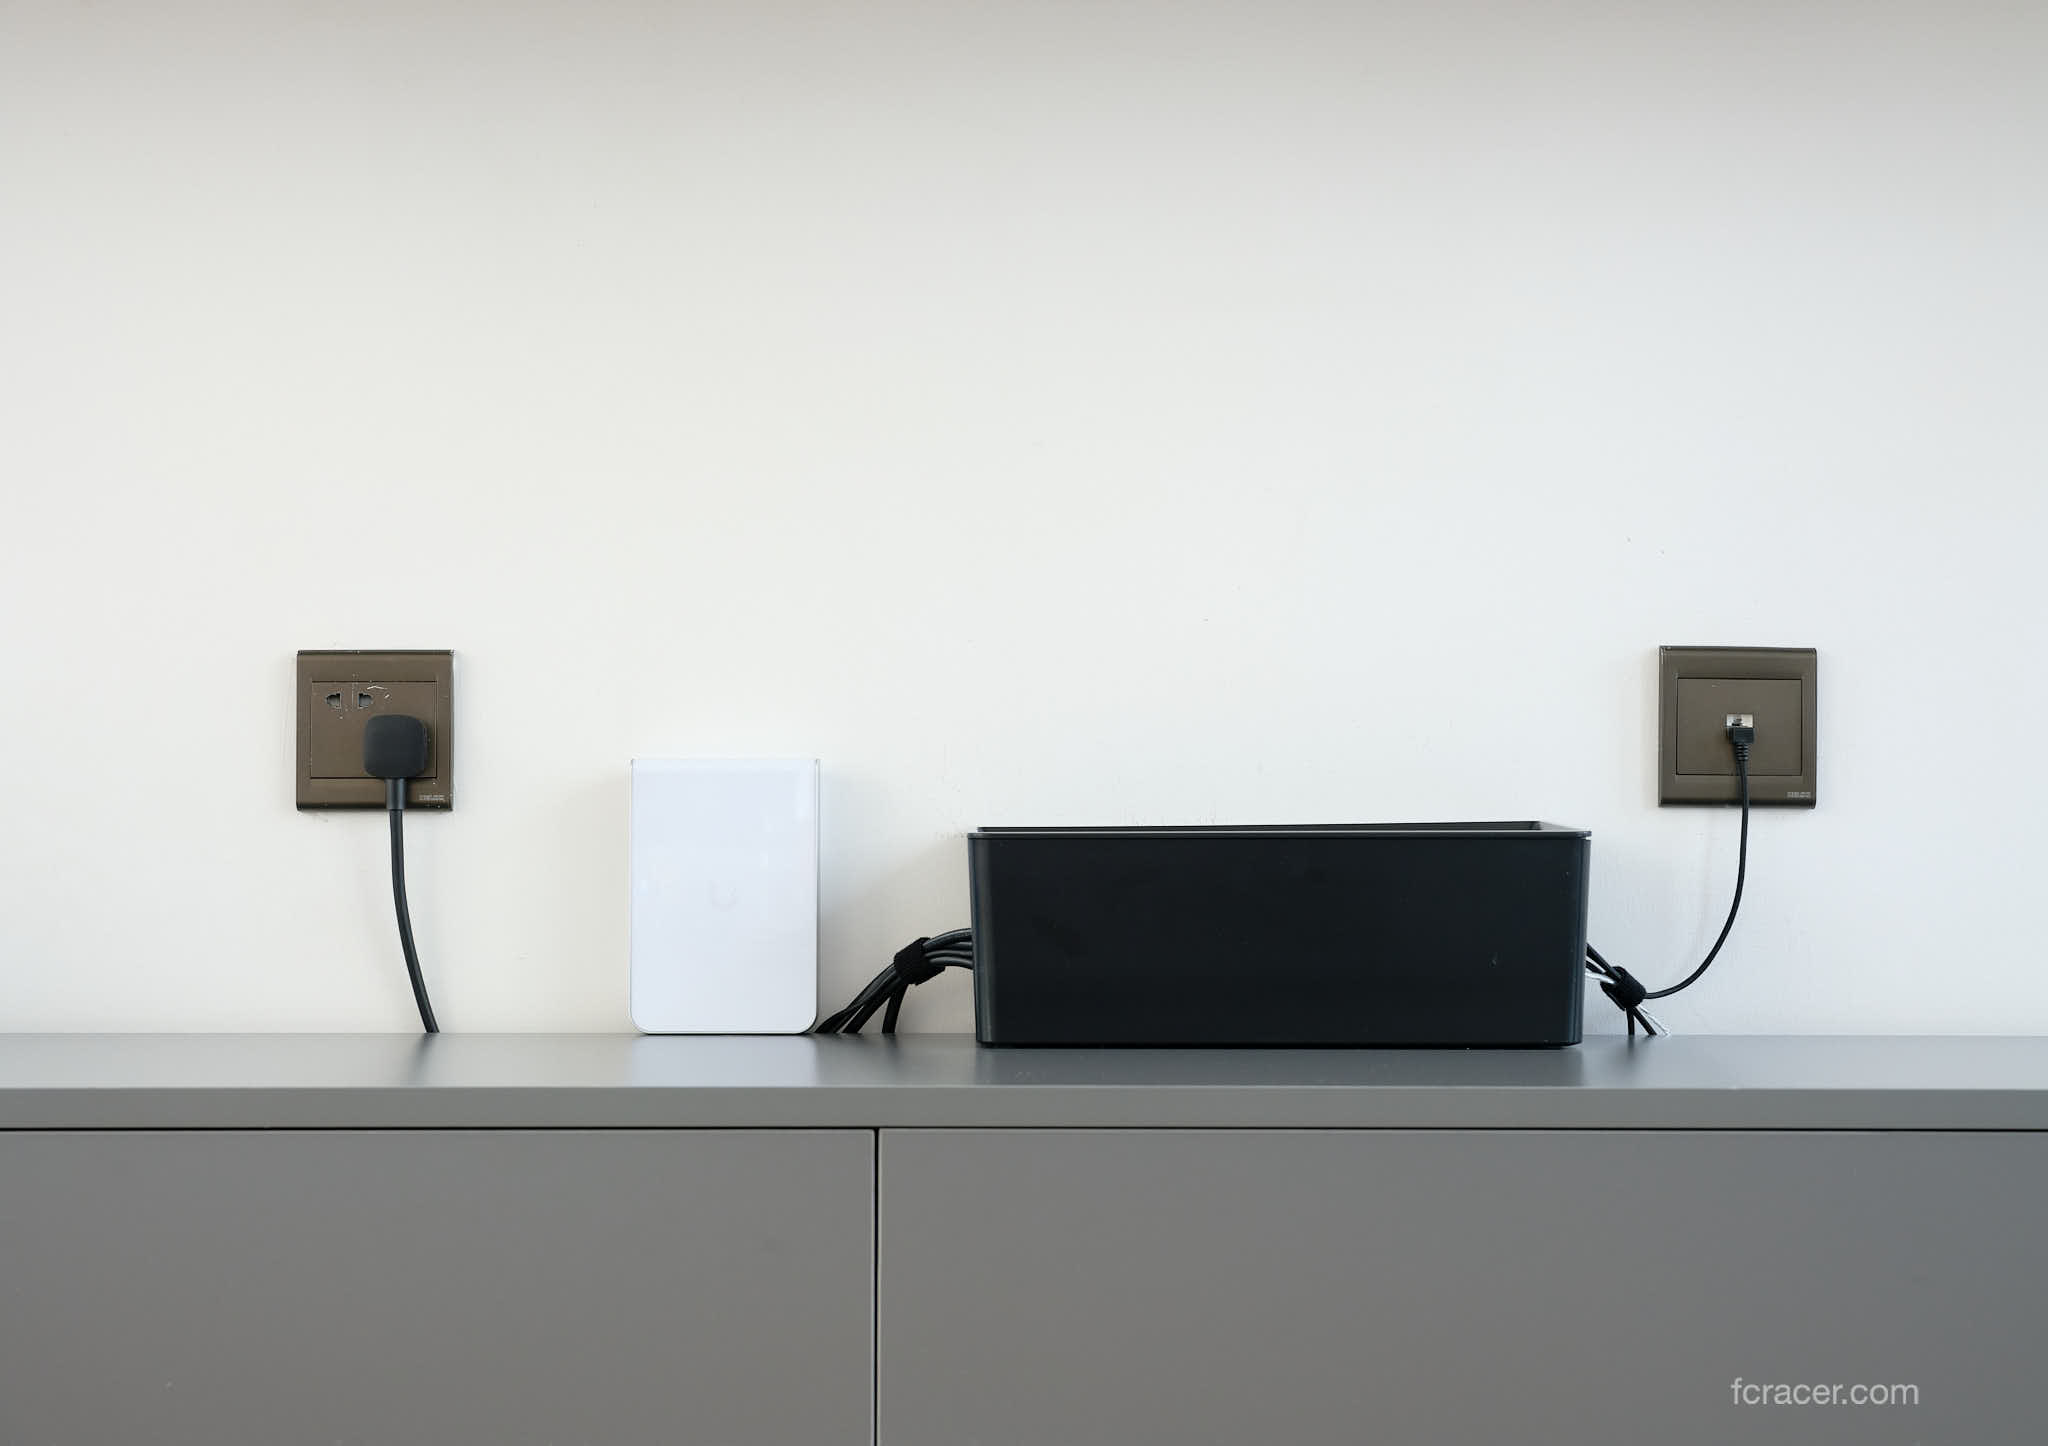
This opened a whole new set of opportunities. It would be Lesson #1 in this endeavour: Wherever possible, use wired connections. I placed the Flex Mini 2.5G switch in the Living Room (fits neatly in a cable management box) and hardwired it to the UCG Max and U7 Pro Wall; the analytics confirmed a 2.5 Gbps connection.
I then hardwired the U6 Mesh to the UCG Max in the Entrance (where the Internet terminates). Because the bedroom twisted pair could not exceed 100 Mbps, I chose to wirelessly connect the U6 Mesh in the Master Bedroom to the one hardwired in the Entrance.
I tested it both ways, with client devices connecting directly to the hardwired U6 Mesh in the Entrance and via the wirelessly connected U6 Mesh in the Master Bedroom. I consistently saw higher throughput (250+ Mbps vs. 80 Mbps) and much better connection stability with the wirelessly connected AP in the Master Bedroom.
Finally, for the Den, I hardwired the 10 Gbps switch that serves the Mac Studio Max and Synology DS1522+ NAS to the UCG Max which gives the Den 2.5 Gbps connectivity to the rest of the house, a nice increase from the previous 1 Gbps limit. I would now be able to connect a 2.5 Gbps USB-C adapter in the Living Room and edit photos on the NAS at ~290 MB/s.
“I turned to MoCa or Ethernet Over Coaxial (EOC) and was shocked at the results. Using MoCa 2.5, I’m able to get 1,400 Mbps in the speed tests.”
When I was updating my other apartment to UniFi, I didn’t have the option to use Ethernet as the apartment has carrier wiring installed and nobody knows how to access it for personal use. In that situation, I turned to MoCa or Ethernet Over Coaxial (EOC) and was shocked at the results. Using MoCa 2.5, I’m able to get 1,400 Mbps in the speed tests.
In another part of the other apartment, MoCa did not work because the coax cable in that room has no connection to the room where the gateway resides. Mesh was not possible as there are several concrete walls in the way, so I turned to Powerline Adapters. The Powerline Adapters are not as good as MoCa, but I was still able to get a solid 100 Mbps in the room. In ideal conditions (the two adapters stacked on top of each other), I was able to get 500 Mbps so it’s a viable option for reducing latency and improving speeds versus mesh Wi-Fi.
Wireless Optimization
Lesson 2 – Wireless networks require optimization
With the network now relying on rock-solid 2.5 Gbps hardwired connections for backhaul, the remaining task was to optimize the wireless connectivity. This became Lesson #2: Wireless networks require optimization. Going into this, I didn’t realize how complex Wi-Fi has become.
Wi-Fi is performance is influenced by these components:
- There are several ratified standards (Wi-Fi 4, 5, 6 and 7) which dictate how the packets are sent and received. In general, the later the specification, the more efficient the transmission and the higher the speed.
- Wi-Fi operates in three frequency bands (2.4, 5 and 6 GHz), of which some are restricted in certain countries. For example, China has designated 6 GHz for cellular connectivity so 6 GHz Wi-Fi will not work there. A 2.4 GHz signal can travel further and penetrate deeper through the walls. A 6 GHz signal is mostly useful when near the AP or within line of sight.
- There are multiple channels available within each frequency band, which are again restricted by country. Modern routers also let you use multi-purpose channels which may have less network traffic in your neighbourhood. These Dynamic Frequency Selection (DFS) channels are often used by radar, military or satellite communications; if the router detects any of these uses on the channel, the router will automatically change the channel. The goal is to find a channel that is least utilized by your neighbours.
- There are five channel widths which are linked to the frequency band (20, 40, 80, 160 and 320 MHz). Using the wrong width can mean causing and experiencing interference with your neighbours.
- The capabilities of the antennas on the AP and the client device determine the maximum throughput. For example, due to battery constraints, most client devices are limited to a 2×2 antenna, so even though the AP may have 4×4, the client device will be the limiting speed factor.
- The distance and materials between the AP and the client device play a major role in the reliability of the connection and the maximum throughput.
It’s a lot to take in, but I have some good news for you, which leads to Lesson #3: Your existing Wi-Fi is likely good enough.
Choosing the frequency, channel and channel width
Lesson 3 – Your existing Wi-Fi is likely good enough
As I progressed in my journey with the new network, the analytics tools that UniFi provides with the Network application and WiFiman gave insight into what helped the reliability and speed and what hurt it. Here are some rough guidelines that worked for me:
- Ensure that your ISP provided router has its Wi-Fi turned off. When I first ran the environment scan in UniFi Network, I could see a very strong 2.4 and 5 GHz network very close to my apartment. More annoyingly, this network was using 40 MHz on the 2.4 GHz band and 160 MHz on the 5 GHz band which was making it very challenging to find clear channels for my UniFi setup.
- Using Network and WiFiman, I managed to identify the source of this Wi-Fi. It was myself! I feel foolish to admit this, but when I moved into the new apartment last year, the installer must have thought he was doing me a favour by reactivating the Wi-Fi on the ISP provided router. For more than six months, I suffered through Wi-Fi issues mostly caused by the interference from my own router.
- For 2.4 GHz, choose channels 1, 6 or 11 with 20 MHz channel width. Ideally, you should setup a separate wireless network for 2.4 GHz devices so that they don’t interfere with your faster 5 GHz devices. However, in my 20+ client device home network, I didn’t see much benefit from this. There’s however a security benefit in having a separate IoT device network, which typically operates at 2.4 GHz, but that’s a topic for another day.
- For 5 GHz, select 80 MHz channel width to start and do a Wi-Fi scan in your environment to select a channel that is not occupied or has low signal interference in that location. Do the same for each AP to ensure that you minimize interference throughout your home. This is tougher said than done in modern apartment buildings in cities like Hong Kong!
- If your environment scan shows that you don’t have much competition on the 5 GHz band, you can increase your channel width to 160 MHz to increase speeds. When you increase the channel width, you increase the chances of interference because the wider channel width overlaps several channels beyond the one you’ve chosen.
- For 6 GHz, select 160 MHz and do the same environment scan you did for 5 GHz and select the channel with the least competition. In my environment, there was no 6 GHz competition, so I could increase the channel width to 320 MHz, however I don’t have any devices that can connect at 320 MHz to test if it made a real difference.
Optimizing the above parameters dramatically improved my Wi-Fi reliability and speeds. Interestingly, with this new knowledge in hand, I re-installed the AmpliFi Alien setup, now with hardwired backhaul and optimized Wi-Fi settings.
To my surprise and chagrin, the old setup could now easily maintain 300-800 Mbps speeds throughout the house, on par with what the U6 Mesh APs could do in the new setup. Your current Wi-Fi is likely good enough and just needs some optimization to get the best from it.
Site-to-site WireGuard VPN
UniFi includes several site-to-site VPN offerings. They have Site Magic which allows super easy connectivity to any network under your administration in the UniFi Site Manager. However, it doesn’t allow for exit nodes so you can’t use the Internet remotely through Site Magic.
If you want to have exit nodes, you have the choice of WireGuard and OpenVPN. OpenVPN is blocked where I live so I turned to WireGuard. The setup process is incredibly simple. All it takes is to setup a WireGuard server (part of the Network application in UniFi) at the remote site and a WireGuard Client at the local site.

Once the Client and Server were setup, I initiated the connection and then setup “Policy-based Routes” which tell the UCG-Max to route all traffic from specific devices to go through the WireGuard VPN. By doing this, my AppleTV and other devices can access the Internet at my remote site.
It all works well, however there’s a small bug in UniFi’s implementation related to MSS size. I’m not technical enough to explain it, but from what I understand is that TCP has a limit to the size of the packet and the sender and receiver negotiate this size. However, when using VPN, there’s some overhead, so the TCP packet needs to be smaller than usual.
UniFi is aware of the issue and suggested using this temporary fix in the interim. I can confirm this fixes the issue and the VPN then works as expected.
To fix this issue, you need to activate the debug mode in the settings and then go to the gateway under devices. Select the gateway and then click on Debug under settings. You can then access the Command Line Interface (CLI) and enter the following:
iptables -t mangle -A UBIOS_FORWARD_TCPMSS -o wgclt+ -p tcp --tcp-flags SYN,RST SYN -j TCPMSS --clamp-mss-to-pmtu
The final results
When I set out on this journey, I had a clear set of problems to solve. It’s always good to circle back to that list to see if we made the progress we had hoped for:
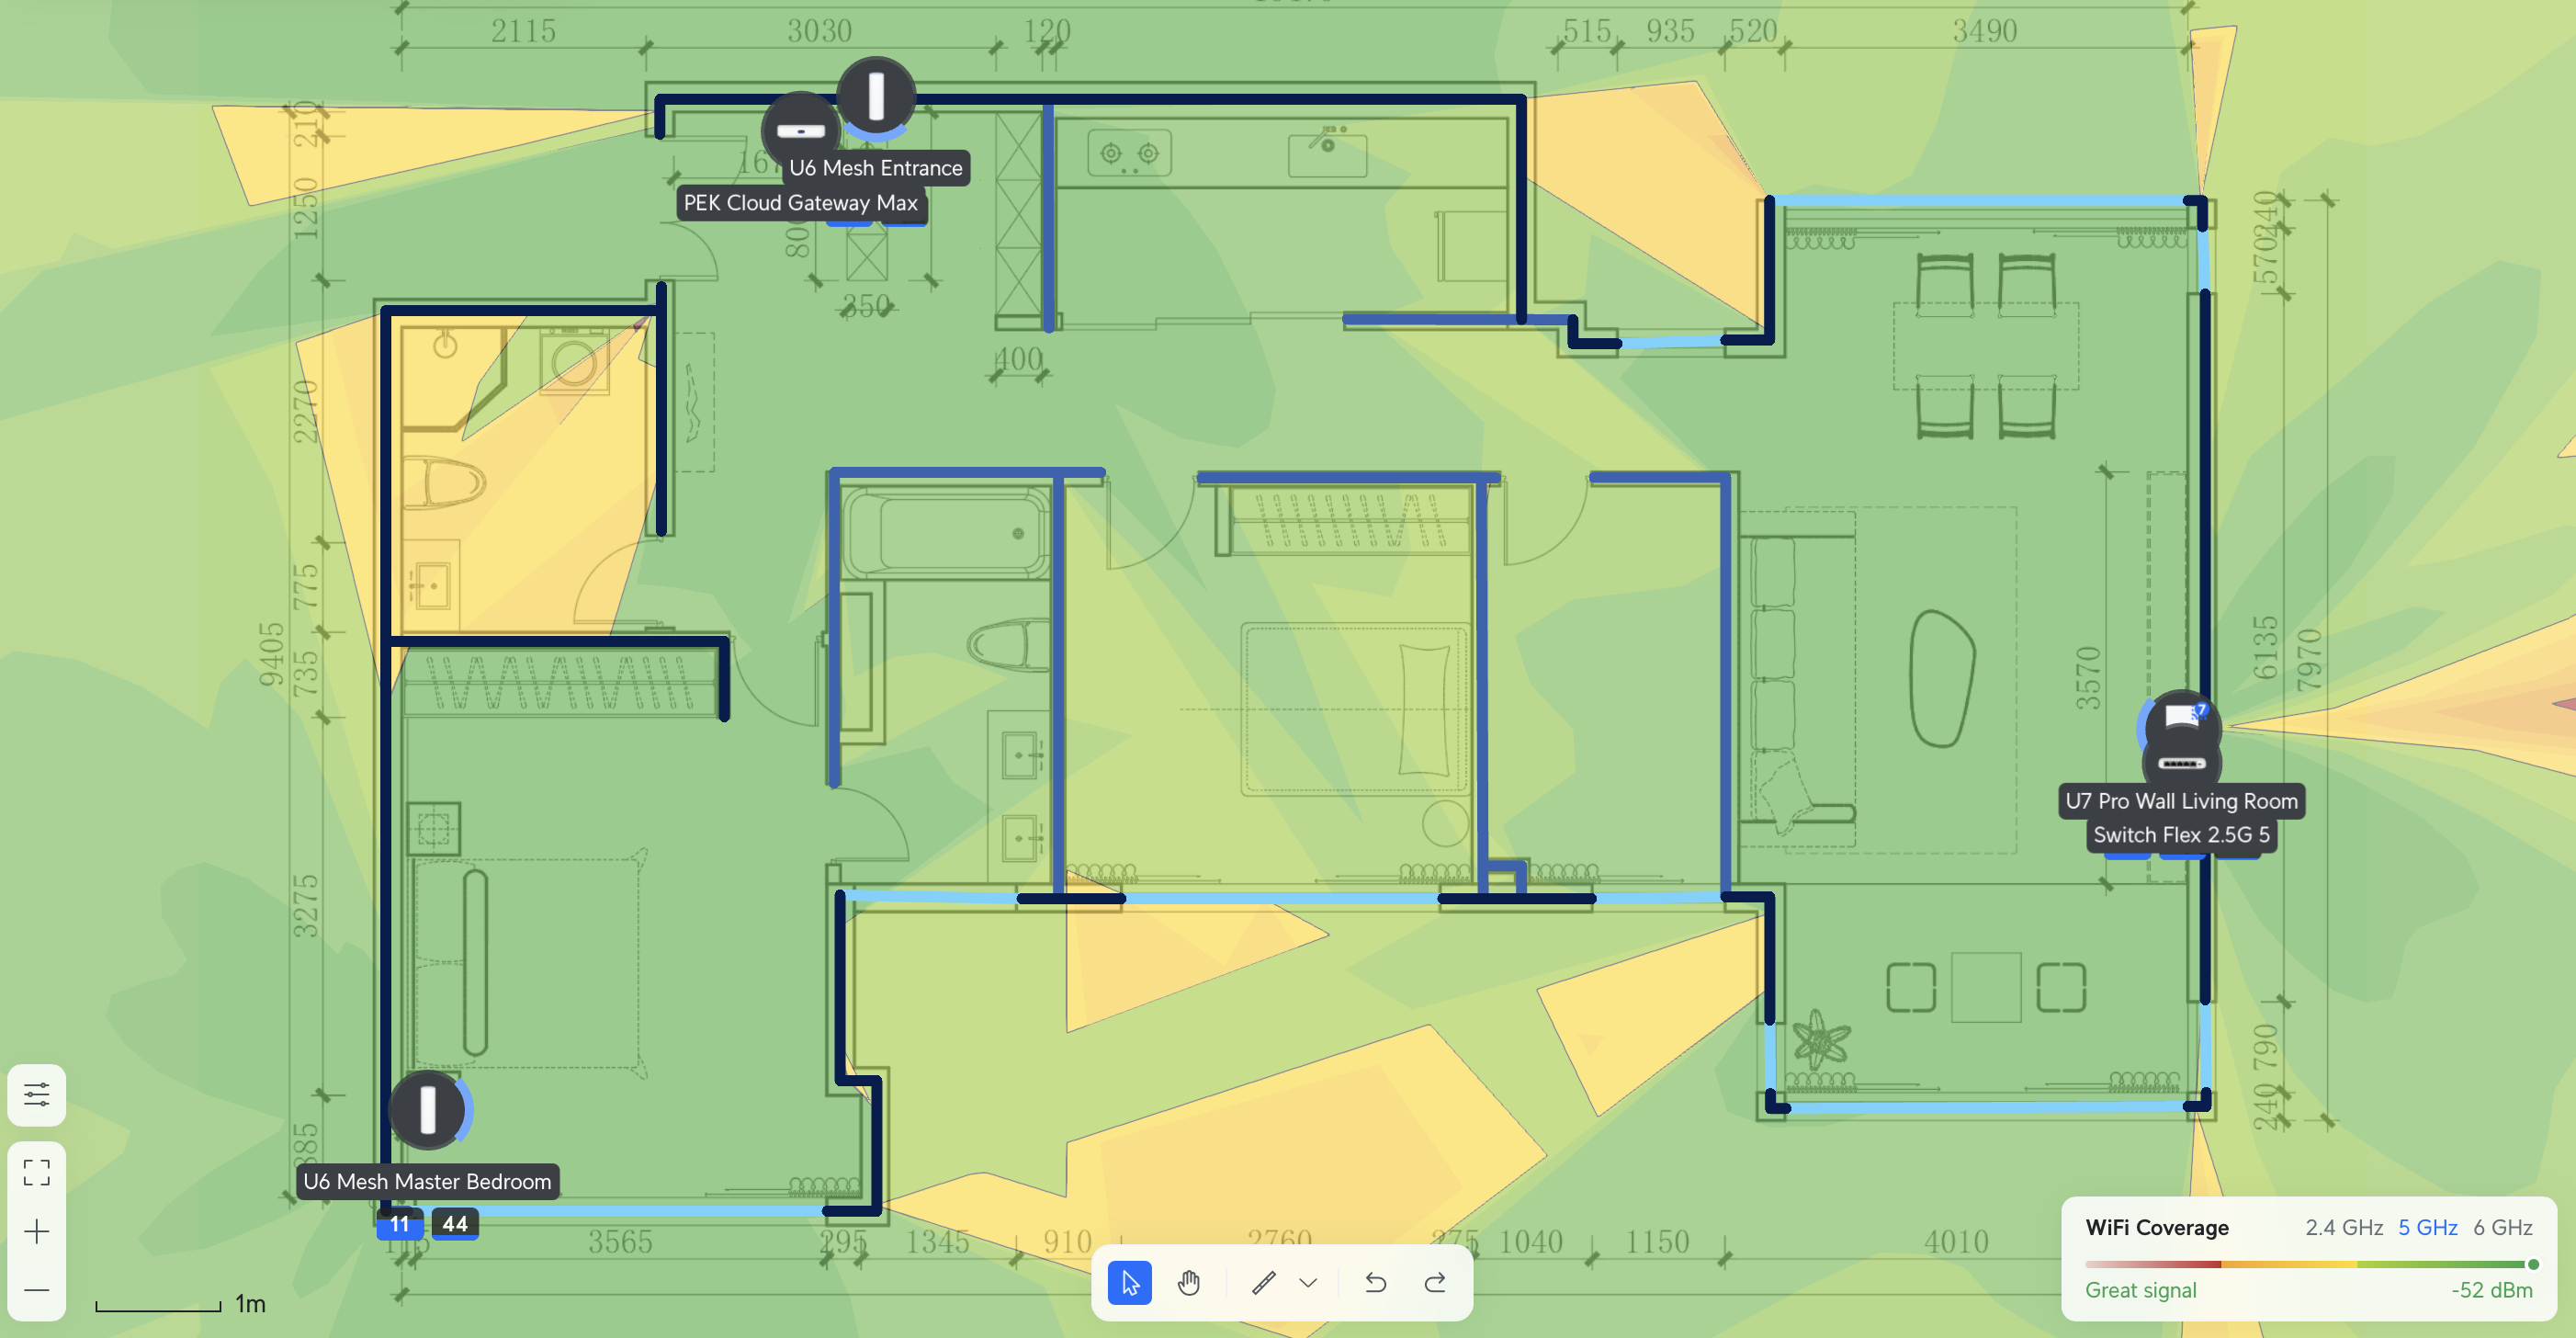
- Wi-Fi speeds: Wi-Fi speeds are now between 300 Mbps and 1,500 Mbps throughout the apartment; there are no dead zones as can be seen in this heatmap made with UniFi’s WiFiman.

- IoT devices connectivity: All IoT devices are rock solid now including the two troublesome HomePod Minis. Even the Xiaomi humidifier that would never stay connected on the Alien setup is now showing 100% connectivity.
It makes such a huge difference to life comfort when IoT devices just work.

- Analytics: I’ve been more than impressed with the analytics available from the UniFi Network application. Any issues that came up during the initial setup phase, I was able to identify using the data available. For a somewhat technical person, this could be the major reason for going with UniFi.
- Wi-Fi 7: I haven’t been able to test this as I don’t have a Wi-Fi 7 device, however I’ve seen people achieving 2.5 Gbps with the same hardware.
- Limit of 1 Gbps: The network now has a baseline limit of 2.5 Gbps in every connected room and the Wi-Fi can now scale up to 2.5 Gbps when Wi-Fi 7 devices come online. With Wi-Fi 6 devices, I’ve tested real-world performance of up to 1,500 Gbps.
- Photo editing over Wi-Fi: Unfortunately, I have not yet solved this problem. My MacBook Air M2 has only Wi-Fi 6 with 80MHz channel width so it’s limited to around 700 Mbps. There was no improvement in photo editing with the changes made; I’ll have to wait until I have a Wi-Fi 7 capable laptop to test the solution.
- Site-to-site VPN with exit node: The WireGuard implementation in UniFi works well once the CLI fix is in place, but there’s room for improvement. The router-to-router Teleport VPN in my previous Amplifi Alien had faster overall speed. I’m working with UniFi to identify the root cause.
- Remote management: This is again one of UniFi’s strengths. It’s so nice to be able to manage three networks remotely and with so much data and power to make fixes. It makes remotely supporting my family much easier.
While I didn’t achieve all my goals, the UniFi setup did very close. More importantly, I learned a lot about Wi-Fi from the analytics and the process in setting it up. If I could go back in time, would I go down this route? I would, but I also recognize that I could have achieved nearly the same with my previous AmpliFi Alien setup had I optimized the Wi-Fi network in the same way I did with UniFI.
“While I didn’t achieve all my goals, the UniFi setup did very close.”
For anyone considering upgrading, it would pay dividends to try and optimize your existing hardware first:
- Hardwire everything that you can, especially the Wi-Fi access points.
- Optimize the Wi-FI by using 5Ghz or 6GHz, low interference channels and channel widths of 80-160MHz.
- Monitor the performance over time so that you can re-optimize when your neighbours make changes to their Wi-Fi that affect your network’s performance.
If the optimization doesn’t achieve what you want, or if you can’t hardwire access points, consider looking at the robust mesh offerings from Asus or TP-Link where they have dedicated backhaul radios, ideally with Wi-Fi MLO technology. Those devices should be able to support 2.5 Gbps to and from the client device while supporting 2.5 Gbps to and from the access points.
If you want a network that can educate and grow with you, UniFi can’t be beat. The incredible ecosystem they’ve built is like being introduced to an addiction; I’m now looking at cameras, entry access devices and even their UNAS offering! Just like Apple, UniFi knows what their customers want and delivers it in a very sticky ecosystem. Be warned that just like Apple, they leave one key feature that you want off their product so that you’re forced to buy at least one more product.
I hope you’ve enjoyed this post and learned something. Please feel free to ask questions in the comments below; I’d be happy to provide further insight.
April 2025 Update
Since setting up the UniFi network, I’ve been very happy with its performance. As noted above, I tried the UDR7 but found the fan noise to be far too loud for a home environment, especially when it’s placed near a wall where the sound is amplified by the wall.
I subsequently purchased the UX7 and have been using it for several weeks now. This little device is a major step-up from the original UX. Gone is the underpowered CPU and routing capabilities. The UX7 is super responsive and has more than enough performance for most homes.
I have the UX7 connected to a USW-Flex-2.5G-5 switch, which then propagates to the existing network I had in place with the UCG-Max and UDR7. The whole setup works very well; the range of the UX7’s built-in AP is impressive. I’m getting speeds of 1,500 Mbps near the UX7 over single link WiFi6.
The range on the UX7 is so good that I may be able to eliminate the U6 Mesh in the bedroom and go straight to the UX7. I think UniFi has a home run on its hands with the UX7. UniFi has also launched the UCG-Fibre which looks like a compelling product if you want to eliminate the Fibre ONT from your service provider.
Discover more from fcracer - Travel & Photography
Subscribe to get the latest posts sent to your email.