This will not be a typical in-depth review. I wasn’t planning on making a post about a NAS, but I’ve been so impressed with this device that I thought my readers would like to know about its existence. For avid readers of this blog, you’ll be familiar with the popular series of posts about ensuring your images and critical data are safely stored across the typical workflow:
- Data integrity at capture: SD Card Comparison
- On-site image workflow: Culling, backup and editing
- Off-site storage and backup: Storage, backup and disaster protection
Disclaimer: Before diving into this first impressions review, if you don’t already have a NAS workflow, I highly recommend reading the three posts above. I see far too many people that treat a NAS as their only backup, when a NAS should never on its own be considered a sufficient backup. The DS1522+ and E10G22-T1 Mini were purchased at full retail price from JD.com in China.
NAS as a foundation for your 3-2-1 backup strategy
For the third part of the series regarding Off-site storage and backup, I strongly recommended getting a NAS that can form the foundation of your 3-2-1 backup strategy. The 3-2-1 backup strategy entails having at least three copies of your data, with two on different storage media and one off-site.
For my setup, I have the following setup that provides for four copies of my data:
- One-disk fault tolerance RAID setup on the NAS which provides the first of three backups and is maintained in real-time.
- An internal drive in the NAS that completes an incremental backup of the main volume every night, with the ability to go back in time in case a file was accidentally deleted earlier but identified as missing later.
- An external USB that I store off-site which I connect to the NAS every 2-4 weeks which holds a complete backup of the NAS.
- To add an extra layer of protection, I also backup my most critical files to Backblaze’s excellent cloud-based B2 service, which is fully integrated and seamless with the Synology NAS.
Looking for the perfect NAS
With this strategy, you can see that the NAS plays a critical central role to managing and protecting all of this data, which in my case currently totals 7TB. With my previous Synology DS918+ being limited to four drives, and 1Gbps Ethernet speeds, I’ve been on the hunt for some time for an affordable alternative. QNAP and other vendors have great offerings in this space with both 10Gbps and Thunderbolt connectivity, but price, availability and the need to learn a new Operating System (OS) had kept me from taking the leap.
After a very long wait, Synology finally introduced a relatively affordable 5-bay NAS device with optional 10GbE connectivity, and very importantly for my use case, built in NVMe cache slots. In the past, to get both 10GbE and the cache slots meant buying an expensive card or forgoing one for the other. The DS1522+ now allows both, with a very cute, tiny and well engineered 10GbE card that slots in the back.
First impressions
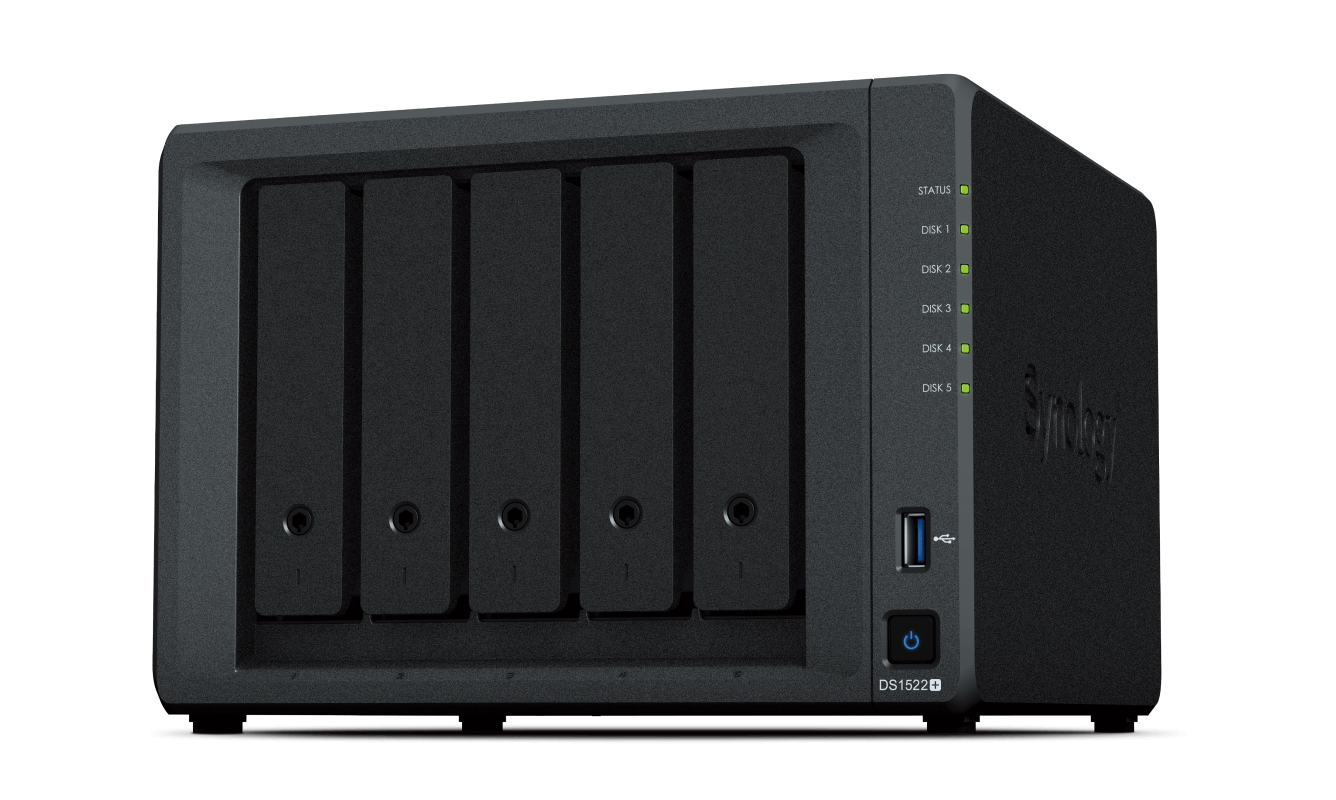
A NAS is not typically a very sexy device and the DS1522+ is no exception. In fact, it looks pretty much exactly the same as my previous DS918+ and any other DS series NAS from Synology. It’s not a looker, but it also doesn’t draw attention to itself, which I think is a positive. I’m in the function over form camp when it comes to a NAS.
I should give a shout out to the packaging department at Synology. Their boxes are high quality, well protected, have a perfectly designed handle for easy carry and can be stored nice and compact. The new owner of my DS918+ will be getting a well kept box that makes his second hand NAS feel like a new one.
The NVMe cache slots are on the bottom of the unit, drive bays up front with the usual tool-less slots, and the only thing to give away that this is something different is the tiny screwed down door on the back hiding the slot for the optional 10GbE card. Other than that small change, it’s traditional Synology all the way.
Migrating from the previous NAS
I had deep anxiety going into this process, and read up on the different options. Synology has a good guide here. You have three choices:
- Connect the old and new NAS to a network or to each other and run Migration Assistant;
- Swap drives into the new NAS and do a “Drive Migration”; or
- Setup the new NAS and restore from a Hyper Backup.
Because I had 7TB of data to move across, I decided the drive migration would likely be the quickest. What I didn’t expect was how quick and easy the process would be. It’s important to move the drives over to the same exact spots as from where they were removed. It may not matter as much with the new RAID types, but it’s good practice nonetheless.
With the drives swapped over and the NVMe cache drives installed, I fired up the NAS, found it on the network and saw that it was telling me that I need to complete the migration. I followed the on-screen prompts and within a staggeringly short 10 minutes, I was using the NAS just like I was the previous one. It was so quick that I thought I must have missed a step. Synology has this nailed!
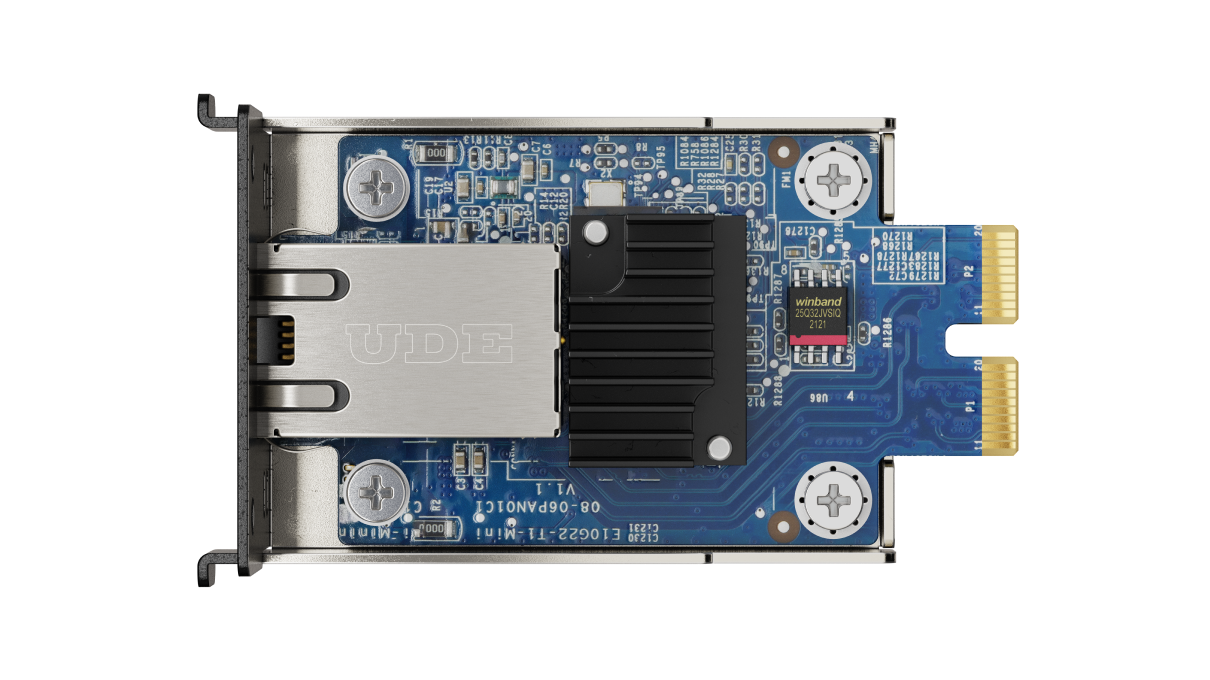
10GbE E10G22-T1 Mini
This cute little network card is going to completely change the way I use my NAS. I’ll now be able to do photo and video editing directly from the NAS, without having to use the Mac Studio’s internal SSD as a scratch drive.
I should however caution you that Capture One does not endorse or support editing from a NAS (there are sometimes connection issues if you leave a session open overnight). Other photo editing and video editing software however have no issues with using the NAS directly.
Because my network is all 1Gbps wifi mesh using three of the excellent and super reliable Ubiquiti Amplifi HD routers, I didn’t want to upgrade everything to 10Gbps. Instead, I’ve hard wired the Mac Studio to the 10Gbps card in the NAS. I’ve also wired a 1Gbps connection between the NAS and my router. It all sounds a bit complicated, but here’s a diagram to make it simple:
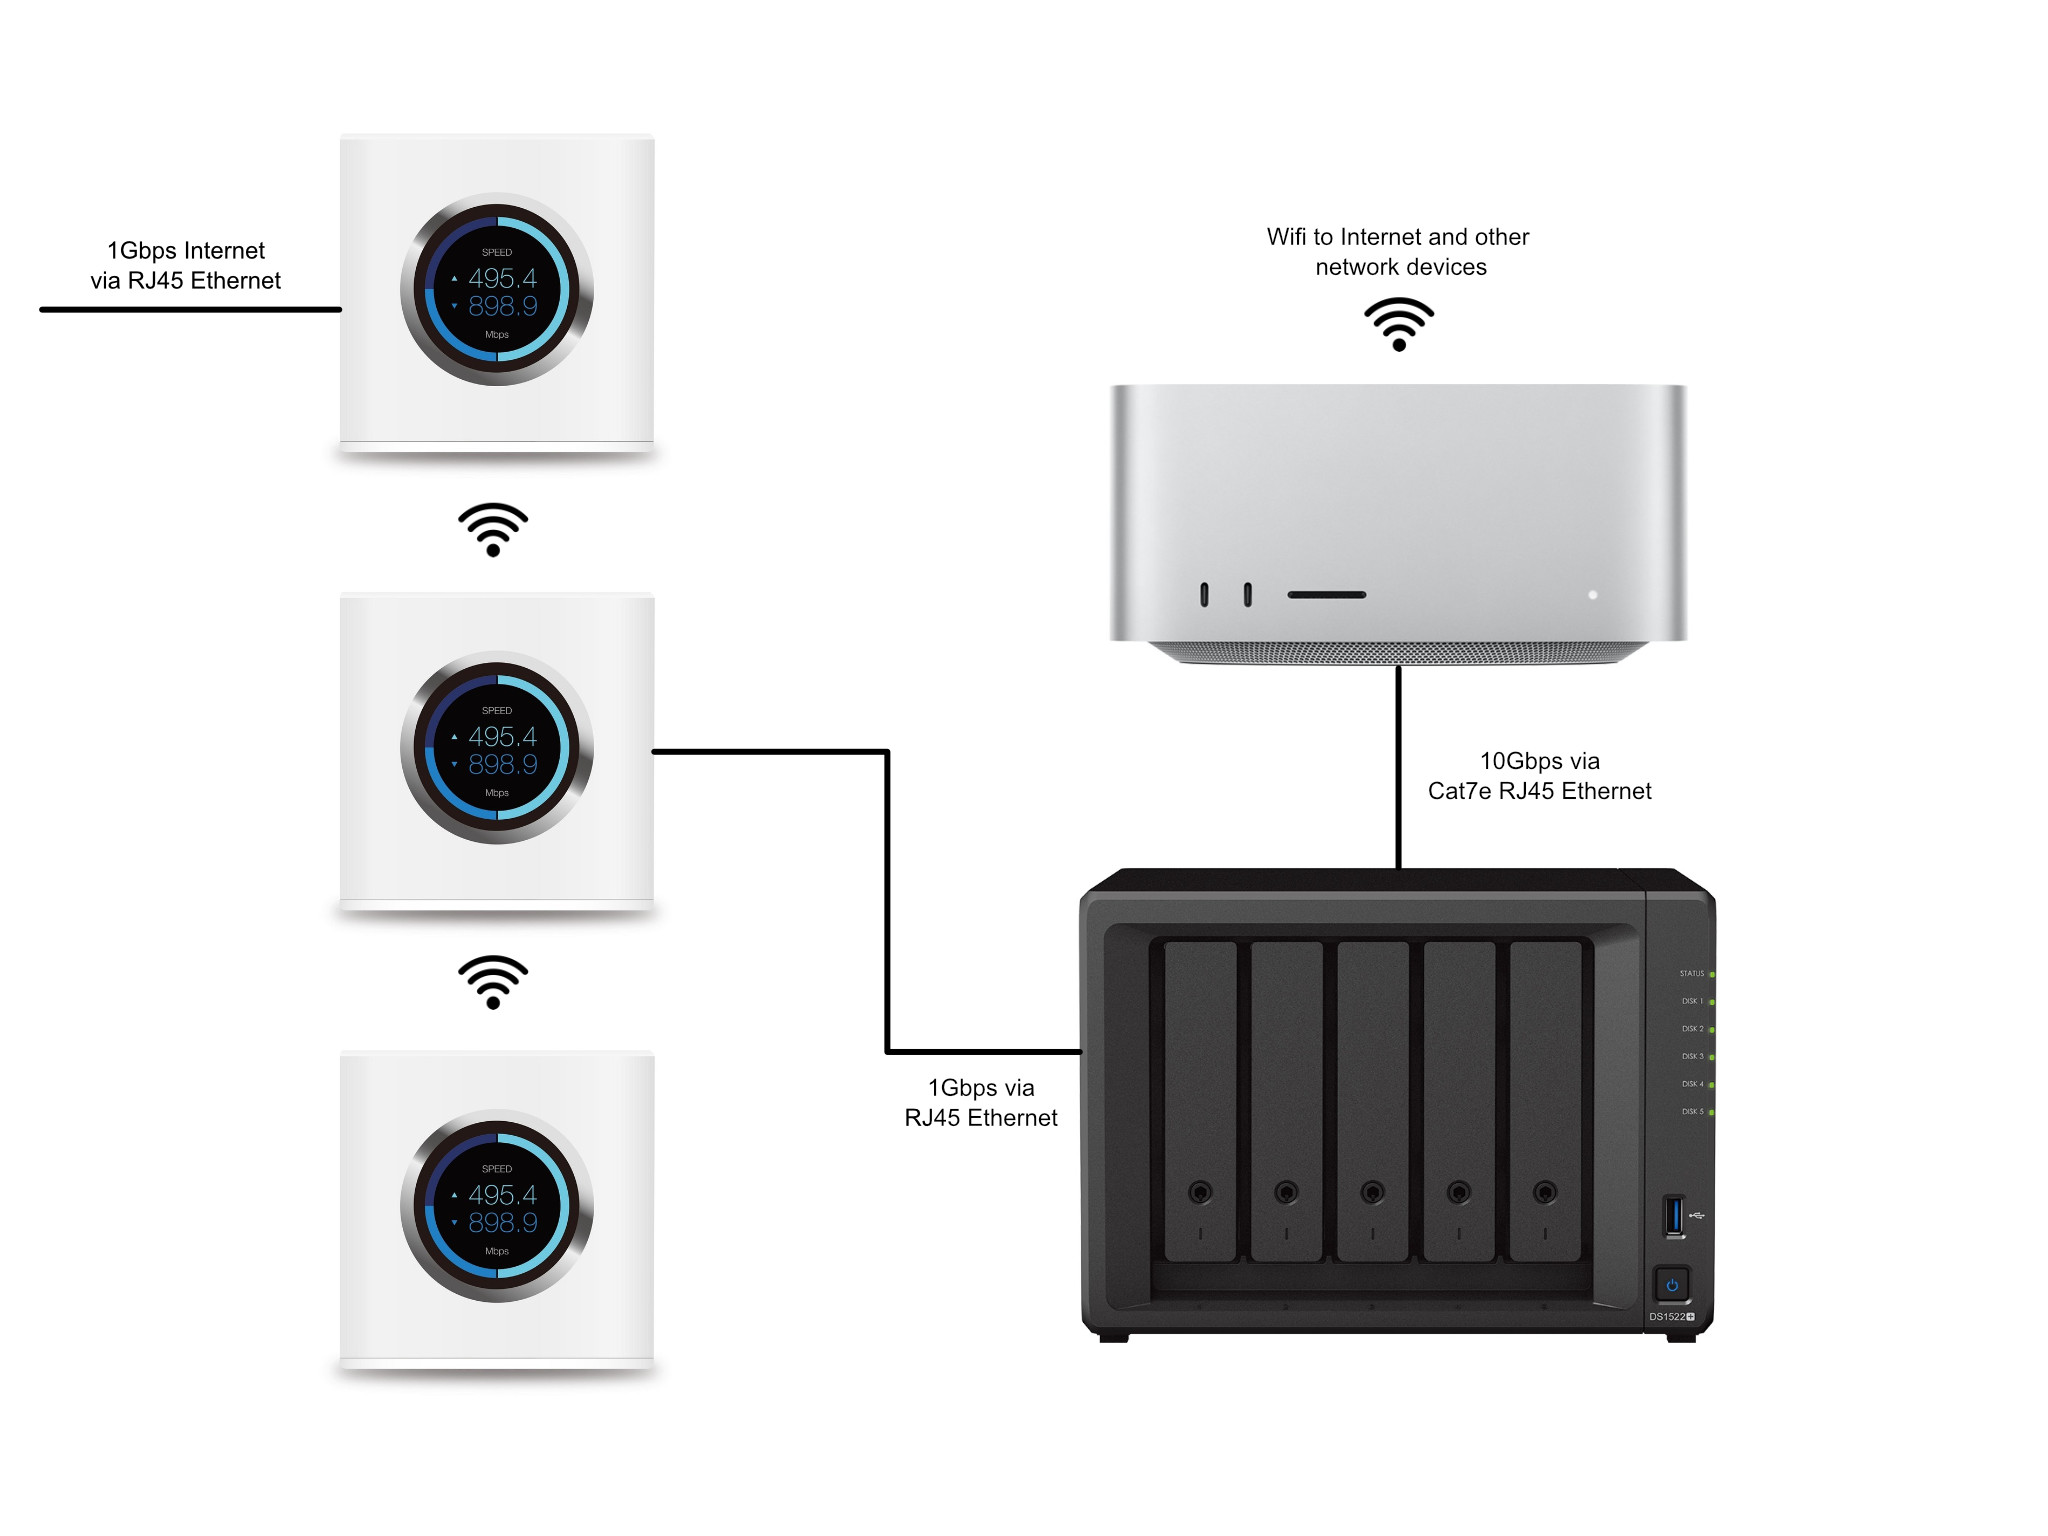
To get this working, you need to create a private network for the Studio to communicate with the NAS on the 10GbE connection instead of the 1GbE connection. Here are the steps I followed based on advice found on Apple’s discussion forums:
- Set the Synology’s 1GbE port and the Studio’s Wifi to IP addresses on your LAN which will provide routable internet access; I let DHCP from my router take care of this and then locked those IP addresses down by making them static leases.
- Set the Studio’s 10GbE IP address to a self assigned static IP address in the 169.254.x.y range in the System Preferences / Network / Ethernet.
- On the Synology set its 10GbE IP address to a non routable (self assigned) static IP address in the 169.254.x.z range.
- x in steps 2 & 3 should be the same but y and z should be different, e.g. 169.254.10.10 (Mac) & 169.354.10.11 (NAS)
- In the Finder use the CMD-K (menu Go / Connect to Server…) command to connect the Studio and the NAS using the NAS IP address set in steps 3, e.g. smb://169.254.x.z (169.254.10.11 as in step 4 example). Select the NAS shares from the popup & enter NAS share User ID & Password. Select to store the NAS share password in your Keychain file.
- After testing by logging out and then back in you can optionally use the Finder preferences to display network shares on the desktop.
- Re-start the Studio and the NAS will appear in Finder just as it did before, but now with 10Gbps speeds.
Real life performance
I don’t push the NAS’ capabilities in regards to virtual machines and other typical NAS use cases, so I’ll leave that to someone else to quantify.
I want to provide practical experience from a photography and video editing perspective. With the DS918+ and 1GbE connectivity, I was able to get a maximum data transfer rate of ~115MB/s. When moving a 30GB Capture One session from my computer to the NAS, it was quite a long chore. Just moving the files would take over five minutes.
The first time I moved a video file over to the new NAS, I had to do a double-check to ensure the file actually got transferred. A 1GB video file was transferred before I could even check its speed. The same 30GB Capture One session now transferred in less than 45 seconds!
Without any optimization, speeds were above 400MB/s. I have no doubt that you could reach the 750MB/s rated speed of the NAS if your RAID is setup for speed. Furthermore, the better CPU, IronWolf Pro drives and NVMe cache all work together to provide a high level of responsiveness in working with the small files that Capture One utilizes.
Noise, noise and lots of noise
All of the expectations I had for this device have been met, except for one big one: NOISE! A heck of a lot of noise! As the Seagate 7200RPM IronWolf Pro 16TB drives pounded away, I got tired really fast of all the clicking and clacking they were making. I had researched these drives carefully and listened to youtube videos from NasCompares.com that show the typical read/write and seek noises.
Something seemed to be wrong because these Seagates are known to make some noise, but this was excessive. I got down on my knees and started to press around the NAS box, and found a number of spots where some pressure reduced the noise dramatically. My OCD nature couldn’t let this go, so I powered down the NAS, disconnected the cables and started to disassemble the DS1522+.
Taking the NAS apart was easy. Remove two screws on the back, slide the left outer side of the case forward about 20mm and then slide it out sideways to the left (like a horizontally flipped “L”). With the outer case in hand, a few taps on it revealed rattles. Those rattles were coming from the NVMe cache doors. A bit of adhesive-backed felt placed at the latch stopped those rattles.
I added a small piece of foam on the upper side of the inner cage to put a small amount of pressure on the outer case to dampen vibrations. I also noticed the disk trays were a bit loose in the channels, so a small piece of adhesive-backed foam was placed in each channel, just thick enough to add some friction, but not enough to put stress on the connectors at the back or to make ingress/egress difficult. I think the soft half of adhesive-backed velcro strips would do the trick too.
After putting the NAS back together, I fired it up to find a totally different acoustic performance. Gone were the loud clicks and bangs and all of the resonances. While it’s still not whisper quiet, it’s quiet enough that I can now hear the cooling fan. The acoustic signature now matches what I had heard online and is inline with what I would consider to be acceptable noise for this level of performance.
Conclusion
I was hesitant to spend US$699 on a new NAS plus the US$149 for the 10GbE adapter, but in the end, I’m super happy with the purchase. It will fundamentally improve my workflow and provide for new ways of working. Previously, if I wanted to re-edit an old picture stored on the NAS, I would hesitate because of all the lag and delays, but now I can easily load Capture One, find the session and edit to my heart’s desire.
Another small perk that I realized after the purchase. When I come back from travelling, I need to move the images and videos from the laptop to the NAS. I assumed I’d have to copy these to the Studio via an external USB and then move them to the NAS via 10GbE. However, Apple has a nice feature that lets you directly connect two machines via high speed USB or Thunderbolt.
By connecting the MacBook Air to the Studio using a high speed USBC cable, I was able to use the Studio to access the files on the MacBook Air and copy them to the NAS. Speeds peaked at 265MB/s using this method and maintained 200MB/s+ throughout a 65GB data transfer. This is again a big time saver for my workflow, which further makes the NAS purchase one that I’m happy to have made.
I know that a NAS can be a complex device, so I’m happy to answer any questions you may have, either down below or via the contact page. Hope you’ve found the above useful.
Synology DS1522+
USD 699
Pros
- Great price point with E10G22-T1-Mini for Synology 10GbE
- The best Operating System of any NAS
- Reliable performance
Cons
- Other brands provide 2.5GbE/5GbE options for less money
- Only a 5Gbps USB 3.2 Gen 1 port
- Casing has loud resonances with large drives
Discover more from fcracer - Travel & Photography
Subscribe to get the latest posts sent to your email.