In this post, I’ll share my recent experience of printing a large 150cm x 100cm metal print of the iconic Bangkok skyline during blue hour. People often ask why I use GFX 44mm x 33mm Medium Format cameras rather than the more common 36mm x 24mm Full Frame cameras. There are two reasons:
- I want the best image quality possible in a portable camera; and
- I like to have the option to print large.
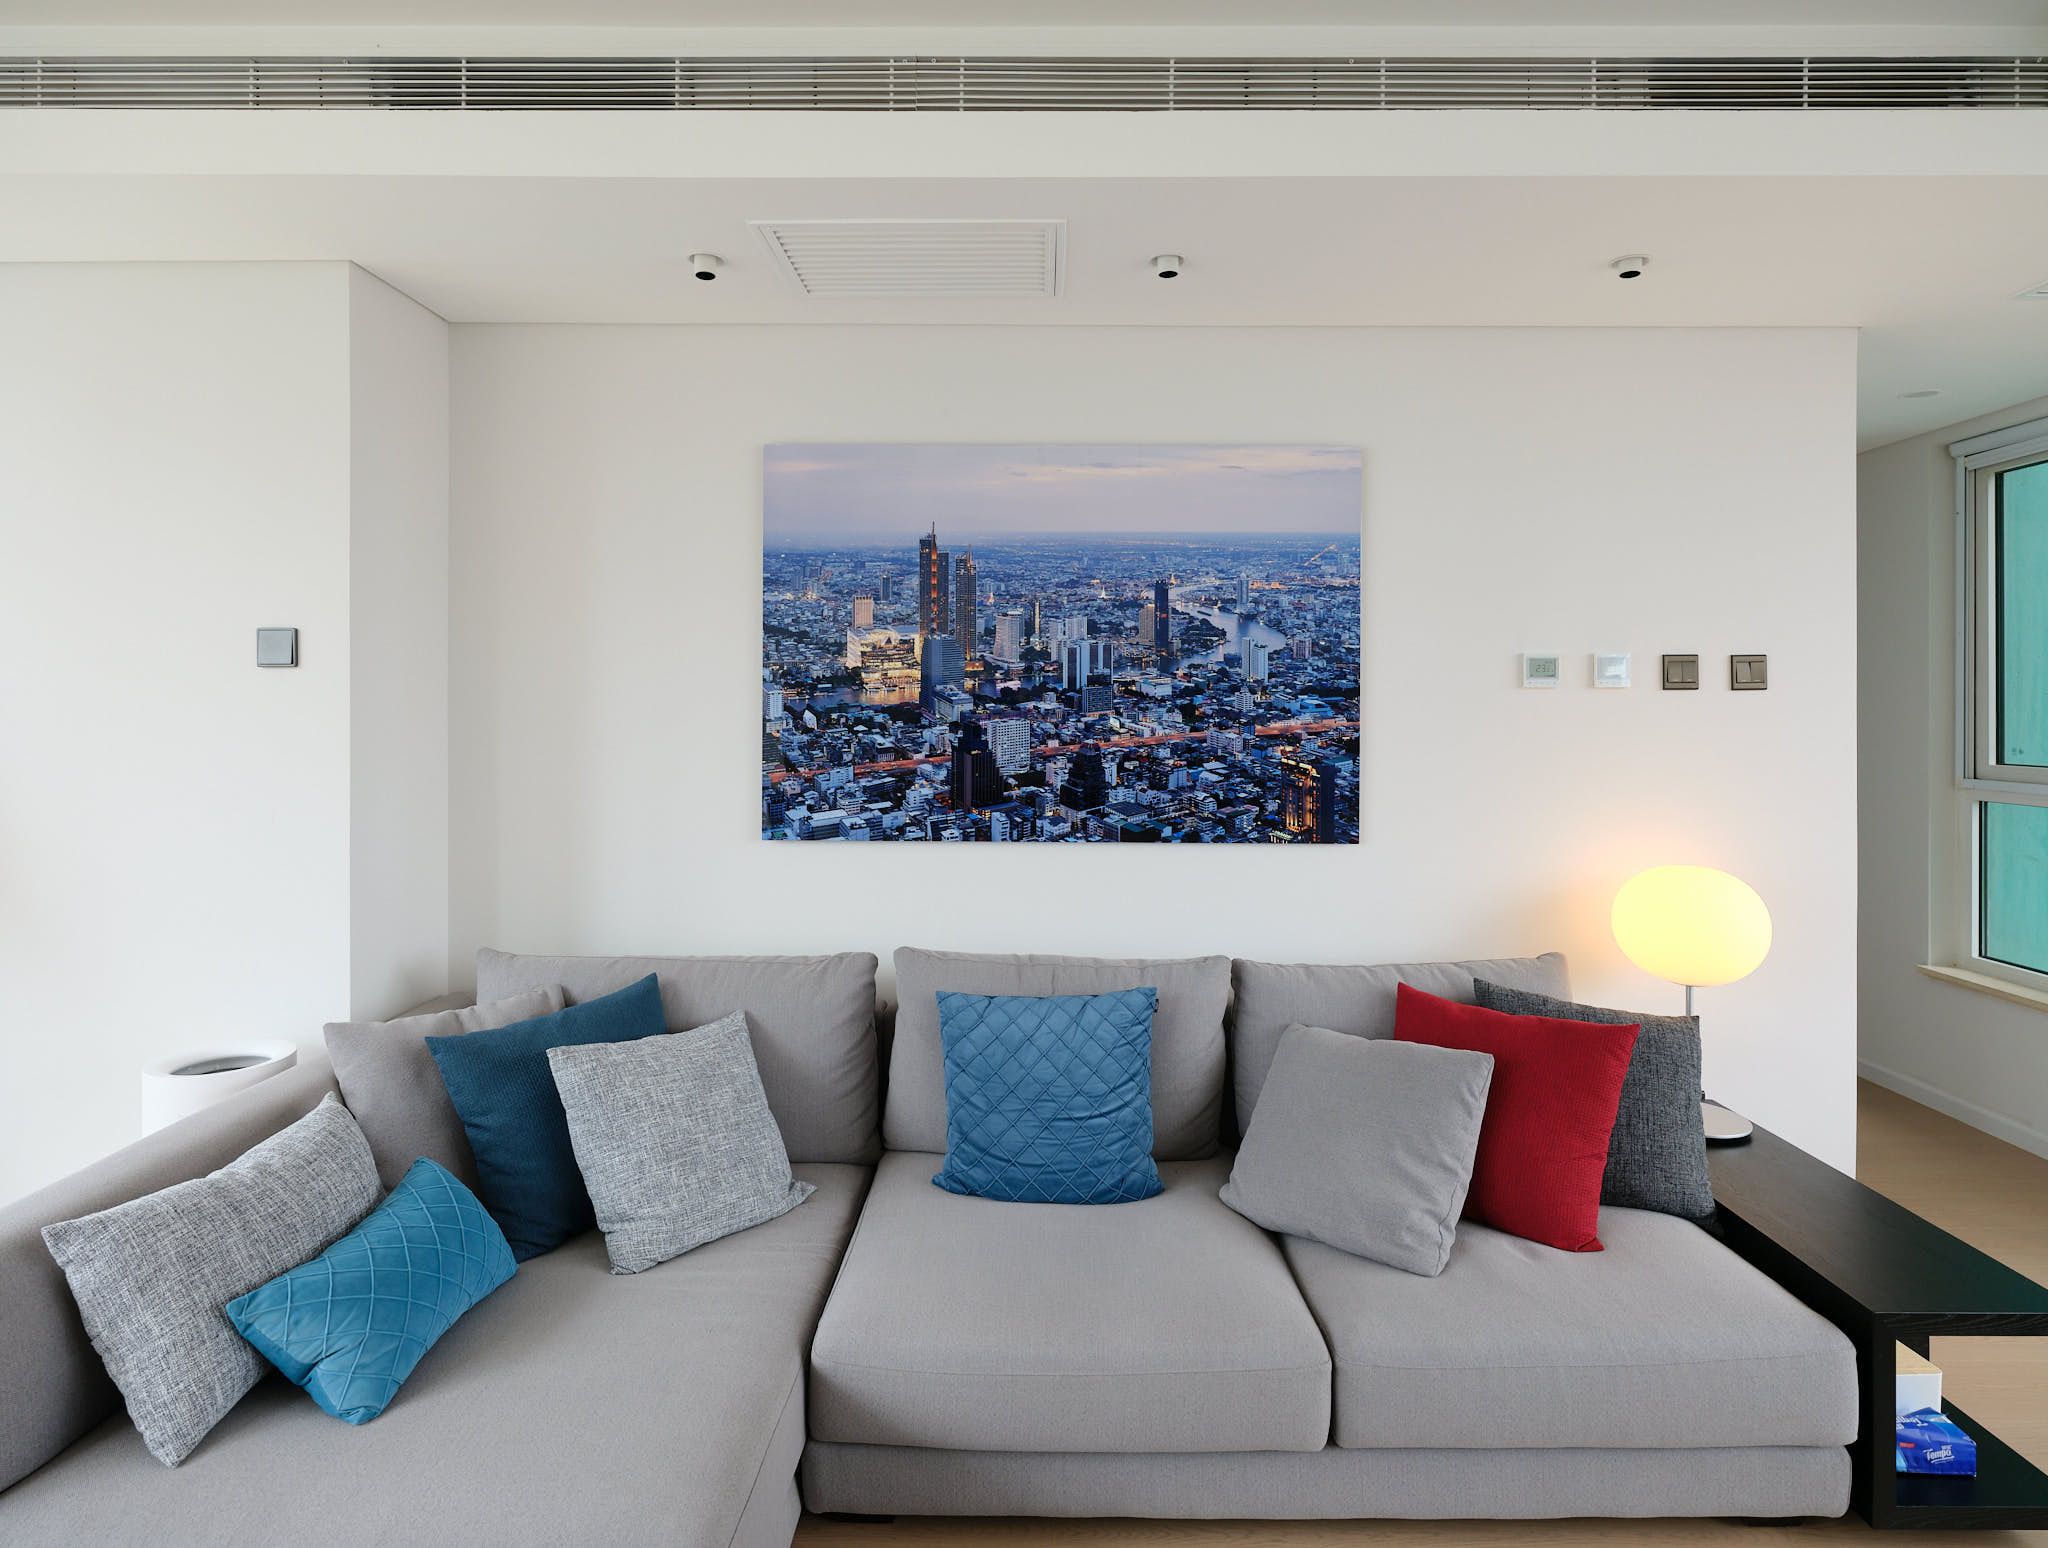
I recently moved into another rental apartment in Beijing and wanted to make a large acrylic or metal print to place above and behind the main sofa. Thailand is developing a special place in my heart (I’ve visited the country more than 10 times in the past 24 months) as I’m starting to plan for retiring there in 10-15 years’ time.
I’ve had excellent experience with Photato in Hong Kong with acrylic prints, but for the size I wanted, 150cm x 100cm, the whole package would have been very heavy and expensive. Since I’m in a rental apartment, I didn’t want to make holes in the walls, especially holes that will require some filler in the future.
A friend recommended a China-based supplier of metal prints called LuxCore. Not only are they local and inexpensive, they also speak and communicate in English. I reached out to LuxCore using Taobao, Alibaba’s local e-commerce app that’s similar to a super Amazon.com. If you decide to contact them, you’ll need an Alibaba/Aliexpress account or if you reach out to me via the contact form, I can provide you their WhatsApp and WeChat numbers.
Determining the image to print
Depending on how big you want to print, it’s important to pick an image that has been taken with care and with the right settings. If you’re printing a 150cm x 100cm print, you likely won’t enjoy the outcome if you choose to print a 12MP image taken at 12,800 ISO using a kit zoom lens.
That’s not to say that you can’t use that image because you certainly can; viewing distance plays a big role in what you can get away with. The larger the print, the greater the viewing distance, and the more forgiving it can be (look at all the “Made with iPhone” images you see plastered on huge billboards around the world.
“We live in a golden age of photography where we can print a sharp 150cm x 100cm image taken handheld in the blue hour at 1/17s wide-open at F4!”
For my purposes, I like to be able to go right up to the print and see lots of detail, so I chose a GFX100S image from a recent trip to Bangkok, taken with the GF32-64 zoom lens. The image, after cropping, still represented 81MP. Because of where the image was taken, no tripods were allowed, so this image is handheld at 1/17s at ISO800 and F4.
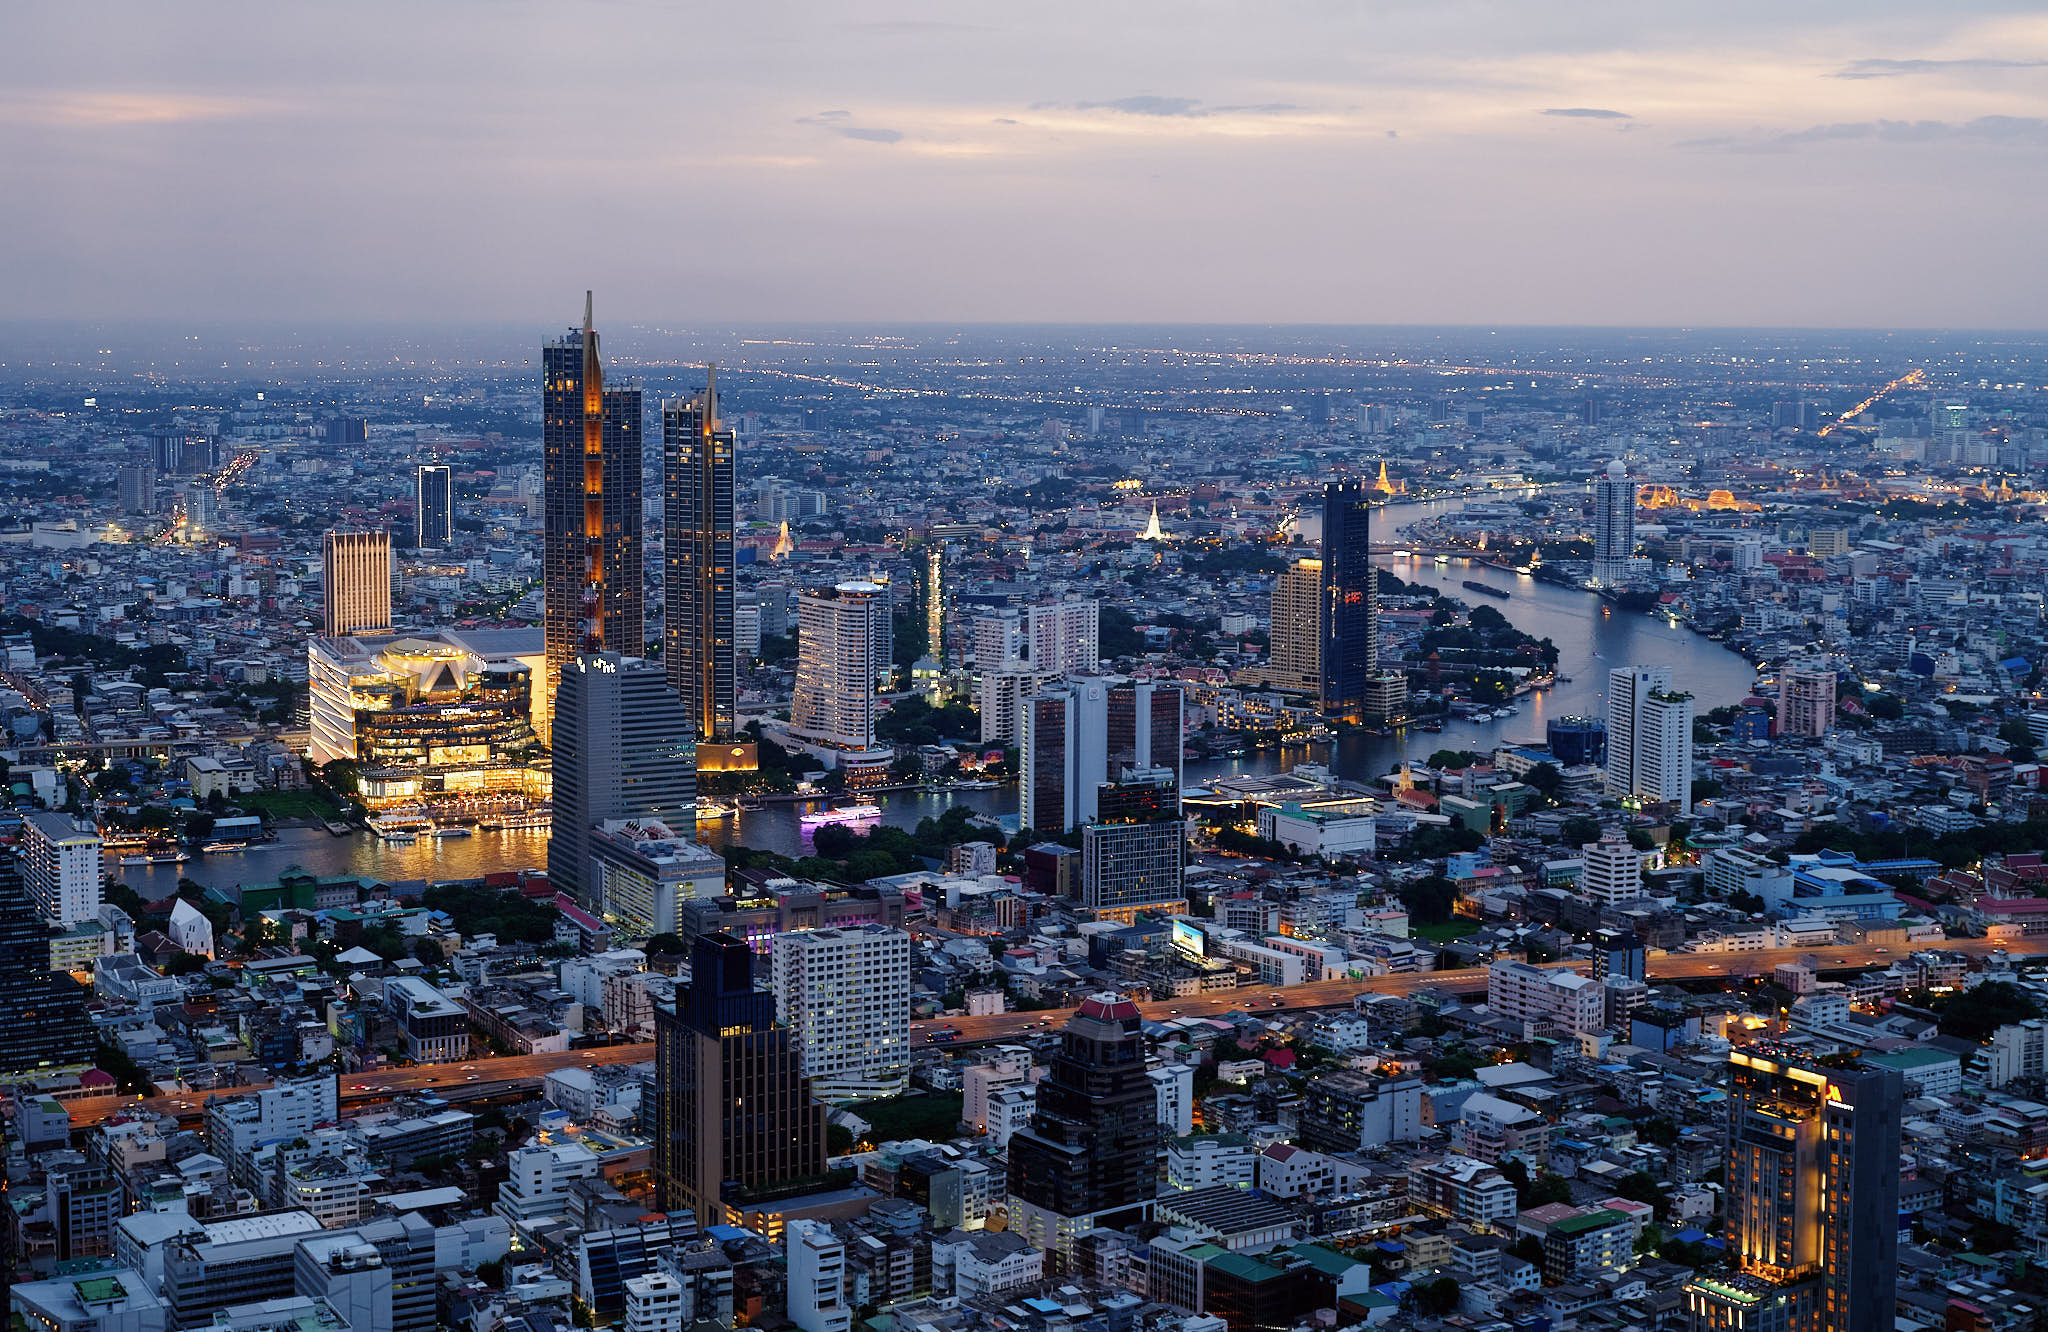
We live in the golden age of photography where we can print a sharp 150cm x 100cm image taken handheld in the blue hour at 1/17s wide-open at F4! In an ideal situation, I would have taken this image at ISO100, F8 and with the GF55 prime lens. The GF32-64 has some edge softness at F4 which is apparent in my image (right side especially).
Determining the size to print
With today’s cameras that all have high resolution sensors and excellent lens choices, you can print pretty much any size that you want. It then comes down to how much space you have, what would look good from a proportion perspective, and also how much resolution you have available to you after cropping the image.
If you want a rule of thumb for ideal print resolution, I suggest ensuring you have 200 pixels of image data available for each inch of print size. For example, if you have a 24MP camera that produces 6000 x 4000 pixel images, you can safely print 6000 px / 200 px per inch = 30 inches or 76cm and 4000 px / 200 px per inch = 20 inches or 51cm.
“I suggest ensuring you have 200 pixels of image data available for each inch of print size.”
For the image that I printed, after cropping, I had 11,000 pixels x 7,400 pixels to work with. Using my own rule of thumb, the maximum print size should have been 11,000 px / 200 px per inch = 55 inches or 140cm by 7,400 / 200 px per inch = 37 inches or 94cm.
To determine what actual size to print, I suggest taking an image of the space and then use Photoshop or Affinity Photo to try out different sizes. This visual will help a lot in determining what will look good. I rendered three options:


Based upon the renderings, I preferred 135cm x 90cm. However, when working with the printshop, this would have meant a custom cut of the aluminum backing and would require an extra week or two for them to manufacture the print. Therefore, I decided to go with the standard cut size of 150cm x 100cm, even though it’s proportionately a bit big in this room setup.
Going back to my rule of thumb, 150cm / 2.54 = 59 inches and 100cm / 2.54 = 39 inches. I had 11,000 pixels to work with in the horizontal dimension, so the output would be 11,000 px / 59 inches = 186 pixels per inch. On the vertical dimension, I had 7,400 px / 39 inches = 189 pixels per inch. It didn’t quite meet my 200 pixels per inch threshold, but it was close enough.
Determining the print medium
It’s important to choose your size first because it will have an important bearing on the medium you may want to consider. For example, since I chose a large print at 150cm x 100cm, my usual go-to acrylic glass for cityscapes like the Bangkok blue hour image would be a challenge. The 4-6mm acrylic glass would be very heavy at that size and require proper reinforcement of the wall mounting hardware.
“The metal print cost CNY 1,660 + CNY 70 shipping for a total of CNY 1,730 (USD 240). From the time the print shop downloaded the image to when it arrived at my doorstep was three business days.”
Therefore, I looked at the alternatives and decided on a metal print. Metal prints are super lightweight, easy to transport, easy to hang, fade resistant and robust. The only downside to them versus acrylic is that they’re not typically as high resolution and don’t reflect light as strongly as the acrylic glass does. The colours look deeper and more saturated in acrylic, but the tradeoff in weight wasn’t worth it in this situation.
Cost was not a factor in my decision, but to give some context, the metal print cost CNY 1,660 + CNY 70 shipping for a total of CNY 1,730 (USD 240). The estimate for an acrylic print was CNY 6,500 + CNY 200 shipping for a total of CNY 6,700 (USD 930). From the time the print shop downloaded the image to when it arrived at my doorstep was three business days.
Preparing the image for printing
Before sending an image off to print, especially one that’s going to be larger dimensions than the native resolution can accommodate, it’s best to do some preparation work on the image. I’d recommend reading this post that goes into much more detail, but the summary is as follows:
- Resize the image for the final output. In my case, I wanted 300dpi and 150cm x 100cm. Therefore, I needed an image that was 17,717px x 11,811px.

- Set the colour space to match what the printer requires. LuxCore told me they prefer AdobeRGB so that’s what I set the output colour space at.
- Brighten the image to reflect the fact that computer screens emit light, whereas a print reflects light. It’s very important to use the histogram rather than just your eyes to set the brightness. I will typically add 0.2-0.3 stops of exposure to compensate for the print medium. You can’t trust your eyes because most computer screens are set too bright, however Apple does provide a handy utility in MacOS under Settings > Displays > Presets that lets you setup a 100 nits brightness preset to help imitate how the image will look printed.

- Sharpen the image at the print output size. I used Capture One’s built in sharpening mechanism in the Export window with a strength of 60 with a threshold of 1 to prevent noise from being sharpened.

- Check the image for any mistakes or odd features that may become more apparent when printed large. In my image, there was one issue I missed which was a blown out pagoda which could have used some highlight recovery. On screen, it’s not very apparent, but in the print, it appears as a near-white blob.
Sending the image to the print shop
This is an often overlooked step and can sometimes surface unforeseen issues. With the resulting image file being so large, especially if you export in the TIFF format (not necessary as 100% JPEG is more than sufficient for printed medium), getting the image to the print shop can be quite a hassle.
The 100% JPEG I used came in at 178MB and I had to find a way to get this file to the print shop. The easiest way is to setup a WeTransfer or Dropbox. The second easy way is to share a link from your NAS. Many operating systems or photo sharing platforms have sharing capabilities, however you must ensure they don’t modify the file enroute.
For example, I used WeTransfer and found the image file on the receiver’s end to be different in size than what I sent. I reached out to WeTransfer and they confirmed they apply non-destructive lossless compression on the file prior to transfer. I was ok with that since it’s lossless, but some providers will use lossy compression which is not something we want for our images.
I suggest that you always confirm the size of the file the print shop has received and that it matches their format, DPI and colour space requirements. Don’t take for granted that the print shop will check this for you as they receive hundreds of images everyday from professionals and often won’t confirm the file’s particulars; they assume the professionals they work with know what they’re doing.
Checking the printed image
In photography, there’s nothing more exciting than holding a physical print of an image that you took with your blood, sweat and tears. In that exciting moment however, it’s important to check three things when you receive your print:
- Colour accuracy – Ensure the colour matches what you expect. I’ve had prints show up that look completely different than what I had sent in. This would often be traced back to the printshop using the wrong colour space. This doesn’t happen very often these days, but was much more common in the past where the print process was less automated and streamlined.
- Print consistency – Ensure the print quality is consistent throughout the image with no streaks, light or dark spots, or ink inconsistencies. This is something that I haven’t seen in a long time, but is often more apparent in very large prints, especially along the edges.
- Bends or tears – Ensure the print is not bent or damaged in the printing or shipping stage. If you’re dealing with a high production workshop that specializes in commercial prints, you will often find small flaws in the final print. These small flaws are acceptable to most commercial applications because the print will only be up for the period of the marketing campaign or will be placed in a high traffic area where it will incur damage anyhow. If your print shop specializes in art gallery prints, flaws should be very rare.
Hanging the printed image
This is not the time to be laid back and take the easy route. It’s very important, especially with a heavy, large print, to hang it properly. As noted above, I’d recommend rendering some positions in Photoshop so that you can get the placing correct before making any holes in the wall.
I’d also recommend getting one of the best inventions of the modern world, the laser level. I use the Bosch GLL50G levelling laser which has an auto function that can get very precise without having to fuss around with it. The laser will help you make at least two mounting holes to keep the print stable on the wall.
If the print is sufficiently heavy, please consider using reinforcement inserts to ensure the screws can hold the weight. There’s nothing worse than hearing a new acrylic print come crashing down to the ground, or worse, hitting a loved one on the way down.

Lighting the printed image
Printed images reflect light whereas we’re accustomed to emitted light from our computer screens. It’s therefore important to put some light on the print. This can be from the natural light in the room, placement so that the print gets light, or from pointing a spotlight on the print. The latter especially makes acrylic and metal prints stand out.
Conclusion
I love holding my prints in my hand; there’s no better feeling in photography in my opinion. I think it’s so important to print images that I’d recommend taking the leap and trying it out for yourself. Start with a small A4 sized print and then work your way up.
If cost is an issue for you, consider using an inexpensive print shop like I did. For only USD 240, I got a well made 150cm x 100cm metal print that I can be proud to hang in my home. When you have more experience at printing or when you want the “forever print”, you can then spend the money on an acrylic print.
“I love holding my prints in my hand; there’s no better feeling in photography in my opinion.”
If I could go back in time, some additional tweaks I would have made to the image include more sharpening and a bit more contrast. Given the print size, I think it could have taken more to give the image a bit more punch. I would have dialled in +5 on contrast and pulled back exposure by 0.1 stops to give it a bit more depth. I would have also used the highlight recovery brush to fix the one pagoda that’s burned out (looks worse on print than the screen image).
I hope that you’ve found this post useful. If you have any questions, please let me know in the comments below. The website has been having some issues with people unable to comment. If you come across this issue, please reach out via the contact form so that I can find a solution to it.
Discover more from fcracer - Travel & Photography
Subscribe to get the latest posts sent to your email.
Very inspiring. Love this post about printing images. I think this has finally pushed me to give it a try!